
I still remember standing under my truck late on a Sunday evening, staring in frustration at a persistent puddle of fresh synthetic fluid spreading across my clean driveway.
That slow, stubborn drip from my chevy silverado oil pan gasket seemed impossible to solve without spending a fortune at a dealership.
After mastering the repair myself, our team at Bryan’s Garage built this complete step-by-step master guide to save you money and fix your oil leak properly the first time.
In This Article
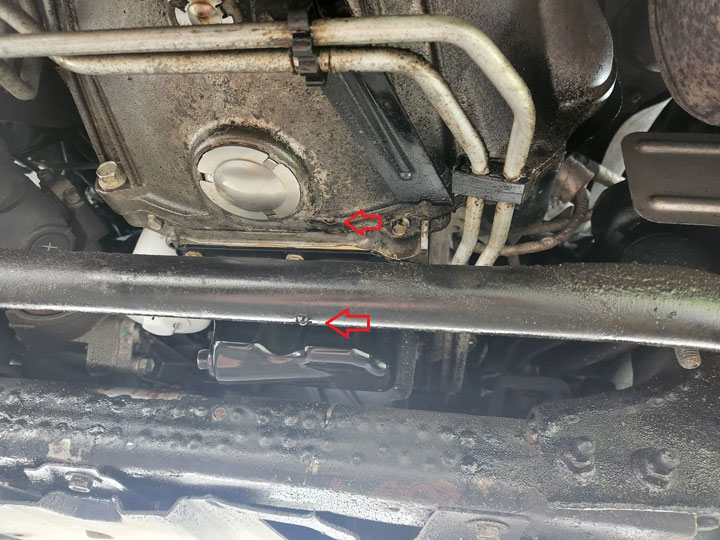
- How to accurately diagnose oil pan leaks versus rear main seal and top-end engine leaks.
- A complete 7-step DIY guide including 4WD front differential clearance procedures.
- Official GM factory torque specifications and critical bolt tightening sequences.
- Mastering RTV silicone placement at timing cover and rear cover corner intersections.
- How the internal oil pressure relief valve impacts AFM engines and oil consumption.
Your Silverado has a secret compartment hiding above your glove box.
And 8 other things Chevy never told you.
Hidden dash storage · Key fob window trick · Auto 4WD mode · Buckle to Drive · and 5 more.
▶ Read Now — Show Me Everything
bryansgarage.com · Bryan Mark · 2026

How to Replace a Chevy Silverado Oil Pan Gasket: Step-by-Step DIY Guide
Replacing an engine oil pan seal on a full-size Chevrolet truck is a major mechanical repair that requires patience and methodical execution.
Before beginning work, assemble a comprehensive set of hand tools including 3/8-inch and 1/4-inch drive ratchets, metric sockets ranging from 10mm to 18mm, and a precise inch-pound torque wrench.
You will need heavy-duty jack stands, a hydraulic floor jack, oil drain pan, plastic scrapers, brake cleaner, high-temperature black RTV silicone, and a fresh molded rubber oil pan gasket with steel insert crush limiters.
- Step 1: Elevate the Truck and Drain Engine Oil
- Park your Chevrolet Silverado on a level concrete surface and set the parking brake firmly before beginning work.
- Raise the front end using a floor jack placed beneath the main frame rails.
- Position heavy-duty jack stands under the frame and lower the truck securely onto the stands.
- Place an oil catch pan under the oil pan drain plug located at the rear of the sump.
- Remove the 15mm drain plug and allow all engine oil to drain completely into your catch container.
- Remove the oil filter using a filter wrench and allow the filter mounting boss to drip dry.
- Step 2: Unbolt Steering Crossmember and Perform 4WD Front Axle Drop
- Locate the steel frame crossmember running directly underneath the front differential housing.
- Remove the four large crossmember mounting bolts using an 18mm socket and breaker bar.
- Set the structural crossmember aside to expose clearance under the front differential and oil pan sump.
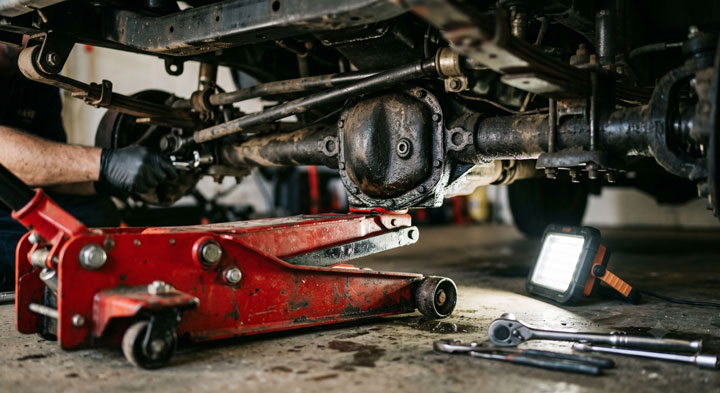
- If working on a four-wheel-drive truck, perform a partial chevy silverado 4wd front axle drop to clear the oil pan.
- Support the front axle assembly with a hydraulic jack before unbolting the differential frame mounts.
- Lower the front differential two to three inches carefully while ensuring front drive axle CV joints do not bind or stretch wiring harnesses.
- Step 3: Remove Bellhousing Cover and Oil Pan Fasteners
- Remove the small plastic or aluminum transmission flywheel inspection covers located on both sides of the oil pan rear flange.
- Remove the two horizontal bellhousing-to-oil-pan bolts using a 10mm socket.
- Loosen all perimeter oil pan bolts using a 10mm socket, keeping track of bolt lengths for proper reassembly.
- Note that the two rear corner oil pan bolts are longer M8 fasteners that pass through the rear cover housing.
- Carefully lower the oil pan straight down away from the engine block, taking care not to damage the internal oil pickup tube screen.
- Tilt the oil pan backward slightly to wiggle the internal baffle around the oil pickup assembly and remove the pan completely.
- Step 4: Clean Engine Block Sealing Surfaces and Oil Pan Rails
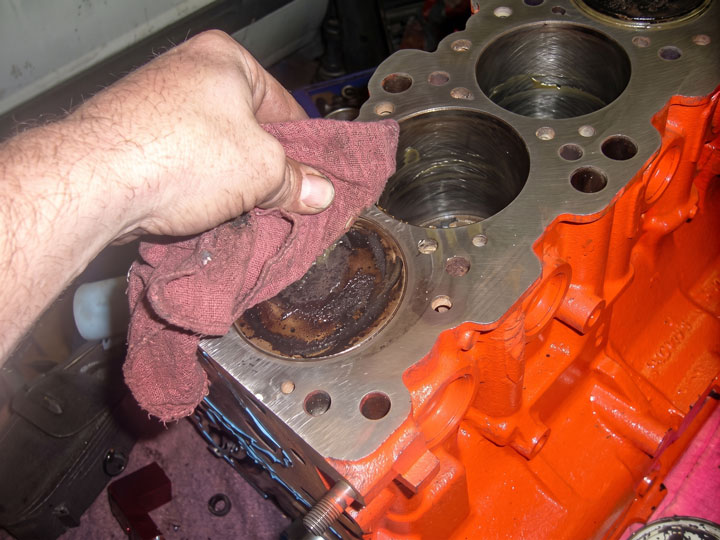
- Remove the old crushed rubber gasket and inspect the perimeter sealing surfaces of the oil pan.
- Scrape all remnants of factory RTV silicone off the front timing cover corners and rear cover joint lines using a plastic scraper.
- Never use steel razor blades or rotary wire wheels on aluminum sealing surfaces, as gouges create permanent leak paths.
- Spray the oil pan rails and engine block perimeter thoroughly with solvent-free brake cleaner.
- Wipe all surfaces dry with lint-free microfiber towels until no oil residue remains on the sealing mating plane.
- Clean the interior of the aluminum oil pan to remove settled sludges or debris before installing new seals.
- Step 5: Apply RTV Silicone Sealant and Position New Gasket
- Inspect the fresh molded rubber gasket to ensure all rivet retention clips line up with the pan rail bolt holes.
- Snap the new gasket onto the clean aluminum oil pan rail, securing the integrated snap clips into their corresponding holes.
- Apply a small dab of high-temperature RTV silicone sealant at the four engine block seam locations.
- These four critical sealant points sit where the front timing cover meets the engine block and where the rear cover meets the block.
- Make a bead of silicone roughly pea-sized over each seam line to bridge the physical gap between aluminum castings.
- Mount the oil pan and gasket assembly straight upward against the engine block within ten minutes of applying fresh RTV silicone.
- Step 6: Reinstall Oil Pan Fasteners and Execute Torque Sequence
- Thread all perimeter oil pan bolts by hand to ensure no cross-threading occurs on sensitive aluminum engine block threads.
- Thread the two horizontal transmission bellhousing bolts through the rear transmission case into the oil pan back face.
- Snug all bolts finger-tight while checking that the oil pan fits flush against both the engine block and transmission bellhousing face.
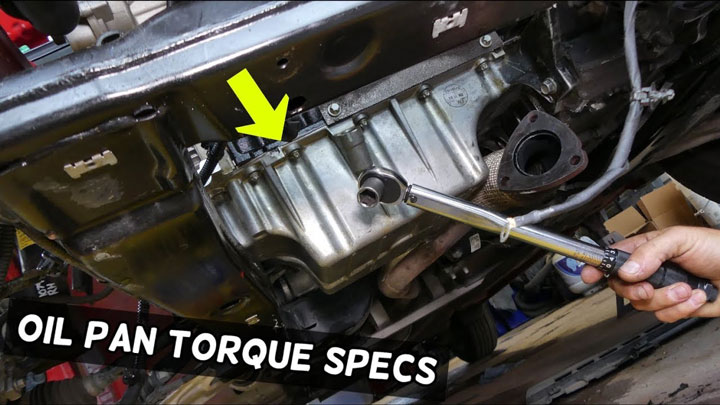
- Tighten the perimeter M6 oil pan bolts in a crisscross criss-crossing pattern starting from the center and working outward.
- Torque all perimeter M6 oil pan bolts to 106 inch-pounds using a calibrated inch-pound torque wrench.
- Torque the two larger rear M8 oil pan bolts to 18 foot-pounds, and tighten the horizontal bellhousing bolts to 37 foot-pounds.
- Step 7: Reassemble Axle, Refill Engine Oil, and Leak Test
- Jack the front differential housing back into its original resting position and torque front axle mounting bolts securely.
- Reinstall the steel frame crossmember and torque mounting bolts to factory frame specs.
- Reinstall the starter heat shield, flywheel inspection covers, new oil filter, and drain plug with fresh crush washer.
- Allow the newly applied RTV silicone sealant to cure for at least two hours before filling the engine with fresh oil.
- Refill the crankcase with the manufacturer-recommended viscosity engine oil using a clean funnel.
- Start the engine, monitor oil pressure on the instrument cluster, and inspect the pan rail thoroughly for leaks.
Performing a proper chevy silverado oil pan gasket replacement saves hundreds of dollars in repair shop labor fees while protecting your engine block.
Our team at Bryan’s Garage provides practical, step-by-step automotive guidance to help owners handle tough repairs with confidence.
Diagnosing Engine Oil Leaks: Oil Pan Gasket vs. Other Common Silverado Leak Sources
Accurate diagnosis is the most vital step before turning a single wrench under your Chevrolet truck.
Gravity causes fluid to travel downward along the block, leading many mechanics to misdiagnose top-end leaks as lower pan leaks.
An aging chevy silverado rear main seal leaks oil directly into the bellhousing cavity behind the flexplate.
When the rear main crankshaft seal fails, oil drips from the tiny drain hole at the bottom of the transmission cover plate.
In contrast, a degraded oil pan seal leaks along the entire side perimeter rails or front timing cover joint.
Another very common leak point on V8 engines is a failed chevy silverado oil filter adapter gasket located above the filter housing.
When this figure-eight rubber gasket degrades, pressurized engine oil sprays down over the left rear corner of the oil pan rail.
Similarly, a leaking chevy silverado oil pressure sensor behind the intake manifold allows oil to run down the back of the engine block.
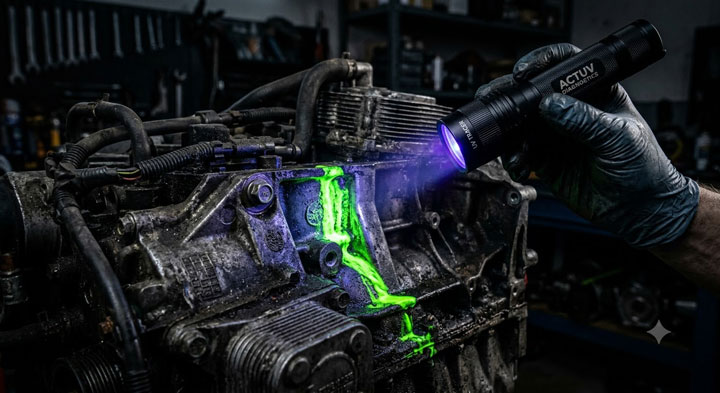
To pinpoint the exact origin, spray dirty engine surfaces thoroughly with aerosol brake cleaner and wipe them clean with rags.
Add a bottle of fluorescent UV engine oil leak detection dye directly into the engine oil filler cap.
Run the engine for ten minutes, then inspect the underside using a blacklight flashlight and yellow protective glasses.
The UV dye glows brightly at the precise physical location where fluid first escapes the engine sealing envelope.
This simple diagnostic step prevents you from replacing a sound oil pan gasket when a simpler top-end seal is responsible.
Understanding LS and LT Engine Oil Pan Design and Torque Sequence Specifications
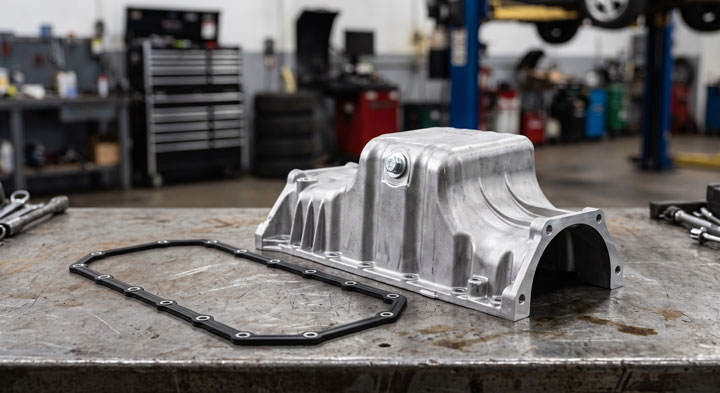
General Motors utilizes an advanced structural aluminum oil pan design across Gen III, Gen IV, and Gen V V8 engines.
Unlike old-fashioned thin stamped steel pans, the aluminum casting acts as a stressed structural member of the engine and transmission assembly.
This rigid structural design increases powertrain rigidity and reduces overall engine noise, vibration, and harshness levels.
Because the pan bolts directly to both the engine block bottom rail and the transmission bellhousing face, alignment is critical.
If the rear face of the oil pan extends past the rear block face, bolting the transmission bellhousing will crack the aluminum pan flange.
Always verify with a straightedge that the rear face of the oil pan sits perfectly flush with the rear engine block surface before tightening fasteners.
Engineers specified distinct fastener sizes and precise torque values to preserve gasket compression without stripping aluminum block threads.
| Fastener Location & Type | Thread Size & Description | Official Torque Specification |
|---|---|---|
| Perimeter Oil Pan Rail Bolts | M6 x 1.0 Steel Flange Bolts | 106 in-lbs (12 Nm) |
| Rear Corner Oil Pan Bolts | M8 x 1.25 Long Flange Bolts | 18 ft-lbs (25 Nm) |
| Oil Pan-to-Transmission Bellhousing Bolts | M10 x 1.5 Horizontal Bolts | 37 ft-lbs (50 Nm) |
| Oil Pan Drain Plug | M12 x 1.75 Drain Fastener | 18 ft-lbs (25 Nm) |
| Oil Oil Filter Mounting Stud | M22 x 1.5 Threaded Adapter | 40 ft-lbs (54 Nm) |
Consulting exact chevy silverado torque specs prevents stripped aluminum threads and uneven gasket clamping force.
Tighten perimeter bolts in an alternating spiral sequence beginning at the center pan bolts and moving outward toward the front and rear covers.
Inside the oil pan on Active Fuel Management engines sits an internal chevy silverado oil pan pressure relief valve.
This spring-loaded relief valve sprays excess oil pressure directly downward into the oil sump during high RPM operation.
If the internal shield over this valve breaks, oil sprays directly onto cylinder walls, causing excessive chevy silverado oil consumption.
Inspect this pressure relief valve shield whenever the oil pan is removed to protect the engine oiling system.
A properly functioning pressure relief valve maintains stable hydraulic pressure for the chevy silverado oil pump across all engine speed ranges.

Mastering Front Differential Drop on 4WD Silverado Models
Four-wheel-drive Silverado models present a tight clearance challenge because the front axle differential housing sits directly beneath the oil pan sump.
Attempting to slide the deep oil pan sump backward without dropping the front axle results in severe frustration and scratched gasket surfaces.
To create sufficient working room, you do not need to remove the front axle assembly from the truck entirely.
Support the center cast iron housing of the front differential using a floor jack padded with a block of wood.
Unbolt the lower differential mounting brackets from the frame crossmember on both left and right sides.
Remove the upper differential mounting nut located near the left frame rail while keeping steady jack pressure under the housing.
Slowly lower the floor jack to let the front axle drop down roughly two to three inches onto a support stand.
This created vertical clearance allows the deep rear oil pan sump to slide out forward easily without snagging the internal pickup tube.
Check the rubber front axle vent hose connected to the top of the differential housing during this step.
Ensure the rubber vent hose does not stretch or disconnect while the axle rests in its lowered position.
Practical Tips for Proper RTV Application and Curing Times
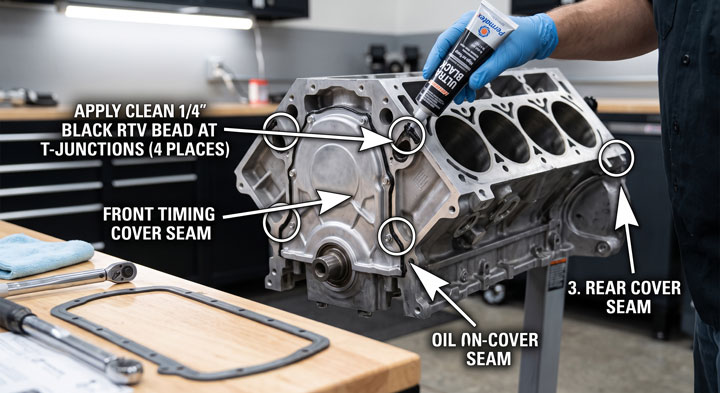
Achieving a leak-free seal on GM V8 engines depends almost entirely on proper RTV silicone placement and clean preparation.
The steel-reinforced rubber pan gasket seals flat aluminum rails effectively, but requires RTV at four specific corner seam junctions.
These four corners are created where the front aluminum engine timing cover and rear cover plates bolt against the engine block cylinder case.
These vertical assembly joints create tiny micro-gaps that rubber gaskets alone cannot fill without room-temperature vulcanizing silicone sealant.
Apply a clean quarter-inch bead of high-temp black RTV directly over each seam junction on the engine block face.
Never apply a continuous thick bead of RTV around the entire rubber gasket perimeter rail.
Excessive silicone squeezes inward when bolts are torqued, breaking off inside the pan and clogging the oil pan gasket chevy silverado pickup screen.
Mount the oil pan and start perimeter bolts within five minutes of RTV application before the silicone forms a dry outer skin.
Tighten fasteners to final torque specification immediately, then allow the sealant to cure completely before adding fresh motor oil.
Allow a minimum curing time of two hours for quick-curing silicones, though twenty-four hours is ideal in cold ambient shop temperatures.
Avoiding Catastrophic DIY Oil Pan Installation Errors
Working on aluminum engines requires careful mechanical technique to avoid costly damage to critical powertrain components.
The most common DIY failure is over-tightening small M6 oil pan bolts, which strips delicate threads inside the aluminum block.
Always use a small calibrated 1/4-inch drive inch-pound torque wrench rather than guessing tightness by feel with a standard ratchet.
Another major hazard is forcing the oil pan into position while transmission bellhousing bolts are already tightened securely.
Tightening horizontal bellhousing bolts before pulling the oil pan up flush against the engine block can crack the aluminum pan flange.
Always torque perimeter block rail bolts first, then tighten horizontal transmission housing bolts last.
Never use steel wire brushes or harsh abrasive pads on a die grinder to remove old gasket residue from aluminum rails.
Abrasive discs deposit tiny aluminum oxide particles into the crankcase that destroy rod and main bearings during engine operation.
Use plastic scrapers or brass wire hand brushes combined with solvent cleaners to keep foreign debris out of the engine crankcase.
Always double-check that the oil pickup tube screen and O-ring seal remain undisturbed before closing up the crankcase.
A pinched or missing oil pickup tube O-ring causes severe oil pump cavitation, low oil pressure, and catastrophic engine bearing failure.

“I’ve driven a Silverado for 5 years and didn’t know this existed.”
— The most common reaction when this article is shared
Did you know there’s a hidden storage compartment behind your rear seats? Or the button combo that switches your digital cluster to a completely different layout?
bryansgarage.com · July 28, 2026
Frequently Asked Questions About Chevy Silverado Oil Pan Gaskets
How long does an oil pan gasket replacement take on a Chevy Silverado?
A professional mechanic takes approximately 3 to 4 hours on a 2WD model and 4 to 6 hours on a 4WD model.
DIY mechanics working on jack stands should allocate a full Saturday to complete the job safely without rushing.
Do I have to drop the front differential on a 4WD Silverado to change the oil pan gasket?
Yes, unbolting and lowering the front differential 2 to 3 inches is necessary to clear the internal oil pickup tube.
Attempting the job without lowering the differential prevents the oil pan from sliding out from under the engine block.
What is the torque spec for Chevy Silverado oil pan bolts?
Perimeter M6 pan bolts require 106 inch-pounds (12 Nm) of torque using a 1/4-inch drive inch-pound torque wrench.
The two rear long M8 bolts require 18 foot-pounds (25 Nm), and bellhousing bolts require 37 foot-pounds (50 Nm).
Where do you put RTV silicone on a Silverado oil pan gasket?
Apply RTV silicone only at the four corner joint seams where the front timing cover and rear cover meet the engine block.
Do not apply continuous silicone beads along the flat rubber gasket rails because squeezed RTV clogs oil pickup screens.
Can I drive my truck with a slow oil pan gasket leak?
You can drive short distances with a minor seep as long as you monitor engine oil dipstick levels regularly.
However, major leaks risk oil starvation, environmental contamination, and oil dripping onto hot exhaust pipes creating fire hazards.
Conclusion
Replacing a worn oil pan gasket stops messy engine leaks, protects internal components, and maintains proper crankcase pressure levels.
Team Bryan’s Garage is committed to helping truck owners save money with clear, expert-verified repair guides.
Ready to transform your car maintenance from a stressful chore into a breeze? Explore more tips at Bryan’s Garage.
Have questions? Our team can help you find the best solutions for your car problems and avoid costly mechanic visits.
Note: Individual results may vary depending on individual vehicle makes, models, year of manufacture, and overall condition. This article is intended for general automotive reference purposes only and does not replace official manufacturer service manuals or advice from a certified mechanic.