I still remember the sinking feeling of pulling my own truck out of the garage and spotting that shiny dark puddle on the clean concrete floor.
Battling a persistent ford f150 plastic oil pan leak is an absolute headache for any truck owner.
At Bryan’s Garage, we have helped thousands of owners diagnose this exact issue, eliminate repeat failures, and choose the most reliable path forward without overpaying at the repair shop.
In This Article
- Step-by-Step DIY Repair Guide: How to properly remove, clean, prep, and install an updated oil pan on your Ford truck.
- Root Cause Mechanics: Why composite plastic pans warp under engine thermal cycling and lose RTV seal bonding.
- OEM vs. Aluminum Upgrades: A detailed head-to-head breakdown comparing stock plastic pans, updated Ford gasket pans, and aftermarket cast aluminum solutions.
- Ford TSB Insights & Cure Times: Technical bulletin facts, chemical cleaner safety, and why silicone cure times dictate repair success.
- Cost Analysis & Prevention: Comparing DIY repair expenses against professional shop rates while avoiding costly torque mistakes.
Your F-150 has a secret slot that starts the truck when your key fob dies.
And 8 other things Ford never told you.
Dead fob fix · Remote window trick · 7.2 kW generator hiding in your bed · Tailgate ladder · and 5 more.
▶ Read Now — Show Me Everything
bryansgarage.com · Bryan Mark · 2026

How to Repair and Upgrade a Leaking Ford F150 Plastic Oil Pan: A Step-by-Step DIY Guide
Fixing a leaking composite oil pan on a 2.7L EcoBoost, 3.5L EcoBoost, or 5.0L Coyote engine requires patience, thorough surface preparation, and the right sequence of actions.
Rushing this process or skipping critical chemical cleaning steps will guarantee a repeat leak within a few thousand miles.
Before beginning your repair, gather all necessary tools, safety gear, and replacement components.
Prerequisites & Required Equipment
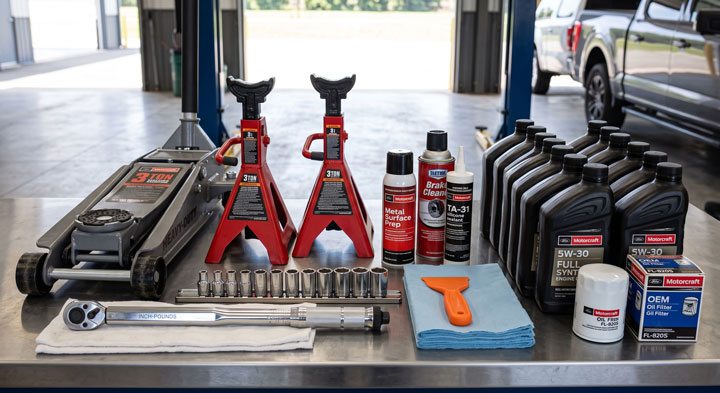
You will need a quality floor jack and rated jack stands to support your truck safely.
Prepare a 1/4-inch drive torque wrench capable of measuring inch-pounds accurately.
Acquire standard metric sockets ranging from 8mm to 15mm, a plastic gasket scraper, and lint-free shop towels.
Stock up on Motorcraft Metal Surface Prep or aerosol brake cleaner, along with Motorcraft TA-31 RTV silicone sealant or an updated rubber gasket kit.
Keep ten quarts of fresh synthetic engine oil and a new OEM oil filter ready for the final refill.
- Step 1: Elevate Vehicle and Remove Undercarriage Shields.
- Park your truck on a solid, level concrete surface and engage the emergency parking brake firmly.
- Raise the front end using a heavy-duty hydraulic jack and secure the frame rails onto heavy-duty jack stands.
- Unbolt the fiber splash shield or metal skid plates beneath the engine using an 8mm and 10mm socket.
- Inspect the lower crossmember and sway bar area to confirm where the oil accumulation originates.
- Allow the engine to cool down completely so hot motor oil does not burn your skin during servicing.
- Step 2: Drain Engine Oil and Remove Composite Oil Pan.
- Place a broad catch basin directly beneath the composite drain plug location.
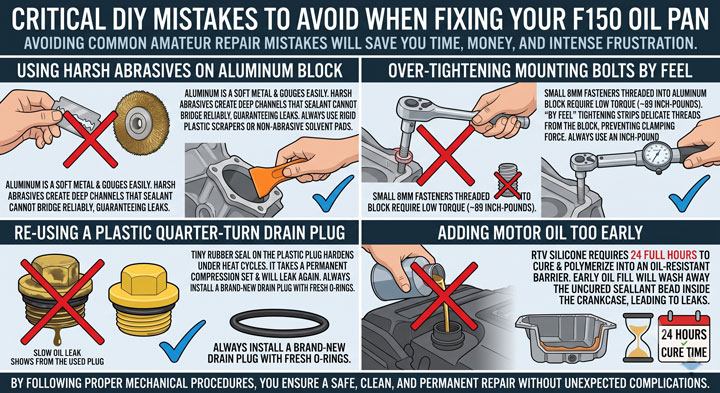
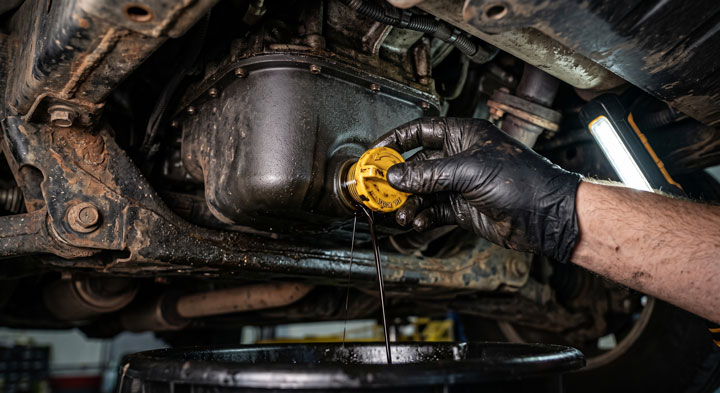
- Rotate the yellow plastic quarter-turn drain plug counterclockwise by hand and allow all engine oil to drain thoroughly.
- Disconnect any low oil level sensor electrical harnesses attached to the side of the composite pan.
- Unscrew the perimeter pan bolts in a cross pattern using an 8mm socket.
- Carefully insert a stiff plastic scraper along the mating seam to pry the composite pan away from the engine block without scoring the aluminum block flange.
- Step 3: Thoroughly Clean and Prep the Engine Block Flange.
- Allow residual engine oil to drip from the crankcase for at least two hours so oil does not contaminate your new sealing surface.
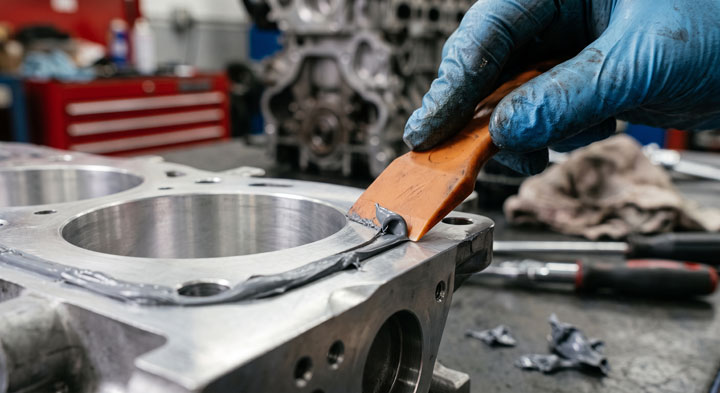
- Scrape away every trace of old cured RTV silicone from the aluminum block mating surface using a plastic scraper.
- Never use brass, steel, or wire wheels on aluminum engine blocks because gouging the surface will cause permanent leaks.
- Wipe down the entire perimeter mounting flange with Motorcraft Metal Surface Prep wiped onto a microfiber towel.
- Verify that the aluminum flange is completely dry, smooth, oil-free, and free of chemical residue.
- Step 4: Swap Oil Pickup Tube (If Installing Aluminum Upgrade).
- If you are upgrading from a stock plastic pan to a cast aluminum pan conversion kit, you must replace the oil pickup tube.
- Unbolt the factory oil pickup screen bracket from the main bearing cap stud using a 10mm socket.
- Remove the single bolt holding the pickup tube to the oil pump inlet housing.
- Install a new OEM rubber O-ring onto the replacement aluminum-compatible oil pickup tube stem.
- Torque the oil pickup tube retaining bolt to 89 inch-pounds and verify the pickup screen height sits correctly inside the new pan depth.
- Step 5: Apply Sealant and Mount the Upgraded Oil Pan.
- If using an RTV-sealed pan, lay down a continuous 4mm bead of Motorcraft TA-31 high-performance silicone along the pan flange, tracing inside the bolt holes.
- If installing an upgraded pan with a press-in rubber gasket, press the molded rubber seal securely into the outer channel without stretching it.
- Press the oil pan flush against the lower engine block within ten minutes of applying RTV sealant.
- Thread all mounting bolts by hand to prevent cross-threading the delicate aluminum block threads.
- Tighten the bolts in a crisscross sequence starting from the center outward, torquing 8mm bolts to 89 inch-pounds.
- Step 6: Respect Cure Time, Refill Engine Oil, and Road Test.
- Allow RTV silicone sealant to cure undisturbed for a minimum of 24 full hours before pouring liquid motor oil into the valve cover filler neck.
- Install a new engine oil filter and hand-tighten it until the rubber gasket contacts the filter adapter face plus three-quarters turn.
- Refill the crankcase with the manufacturer-recommended motor oil weight and check the dipstick level.
- Start the engine and monitor the oil pressure light on the instrument cluster to confirm immediate oil pressure build-up.
- Let the engine idle for fifteen minutes while inspecting the entire pan seam and drain plug area for fresh fluid weeping.
Mastering this repair at home saves hundreds of dollars while protecting your engine’s long-term health.
If you want to handle maintenance safely at home, check out our full collection of troubleshooting guides at Bryan’s Garage.
Why Do Ford F150 Composite Plastic Oil Pans Fail?
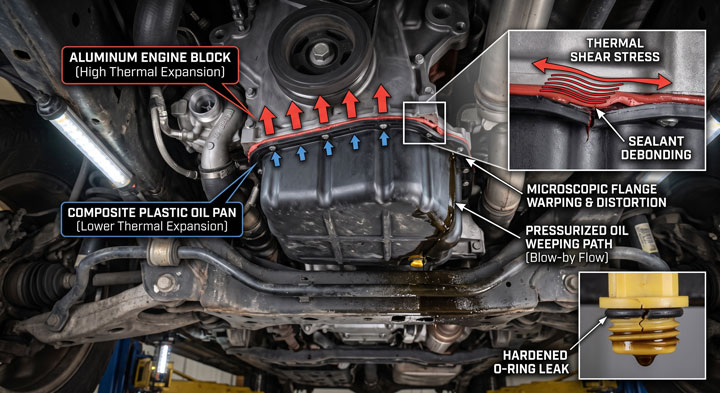
Understanding why composite plastic oil pans develop chronic leaks requires analyzing the extreme thermal and mechanical environment beneath your engine.
Ford introduced molded composite oil pans on 2.7L and 3.5L EcoBoost engines, as well as select 5.0L Coyotes, to reduce engine weight and lower manufacturing costs.
However, modern turbocharged engines generate immense under-hood heat cycles during towing, stop-and-go commuting, and hard acceleration.
Aluminum engine blocks expand and contract at a significantly different rate than composite molded plastic under thermal fluctuation.
This differential thermal expansion creates high shear stress along the thin layer of RTV silicone sealant holding the pan to the engine block.
Over thousands of miles, the intense heat cycles cause the plastic pan flange to bow, warp, and distort microscopically.
Once the plastic flange warps, the continuous mechanical shearing force breaks the chemical bond of the original silicone sealant.
Pressurized crankcase blow-by forces oil vapor through these microscopic gaps, leading to steady oil weeping down the lower crossmember.
Furthermore, engine oil slowly saturates the plastic compound over time, degrading the bonding surface and making simple re-sealing attempts ineffective.
Another major weakness is the quarter-turn plastic composite drain plug used on early factory pans.
The small rubber O-ring on the plastic plug hardens after repeated engine heat cycles and routine oil changes, leading to drips directly from the drain port.
Understanding these mechanical limitations explains why replacing a warped plastic pan with an identical plain plastic pan using raw RTV often results in a secondary leak shortly down the road.
OEM Plastic vs. Aftermarket Aluminum Oil Pan Upgrades: Head-to-Head Analysis
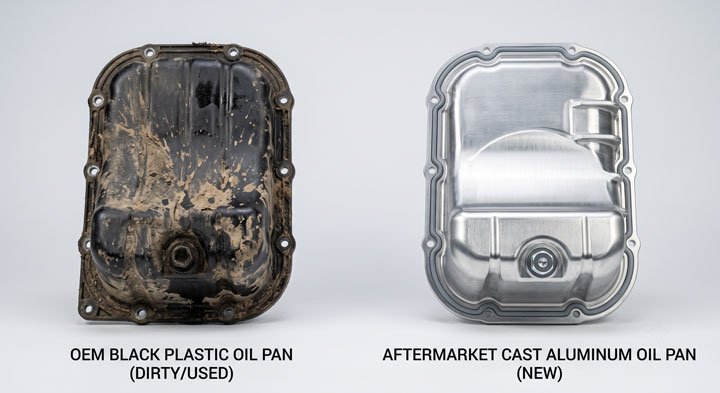
When repairing an f150 plastic oil pan leak, owners must choose between keeping the OEM plastic setup or upgrading to a durable metal structure.
Ford updated their replacement plastic pans to include press-in rubber gaskets, while aftermarket manufacturers developed cast aluminum and billet aluminum conversions.
The following head-to-head chart breaks down how these options compare in cost, installation difficulty, warp resistance, and overall longevity.
| Attribute | Stock OEM Composite Plastic | Updated Ford Gasketed Plastic | Aftermarket Cast / Billet Aluminum |
|---|---|---|---|
| Parts Cost | $80 – $140 | $120 – $180 | $250 – $450 |
| Sealing Method | RTV Silicone Sealant | Press-In Rubber Gasket | Press-In O-Ring / Rubber Gasket |
| Warp Resistance | Poor (High Thermal Flex) | Moderate (Improved Flange) | Excellent (Zero Structural Flex) |
| Drain Plug Style | Plastic Quarter-Turn Plug | Plastic Quarter-Turn Plug | Threaded Metal Magnetic Plug |
| RTV Cure Time | 24 Hours Required | None (Dry Install) | None (Dry Install) |
| Impact Resistance | Low (Can Crack from Debris) | Low (Can Crack from Debris) | High (Resists Road Debris Impact) |
| Expected Lifespan | 20,000 – 50,000 Miles | 60,000 – 100,000 Miles | Life of the Vehicle |
Stock OEM Plastic Pan Mechanics
The original factory composite pan relies entirely on a liquid RTV sealant bead for adhesion and sealing.
Because plastic flexes under heat while aluminum remains rigid, this seal is inherently vulnerable to thermal shear stress.
While inexpensive to purchase, reinstalling an original-style plastic pan with raw silicone frequently leads to repeat leaks within two years.
Updated Ford Gasketed Composite Pan Mechanics
In response to widespread dealer repairs, Ford engineered an updated composite pan that incorporates a molded press-in-place rubber gasket.
This design eliminates the need for messy liquid RTV sealant during installation, making the job cleaner and faster.
The rubber gasket absorbs moderate thermal movement between the plastic pan and the engine block much better than rigid silicone.
However, the outer housing remains composite plastic, meaning severe under-hood heat cycles can still cause the outer mounting tabs to warp over long periods.
Aftermarket Aluminum Oil Pan Conversions
An aluminum pan conversion represents the ultimate permanent solution for late-model Ford truck owners.
Constructed from high-pressure die-cast or CNC-machined billet aluminum, these pans match the thermal expansion rate of the engine block perfectly.
Because the metal flange will never warp or flex, the press-in rubber gasket maintains constant clamping pressure across all mounting bolts.
Additionally, aluminum pans feature traditional threaded drain plugs with magnetic tips to trap metallic debris before it circulates through your engine bearings.
Upgrading to aluminum eliminates 24-hour sealant cure times, allowing you to fill the engine with oil and drive away immediately after torquing the bolts.