
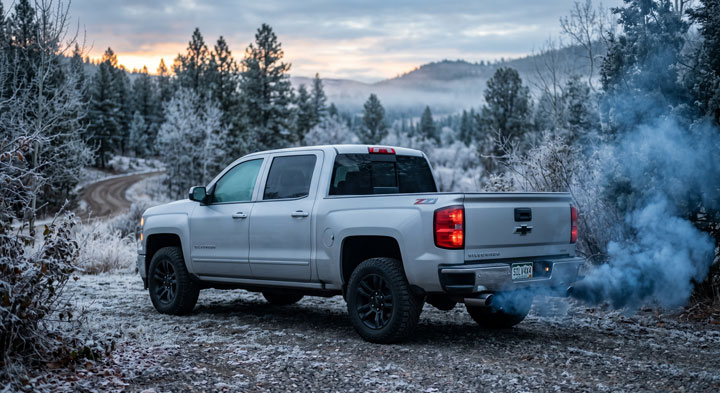
I still remember standing beside my truck on a cold morning, watching a thick cloud of blue smoke drift from the tailpipe every time I started the engine.
Seeing my oil dipstick drop a quart every few hundred miles made me worry about expensive internal engine failures.
Discovering that a clogged chevy silverado pcv valve was forcing oil straight into my intake manifold saved me thousands in unnecessary repairs and inspired our team at Bryan’s Garage to publish this guide.
In This Article
- How to locate the PCV system across different Chevy Silverado engine generations.
- A complete step-by-step DIY guide to cleaning, testing, and replacing PCV components.
- Upgrading integrated fixed-orifice valve covers to solve chronic oil burning issues.
- Diagnosing symptoms like blue exhaust smoke, rough idling, and oil seal leaks.
- Installing oil catch cans and maintaining PCV vacuum lines for long-term engine health.
Your Silverado has a secret compartment hiding above your glove box.
And 8 other things Chevy never told you.
Hidden dash storage · Key fob window trick · Auto 4WD mode · Buckle to Drive · and 5 more.
▶ Read Now — Show Me Everything
bryansgarage.com · Bryan Mark · 2026

How to Locate, Clean, and Replace Your Chevy Silverado PCV Valve: A Step-by-Step DIY Guide
Servicing your positive crankcase ventilation system is one of the most effective low-cost maintenance procedures for GM V8 engines.
Before beginning work, gather a basic metric socket set, needle-nose pliers, flathead screwdrivers, a plastic trim removal tool, and aerosol carb or brake cleaner.
You will also need safety glasses, shop towels, a replacement PCV valve or upgraded driver-side valve cover assembly, and a fresh vacuum line quick-connect fitting.
- Step 1: Locate the PCV System Component on the Driver-Side Valve Cover
- Park your Chevrolet Silverado on a level surface, engage the parking brake, and allow the engine to cool completely.
- Pop the hood and locate the main decorative engine cover covering the upper intake manifold.
- Lift the front of the plastic cover upward to disengage the rubber grommets and slide it forward off the mounting bracket studs.
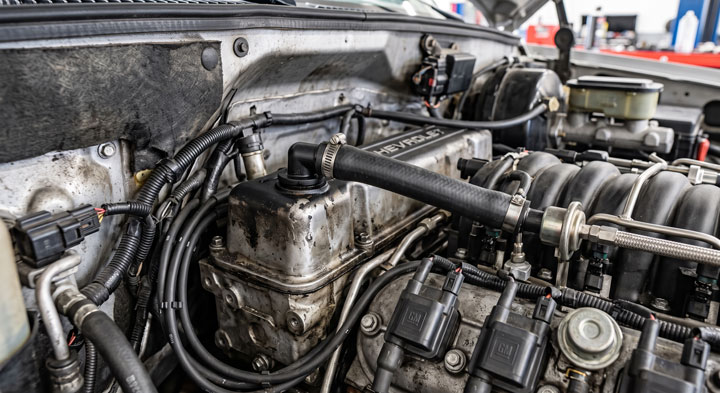
- Inspect the rear driver-side corner of the engine near the firewall to pinpoint the chevy silverado pcv valve location.
- On 1999 to 2002 models, you will find a traditional removable plastic or metal check valve pushed into a rubber grommet.
- On 2003 and newer GMT800, GMT900, and K2XX trucks, locate the rigid vacuum tube connected to a fixed orifice nipple on the valve cover rear corner.
- Step 2: Disconnect the PCV Vacuum Hose and Electrical Harnesses
- Examine the vacuum line running from the rear driver-side valve cover port up to the upper intake manifold plenum.
- Pinch the plastic quick-release retaining clip on the end of the chevy silverado pcv hose using your fingers or pliers.
- Pull the vacuum hose straight off the nipple without bending the hard plastic tubing to prevent snap fractures.
- Unclip any nearby ignition coil wiring harness connectors or brake booster vacuum lines to gain unhindered hand access.
- Inspect the outer rubber quick-connect seals for cracks, oil softening, or severe heat degradation.
- Step 3: Remove and Test Traditional Push-In or Screw-In PCV Valves
- If your truck features an older removable style valve, twist the valve counterclockwise and pull it out of the rubber valve cover grommet.
- Shake the removed valve back and forth next to your ear to check internal pintle movement.
- A functional spring-loaded check valve produces a sharp, clear metallic rattling sound as the internal plunger moves freely.
- If the valve fails to rattle or feels heavy with thick sludge, the internal spring mechanism is gummed up with carbon.
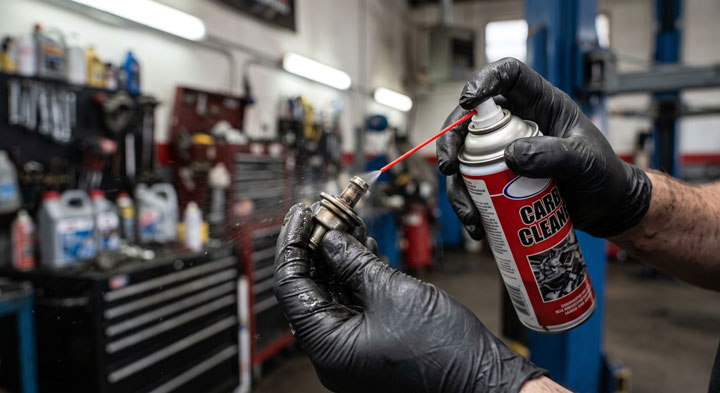
- Spray aerosol carburetor cleaner directly into both ends of the valve to dissolve thick oil sludge, or replace the unit with a new OEM valve.
- Step 4: Clean Clogged PCV Vacuum Hose Lines and Intake Manifold Ports
- Remove the entire vacuum hose assembly running between the valve cover and the intake manifold port.
- Spray aerosol brake cleaner through the internal bore of the rigid plastic vacuum line to flush out accumulated sludge.
- Use a thin nylon bottle brush or compressed air nozzle to clear stubborn carbon deposits from inside the vacuum tube.
- Inspect the vacuum vacuum port nipple on the intake manifold for carbon buildup that restricts airflow.
- Gently clean the intake port orifice using a wooden toothpick or small brass wire brush to restore proper vacuum draw.
- Step 5: Execute Driver-Side Valve Cover Upgrade for Fixed-Orifice PCV Systems
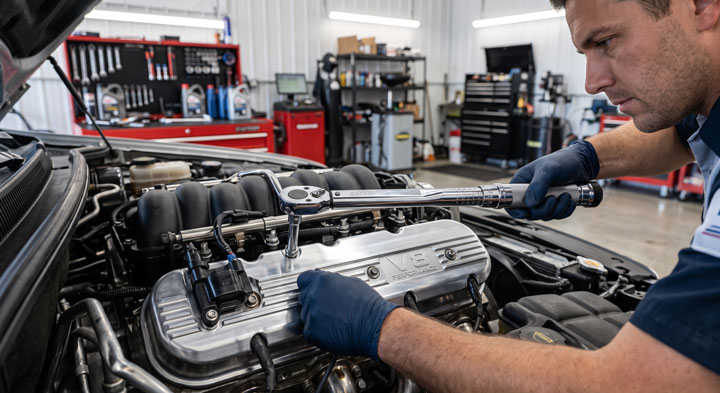
- If your truck features a fixed-orifice system suffering from heavy oil pull-over, unbolt the four ignition coil bracket bolts on the driver side.
- Move the ignition coil pack assembly out of the way without disconnecting spark plug wires from the coils.
- Unbolt the perimeter valve cover retaining bolts using an 8mm socket and carefully break the rubber gasket seal.
- Lift the original valve cover off the cylinder head and thoroughly clean the head mating surface with shop towels.
- Install an updated GM factory driver-side valve cover featuring redesign internal oil baffle drain holes and a fresh integrated orifice.
- Torque the new valve cover bolts evenly to 106 inch-pounds to ensure proper perimeter seal clamping force.
- Step 6: Reassemble Vacuum Lines and Perform Operational Inspection
- Snap the cleaned or new vacuum hose onto the rear valve cover orifice nipple until you hear a solid click.
- Reconnect the opposite end of the vacuum line securely to the upper intake manifold fitting.
- Reinstall the ignition coil pack bracket assembly and reconnect all electrical harness plugs.
- Place the plastic decorative engine cover back over the intake manifold and press down firmly to seat the rubber grommets.
- Start the engine, check for vacuum leaks using soapy water or an smoke machine, and ensure smooth engine idling.
Replacing or cleaning your crankcase ventilation components cures oil consumption issues and keeps your engine bay clean.
Our team at Bryan’s Garage provides practical, field-tested guidance to help car owners conquer DIY maintenance projects with total confidence.
Diagnosing PCV System Failure: Oil Consumption, Blue Smoke, and Pressure Leaks
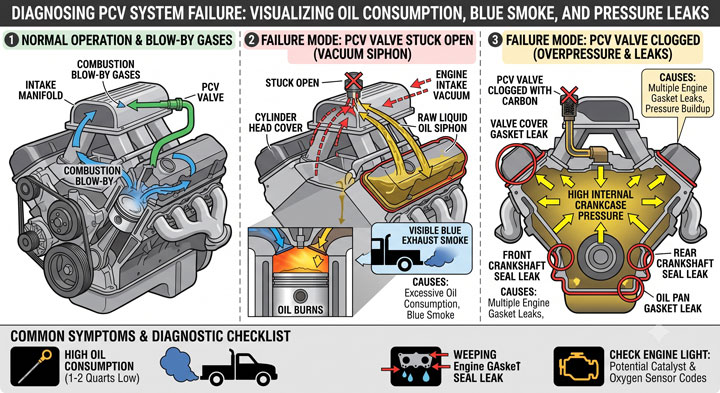
The positive crankcase ventilation system routes harmful combustion blow-by gases out of the engine crankcase and back into the intake manifold.
During normal combustion, high-pressure fuel and air slip past piston rings into the lower oil pan area.
Without constant vacuum ventilation, these corrosive gases build intense internal pressure that destroys vital engine oil seals.
When a check valve sticks in the open position, engine intake vacuum draws raw liquid oil directly out of the cylinder head cover.
This continuous oil siphon causes severe chevy silverado oil consumption without displaying visible external fluid leaks under the engine.
Truck owners often report losing one to two quarts of motor oil between standard oil change intervals.
That siphoned liquid oil burns inside combustion chambers, creating noticeable chevy silverado blue exhaust smoke during hard acceleration or cold starts.
Burning oil also coats oxygen sensors and clogs catalytic converters, triggering costly check engine light trouble codes.
Conversely, when a PCV valve becomes completely clogged with carbon, crankcase ventilation stops completely.
Blow-by gases build excessive internal chevy silverado crankcase pressure that pushes oil past front and rear crankshaft main seals.
High internal pressure also forces engine oil past valve cover gaskets, oil pan seals, and dipstick tube grommets.
If you notice oil weeping from multiple engine gaskets simultaneously, a clogged ventilation system is usually the root cause.
Addressing a faulty pcv valve chevy silverado restores normal crankcase pressure and stops active gasket leaks.

Traditional PCV Valves vs. Fixed Orifice Valve Cover Designs Across Silverado Generations
General Motors modified the crankcase ventilation design significantly across different generations of the Silverado 1500, 2500, and 3500 trucks.
Understanding which specific ventilation setup your engine utilizes prevents purchasing incorrect replacement parts.
First-generation GMT800 trucks equipped with 4.8L, 5.3L, and 6.0L V8 engines used traditional removable spring-loaded check valves.
These early valves pulled directly out of a rubber grommet in the driver-side valve cover and cost very little to replace.
However, starting around 2004, GM transitioned V8 engines to a fixed-orifice system integrated directly inside the aluminum valve cover.
This fixed design replaced the moving spring check valve with a tiny 2.5mm calibrated hole built into an internal steel baffle.
While eliminating moving check valve parts, early fixed-orifice valve covers suffered from flawed internal oil baffle drain locations.
Engine oil sloshing inside the cylinder head pooling near the rear intake rocker arms directly plugged the tiny 2.5mm hole.
| Generation & Engine | PCV System Type & Location | Primary Maintenance / Upgrade Strategy |
|---|---|---|
| 1999–2002 GMT800 (4.8L, 5.3L, 6.0L) | Push-in spring check valve on rear driver valve cover | Replace check valve every 30,000 miles or clean with carb spray |
| 2003–2006 GMT800 (4.8L, 5.3L, 6.0L) | Integrated fixed 2.5mm orifice in driver valve cover | Clean orifice hole or upgrade to revised GM baffled valve cover |
| 2007–2013 GMT900 (5.3L AFM, 6.0L, 6.2L) | Integrated fixed orifice with internal baffle plate | Install updated GM valve cover (P/N 12570427) to stop oil pull-over |
| 2014–2019 K2XX (4.3L, 5.3L L83, 6.2L L86) | Dual-zone crankcase separator integrated in cover | Inspect quick-connect lines; replace complete valve cover assembly |
For 2007 to 2013 GMT900 trucks suffering from chronic chevy silverado 5.3 burning oil complaints, GM released an updated driver valve cover.
The revised valve cover relocates internal oil baffle drain holes away from high-oil-spray rocker arm zones.
It also shields the fixed orifice hole, preventing liquid oil drops from entering the vacuum stream.
Performing a chevy silverado pcv valve replacement on fixed-orifice models requires replacing the complete driver-side valve cover assembly.
The Role of Oil Catch Cans and Valve Cover Upgrades in PCV System Maintenance
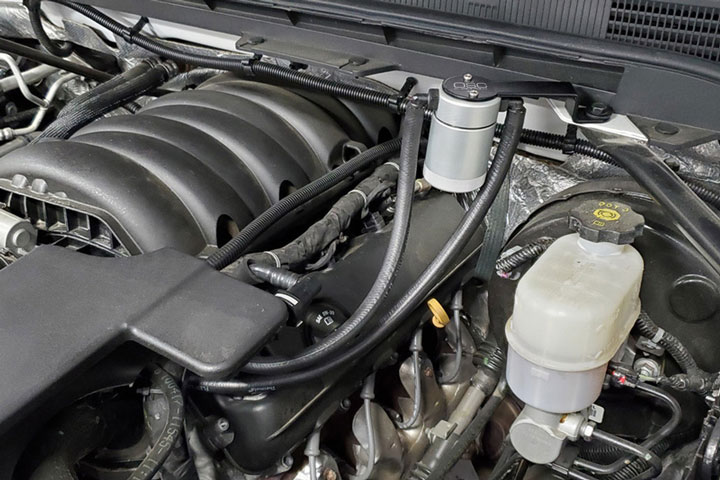
While upgrading to a revised valve cover resolves major oil pull-over issues, microscopic oil mist still enters the intake manifold.
On modern direct-injected Gen V engines, gas no longer sprays over intake valve backs to clean away oily sludge.
Over time, airborne oil mist bakes onto warm intake valve stems, forming heavy carbon deposits that restrict engine airflow.
Installing an aftermarket inline chevy silverado oil catch can provides an effective secondary defensive barrier for your engine.
An oil catch can mounts inline along the vacuum hose running between the rear valve cover port and the intake plenum.
As dirty blow-by vapors pass through the catch can’t internal stainless mesh filter, liquid oil drops condense inside the aluminum reservoir.
Cleaned air continues into the engine intake manifold while trapped oil collects inside the reservoir bottom for easy draining.
Truck owners routinely drain several ounces of dirty oil and condensed water out of the catch can every thousand miles.
Whenever unbolting your valve cover to clean baffles or upgrade to a revised cover design, always replace the underlying seal.
Installing a fresh molded rubber chevy silverado valve cover gasket prevents annoying oil seeps down cylinder head sides.
Replace the small rubber grommet seals surrounding each valve cover bolt to maintain proper clamping force across the gasket rail.
Practical Maintenance Routines for Long-Term PCV System Health
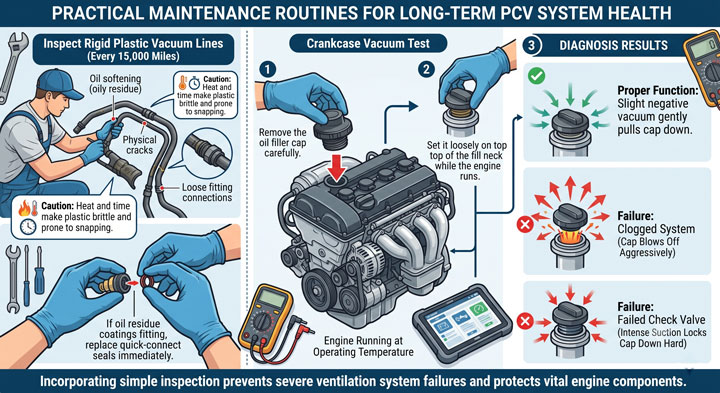
Incorporating simple inspection steps into your regular vehicle maintenance schedule prevents severe ventilation system failures.
Inspect rigid plastic vacuum lines every 15,000 miles for signs of oil softening, physical cracks, or loose fitting connections.
Heat under the hood bakes factory plastic vacuum lines over time, making them extremely brittle and prone to snapping during service.
If you notice oil residue coating the outside of vacuum hose fittings, replace the quick-connect seals immediately.
Perform a quick crankcase vacuum test using your oil filler cap while the engine idles at normal operating temperature.
Remove the oil filler cap carefully and set it loosely on top of the fill neck while the engine runs.
A properly functioning ventilation system creates a slight negative vacuum that gently pulls the cap against the filler neck.
If the cap bounces off aggressively or blows outward with strong pressure, your crankcase ventilation system is completely clogged.
Conversely, if intense suction locks the cap down hard, a failed check valve is allowing unmetered manifold vacuum to collapse crankcase seals.
Avoiding Expensive Mistakes During Silverado PCV System Service
Servicing delicate engine management components requires proper technique to prevent introducing new mechanical problems.
One common mistake DIYers make is forcing stiff quick-connect vacuum fittings off valve cover nipples using metal screwdrivers.
Prying with screwdrivers easily snaps fragile plastic nipples off the valve cover, turning a quick repair into an expensive replacement job.
Always depress quick-release plastic tabs fully before pulling fittings straight off mounting nipples.
Another frequent error is using aggressive metal wire brushes to clean out small fixed orifice holes inside aluminum valve covers.
Metal wire brushes enlarge the calibrated 2.5mm hole, destroying engineered vacuum flow rates and increasing oil consumption.
Clean orifice holes using non-abrasive wooden picks, nylon brushes, and aerosol solvents to preserve exact factory dimensions.
When reinstalling valve covers, never over-tighten the small 8mm perimeter retaining bolts by hand without a torque wrench.
Over-torquing snaps small valve cover bolts inside cylinder heads or deforms perimeter rubber gaskets, causing persistent oil leaks.
Always use an inch-pound torque wrench to tighten valve cover fasteners evenly to factory specifications.

“I’ve driven a Silverado for 5 years and didn’t know this existed.”
— The most common reaction when this article is shared
Did you know there’s a hidden storage compartment behind your rear seats? Or the button combo that switches your digital cluster to a completely different layout?
bryansgarage.com · July 28, 2026
Frequently Asked Questions About Chevy Silverado PCV Valves
Where is the PCV valve located on a Chevy Silverado 5.3 V8 engine?
The PCV valve or fixed orifice port is located at the top rear corner of the driver-side valve cover near the firewall.
A rigid plastic vacuum line connects this rear valve cover port directly to the upper intake manifold plenum.
How do I know if my Chevy Silverado PCV valve is bad?
Common symptoms include excessive oil consumption, blue exhaust smoke on start-up, rough engine idling, and oily spark plugs.
A clogged valve also builds internal crankcase pressure, causing oil to weep past valve cover gaskets and crankshaft seals.
Can I just clean my PCV valve instead of replacing it?
Traditional removable check valves on 1999 to 2002 models can be cleaned using aerosol carburetor spray if internal pintles rattle freely.
However, 2003 and newer fixed-orifice models with clogged internal baffles require replacing the entire driver-side valve cover assembly.
Does a bad PCV valve cause a Check Engine Light trouble code?
Yes, a failing system can trigger Lean condition codes P0171 and P0174 or Misfire codes P0300 due to unmetered vacuum leaks.
Oil fouling caused by bad ventilation also damages oxygen sensors and triggers catalytic converter efficiency codes like P0420.
How much does it cost to replace a Silverado PCV valve or valve cover?
A traditional screw-in or push-in check valve costs under $15 and takes 10 minutes to replace at home.
An upgraded GM OEM driver-side valve cover costs between $60 and $110, requiring about one hour of easy DIY installation time.
Conclusion
Maintaining your positive crankcase ventilation system eliminates blue smoke, stops excessive oil consumption, and protects vital engine seals.
Team Bryan’s Garage is committed to helping truck owners conquer DIY maintenance with expert, field-tested guidance.
Ready to transform your car maintenance from a stressful chore into a breeze? Explore more tips at Bryan’s Garage. Have questions? Our team can help you find the best solutions for your car problems and avoid costly mechanic visits.
Note: Individual results may vary depending on individual vehicle makes, models, year of manufacture, and overall condition. This article is intended for general automotive reference purposes only and does not replace official manufacturer service manuals or advice from a certified mechanic.