When I bought my first Ford truck, I spent hours worrying that a bad DIY job would leave my truck bed leaking and my expensive gear soaked during heavy downpours.
I attempted to mount my brand-new bed cover in my cold driveway using a poorly translated instruction sheet, only to find the rails crooked and the tailgate jamming completely shut.
That frustrating afternoon taught me the hard way how crucial a comprehensive ford f150 tonneau cover install guide really is.
Here at Bryan’s Garage, our mechanical team has refined this exact installation process over hundreds of truck builds to help you achieve a flawless, watertight fit in under an hour.
In This Article
- Step-by-Step Installation Guide: Detailed instructions for mounting side rails, securing bed clamps, and sealing weather gaps.
- Tonneau Cover Design Comparison: Detailed breakdown comparing soft roll-up, hard tri-fold, and retractable bed covers.
- Waterproofing & Bed Seal Geometry: Pro tips on routing drain tubes, bulkhead sealing, and preventing cargo leaks.
- Maintenance Practices for Longevity: How to preserve vinyl UV coatings, calibrate latch tension, and care for aluminum hinges.
- Troubleshooting Common Pitfalls: Solutions for latch binding, cover misalignment, and plastic bed cap clearance issues.
Your F-150 has a secret slot that starts the truck when your key fob dies.
And 8 other things Ford never told you.
Dead fob fix · Remote window trick · 7.2 kW generator hiding in your bed · Tailgate ladder · and 5 more.
▶ Read Now — Show Me Everything
bryansgarage.com · Bryan Mark · 2026
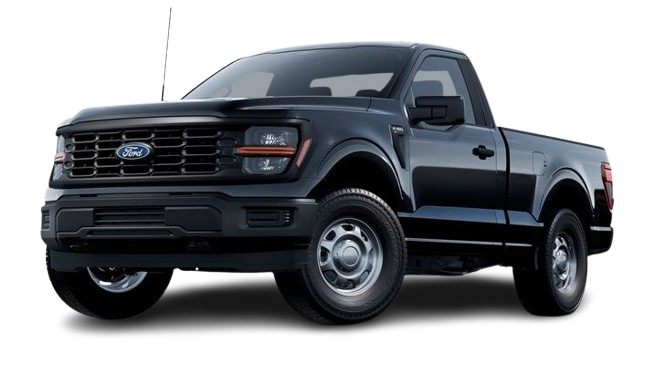
How to Install a Ford F150 Tonneau Cover: Complete Step-by-Step Guide
Installing a truck bed cover on your Ford F-150 is one of the most effective DIY upgrades you can make.
It shields your valuable cargo from weather and theft while improving highway aerodynamic efficiency.
Most modern F-150 truck bed covers require zero drilling into your factory aluminum body.
Instead, they utilize specialized heavy-duty aluminum mounting clamps that grip the interior bed caps securely.
Prerequisites & Required Tools
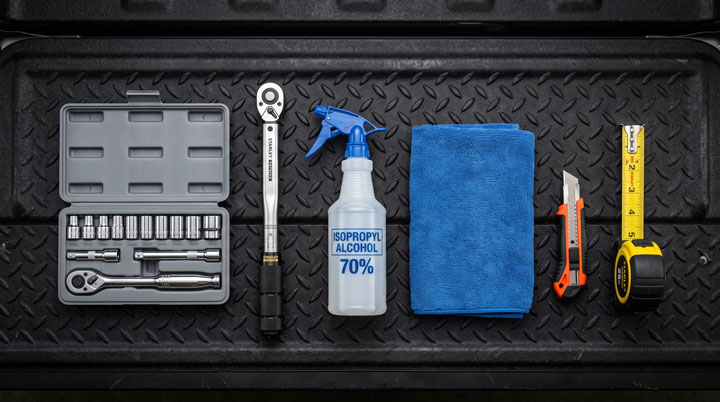
Before unboxing your bed cover assembly, gather all necessary tools and prepare your truck bed workspace.
Working with clean bed rails ensures weather seals adhere tightly without gaps or air leaks.
You will need a socket set featuring 1/2-inch and 9/16-inch or 13mm and 15mm sockets.
Prepare a ratchet, a torque wrench, isopropyl alcohol with a microfiber towel, and a utility knife.
A tape measure is essential for verifying exact side rail alignment from the front bulkhead to the tailgate.
Having a second helper available makes lifting and balancing hard folding cover assemblies much easier.
Step 1: Unboxing, Bed Cleaning, and Bulkhead Seal Surface Prep.
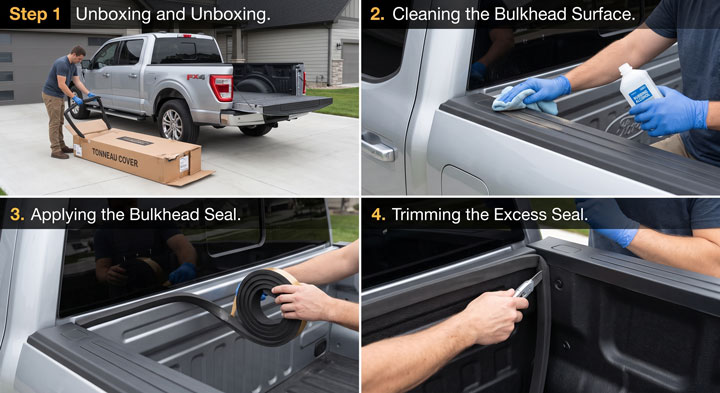
Park your Ford F-150 on a flat, level surface and lower the tailgate down completely.
Inspect the front bed wall adjacent to the cab, known in body shops as the bed bulkhead.
Clean the top surface of the bulkhead and side bed caps thoroughly using isopropyl rubbing alcohol.
Remove all dirt, grease, trail dust, and wax residue to create a pristine bonding surface.
Most F-150 models feature side plastic bed caps that sit slightly higher than the metal bulkhead.
Unroll the included thick rubber weather stripping or foam bulkhead seal provided with your kit.
Peel back the adhesive backing tape slowly and press the seal firmly across the entire bulkhead edge.
Align the foam strip flush with the inside front bed corners to block incoming road spray.
Trim any excess seal length cleanly at the corners using your utility knife.
Step 2: Positioning and Aligning Side Mounting Rails.
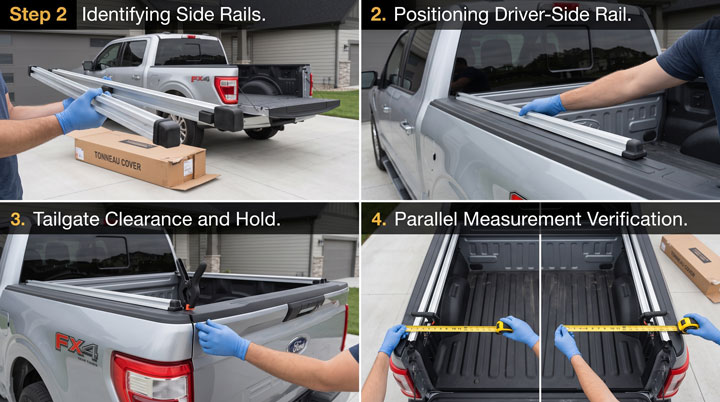
Unpack the left driver side and right passenger side aluminum cover mounting rails.
Identify the front end of each rail, which usually features a rubber end cap or foam bumper.
Place the driver side mounting rail along the inner lip of the plastic bed cap.
Push the front end of the rail snug against the foam bulkhead weather seal you installed in step one.
Close the tailgate gently to test rear tail clearance before tightening any mounting hardware.
Position the rear edge of the aluminum rail so it clears the inner tailgate face by approximately 1/8 to 1/4 inch.
Use a spring clamp or have your helper hold the rail steady against the bed cap.
Measure the distance from the inner bed wall to the mounting rail edge at both front and rear positions.
Ensuring both side rails run perfectly parallel guarantees smooth cover latching operation later.
Step 3: Attaching Bed Rail Clamps and Securing Mounting Hardware.
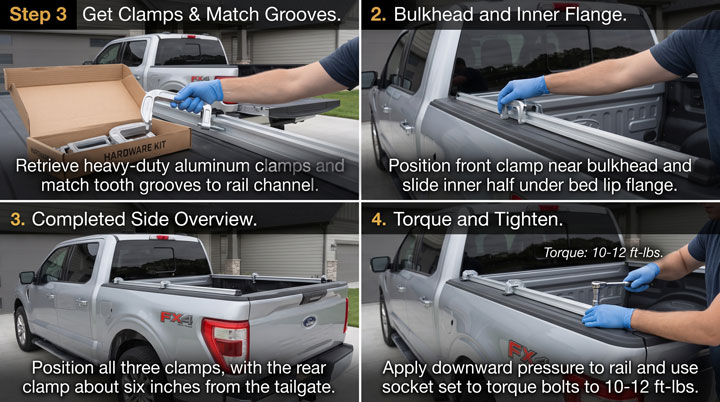
Retrieve the heavy-duty aluminum mounting clamps from your installation hardware box.
Most 5.5-foot short bed F-150 installations require three clamps per side, while 6.5-foot and 8-foot beds use four clamps.
Disassemble the clamp body so the outer tooth groove matches the grooved channel on the mounting rail.
Position the front clamp as close to the front bulkhead bulkhead corner as space allows.
Reach under the aluminum bed lip and slide the inner clamp half behind the bed flange.
Thread the clamp bolt in by hand until the grooved teeth interlock with the rail channel.
Position the rear clamp roughly six inches forward from the tailgate latch mechanism.
Place the middle clamp centrally between the front and rear clamps to distribute clamping force evenly.
Apply downward physical pressure onto the top of the aluminum side rail while tightening each bolt with a socket.
This downward force compresses the rubber seal beneath the rail against the bed cap to create a tight water seal.
Torque all clamp bolts to approximately 10 to 12 foot-pounds using your socket set.
Never over-tighten clamps with pneumatic impact wrenches, as excessive torque can deform soft aluminum bed caps.
Repeat this identical mounting clamp process for the passenger side rail.
Step 4: Mounting the Tonneau Cover Assembly onto Side Rails.
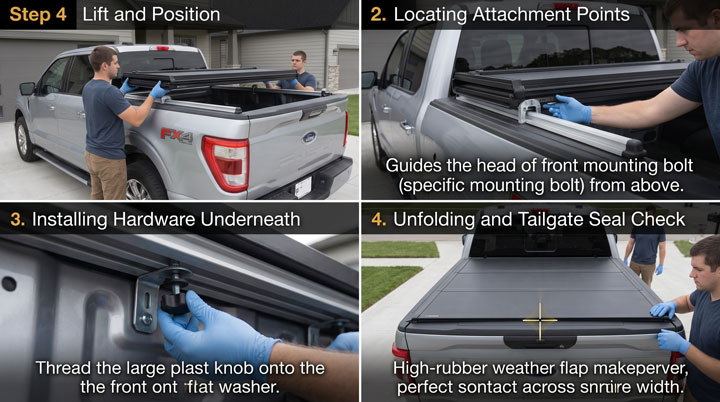
Lift the main tonneau cover assembly carefully with the assistance of a helper.
For hard tri-fold models, keep the cover panels folded together in their stowed transportation position.
Set the folded cover canopy assembly onto the side rails near the front bulkhead wall.
Unfold the front panel retention buckles or locate the front mounting bolt attachment points underneath.
Slide the front mounting bolts down through the slotted brackets on the side rails.
Underneath the rail, install the rubber washers, metal flat washers, and plastic star knobs onto each bolt.
Thread the star knobs on loosely so you can fine-tune the cover’s front-to-back position.
Unfold the cover completely down the length of the bed toward the tailgate.Center the cover visually so the side vinyl or aluminum edges overlap both side rails equally.
Adjust the assembly forward or backward until the rear rubber weather flap seals smoothly against the top of the tailgate.
Once you verify symmetrical cover alignment, reach underneath and hand-tighten the front star knobs securely.
Step 5: Testing Latch Operation, Alignment, and Lock Tension.
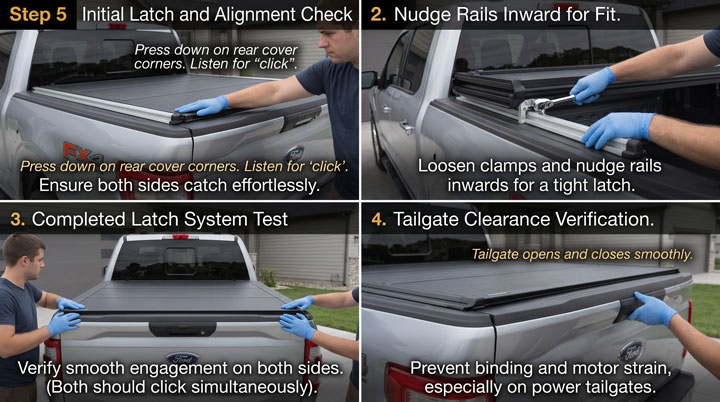
Fold out the final panel near the rear tailgate to test the slam-latch or manual locking pin operation.
Press down firmly on both rear cover corners until you hear a sharp, solid latch engagement click.
If the rear latches fail to catch the side rail catches, the side rails may be spread too far apart.
Loosen the middle and rear bed clamps slightly and nudge the rails inward by a millimeter.
Re-tighten the clamp bolts and test the latch engagement again until both sides catch effortlessly.
Open and close the truck tailgate several times with the cover fully latched in place.
The tailgate should close smoothly without hitting or binding against the rear cover weather seal.
If the tailgate hits the cover panel hard, raise the rear end of the side rails slightly or push the assembly forward.
If you need to install tonneau cover f150 components on a model with a power tailgate, verifying this clearance prevents tailgate motor strain.
Step 6: Routing Water Drain Tubes and Installing Weather Accessories.
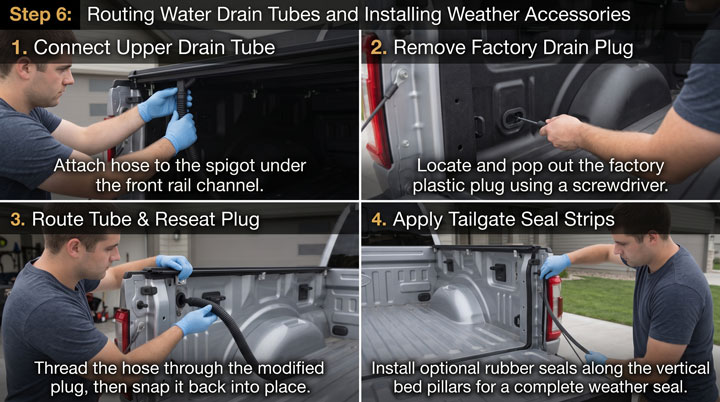
Locate the flexible plastic water drain hoses included with hard folding or retractable bed cover kits.
Attach the upper hose end to the drain spigots located under the front rail water collection channels.
Inspect the front plastic wall of your F-150 bed for factory rubber oval drain plugs or stake pocket access holes.
Pop out the factory plastic bed drain plugs using a flat-head screwdriver or trim removal tool.
Cut a small hole through the center of the rubber plug using your utility knife.
Push the flexible drain tube through the modified plug and snap the plug back into the bed wall hole.
Guide the lower open end of the drain hose so water empties outside the vehicle beneath the chassis frame.
Check the rear tailgate corners for daylight gaps between the bed sides and tailgate face.
Apply optional rubber tailgate seal strips along the vertical bed pillars to block windblown dust and highway moisture.
Taking your time during alignment ensures your bed cover provides years of leak-free cargo protection.
Our mechanical team at Bryan’s Garage recommends re-checking all clamp bolt tightness after your first week of driving.
Comparing Tonneau Cover Designs for the Ford F150: Tri-Fold, Roll-Up, and Retractable
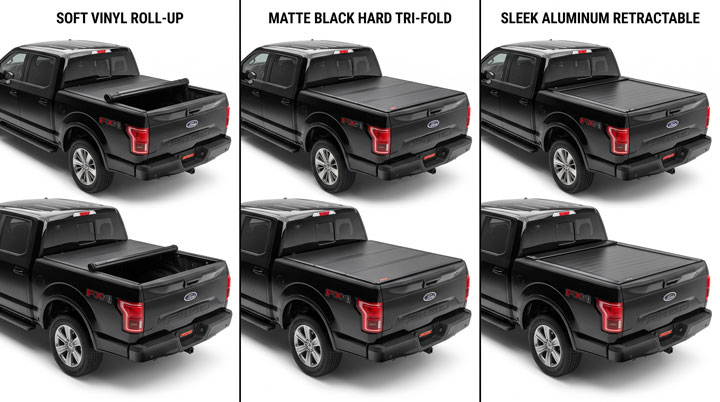
Selecting the right cover design depends on how you use your truck bed for work, family gear, and recreational hauling.
Each style offers unique advantages regarding cargo security, budget, bed access, and weather protection.
Understanding these mechanical differences helps you choose the perfect bed cover for your Ford F-150 box length.
| Cover Type | Average Price Range | Security Level | Bed Access Percentage | Installation Difficulty |
|---|---|---|---|---|
| Soft Vinyl Roll-Up | $200 – $400 | Basic (Vinyl/Zipper/Latch) | 100% Full Bed Access | Easy (30 – 45 Mins) |
| Hard Aluminum Tri-Fold | $600 – $1,100 | High (Locked Tailgate Protection) | 66% to 100% (When Folded Up) | Moderate (45 – 60 Mins) |
| Retractable Aluminum Canister | $1,200 – $2,500 | Maximum (Key Lock / Heavy Aluminum) | 85% to 90% (Canister Occupies Space) | Advanced (60 – 90 Mins) |
| Hard Fiberglass One-Piece Painted | $1,100 – $2,000 | Maximum (Solid Overhead Shell) | Limited (Lifts on Gas Struts) | Moderate (Requires 2 People) |
Soft Roll-Up Covers
Soft vinyl roll-up covers represent the most economical choice for truck owners seeking basic weather protection.
They feature heavy-duty marine vinyl stretched over horizontal aluminum crossbars.
When you need full bed capacity for hauling tall equipment or firewood, roll the cover forward to the cab wall.
Secure the rolled bundle using the built-in nylon storage straps.
While soft covers keep rain off tools, a sharp knife can slice through vinyl, offering minimal theft protection.
Hard Tri-Fold Covers
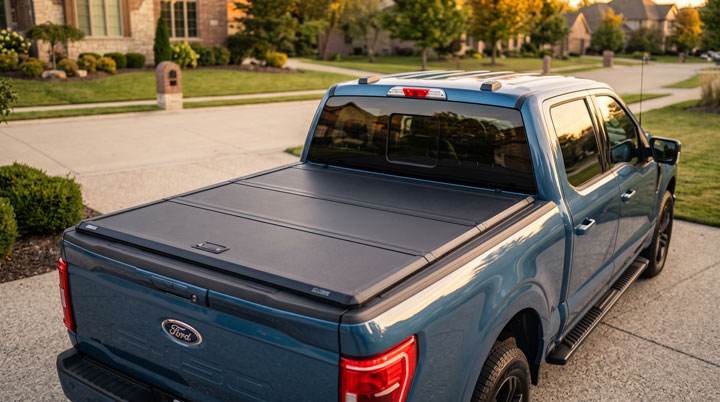
Hard tri-fold covers use solid aluminum or fiberglass composite sandwich panels supported by structural hinges.
When closed and paired with a locked F-150 tailgate, they transform your truck bed into a secure trunk vault.
Most hard tri-folds support up to 300 to 500 pounds of distributed weight on top of the panels.
Many premium models allow you to fold all panels upright against the back glass to access 100 percent of your bed space.
Executing a ford f150 bed cover mounting job with hard panels provides the ultimate mix of security and versatility.
Retractable Covers
Retractable covers feature interlocking aluminum slats that roll smoothly into a compact canister box mounted at the front bulkhead.
They open and lock at intermediate positions along the bed rails using a simple push-button or strap mechanism.
This retractable action allows you to haul bulky cargo without blocking your rear cab window view.
However, the internal canister occupies roughly 10 to 12 inches of front bed space near the bulkhead.