
I still vividly remember driving across Texas in mid-July when warm air suddenly started blasting from my cabin vents during a family road trip.
That sweaty, frustrating afternoon taught me the true value of understanding your truck’s climate control system and mastering a simple DIY chevy silverado ac recharge. Here at Team Bryan’s Garage, we want to empower you with exact mechanical steps, freon capacities, and port locations so you can keep your truck cool without paying dealer prices.

In This Article
- Step-by-Step AC Recharge Procedure: Complete DIY instructions for safely connecting gauge hoses and adding refrigerant.
- Low-Side Service Port Identification: How to quickly locate the low-pressure charging port across all Silverado model generations.
- R-134a vs. R-1234yf Refrigerant Specs: Identifying the exact factory gas type and fluid capacity for your truck.
- Pressure Diagnostics & Ambient Charts: Reading static and dynamic PSI levels to prevent dangerous system overcharging.
- Component Failure Troubleshooting: Spotting leaks on condensers, compressor clutches, and clogged orifice tubes.
Your Silverado has a secret compartment hiding above your glove box.
And 8 other things Chevy never told you.
Hidden dash storage · Key fob window trick · Auto 4WD mode · Buckle to Drive · and 5 more.
▶ Read Now — Show Me Everything
bryansgarage.com · Bryan Mark · 2026

How to Recharge the AC on Your Chevy Silverado: A Step-by-Step Guide
Recharging the air conditioning system on your Chevrolet Silverado is a straightforward task when approached with mechanical patience and proper equipment.
Before connecting any charging hose, inspect your engine bay to ensure safety around spinning belt drives.
You will need a canister of verified refrigerant, safety glasses, protective mechanics gloves, an inline pressure gauge hose assembly, and a digital meat thermometer.
Verify that your engine is completely turned off and parked on flat, stable pavement with the parking brake securely set.
Keep shop rags nearby to clean any minor oil residue off service valve caps during inspection.
Step 1: Verify the Factory Refrigerant Type and System Specifications
Pop the truck hood and locate the vehicle emission and refrigerant control label attached to the radiator upper shroud.
Identify whether your Silverado operates on legacy R-134a gas or modern eco-friendly R-1234yf refrigerant.
For example, if you are servicing a 2016 chevy silverado ac recharge project, your system almost certainly requires standard R-134a gas.
Make sure you select an appropriate ac recharge kit for chevy silverado that matches your factory emission label precisely.
Never attempt to mix different refrigerant types, as internal oil chemical compositions are completely incompatible.
Step 2: Locate the AC Low-Side Service Port
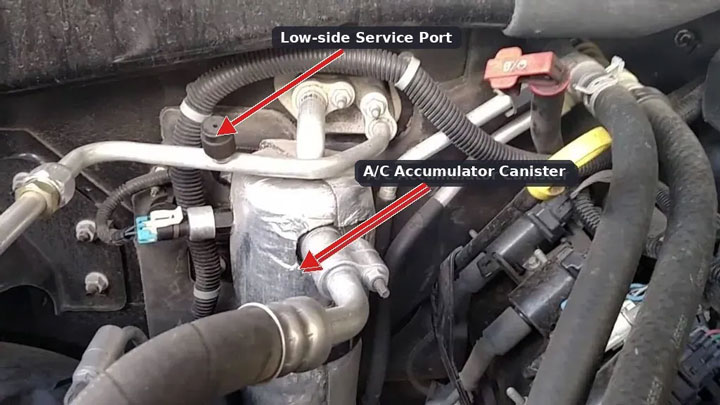
Search the passenger side of the engine bay near the firewall to locate the aluminum AC plumbing lines.
You will see two distinct aluminum lines: a smaller high-pressure line and a larger diameter low-pressure suction line.
Locate the black or blue plastic protective dust cap marked with the letter “L” on the larger aluminum line.
You can quickly confirm your chevy silverado ac low side service port location by tracing the line back toward the aluminum accumulator tank.
Unscrew the plastic dust cap counterclockwise and store it in a safe spot so debris does not enter the Schrader valve stem.
Step 3: Connect the Quick-Coupler Gauge Hose to the Low-Side Port
Inspect the rubber O-ring seal inside the quick-coupler fitting attached to your charging hose gauge assembly.
Pull back the spring-loaded outer locking sleeve on the quick-coupler fitting.
Push the coupler firmly onto the low-side service valve until you hear a solid, mechanical locking click.
Release the outer collar and pull gently upward to confirm the coupler is locked securely onto the fitting.
Do not attach the charging coupler to the high-side service port, as quick-coupler fitting sizes are deliberately manufactured in different diameters to prevent dangerous misconnection.
Step 4: Take Initial Static Pressure Readings with the Engine Running
Start your Silverado’s engine and set the cabin HVAC temperature controls to maximum cold.
Set the blower fan speed to high and ensure the cabin air recirculation button is actively illuminated.
Look at the engine bay drive belt to verify that the central hub of the chevy silverado ac compressor clutch is actively spinning.
Check the inline gauge dial to read the system operating low-side pressure while the compressor clutch is engaged.
Compare your initial gauge reading against the current outdoor ambient air temperature using an accurate pressure chart.
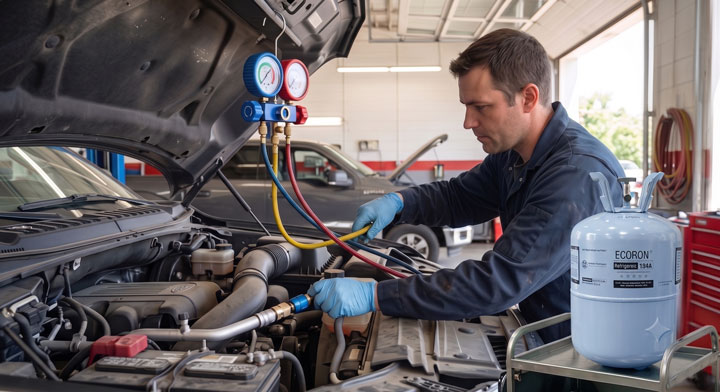
Step 5: Safely Charge Refrigerant into the Low-Side System
Shake the refrigerant can thoroughly for 30 seconds to mix internal lubricant additives evenly.
Hold the canister vertically upright at the 12 o’clock position to prevent liquid refrigerant from surging into the compressor intake.
Squeeze the trigger handle on the charging hose to allow gaseous refrigerant to enter the low-pressure suction line.
Rock the can slowly between the 12 o’clock and 3 o’clock positions every 10 seconds while charging.
Release the trigger intermittently every 15 seconds to allow system pressures to equalize so you can read accurate dynamic PSI on the gauge dial.
Step 6: Monitor Cabin Vent Temperature and Disconnect Charging Equipment
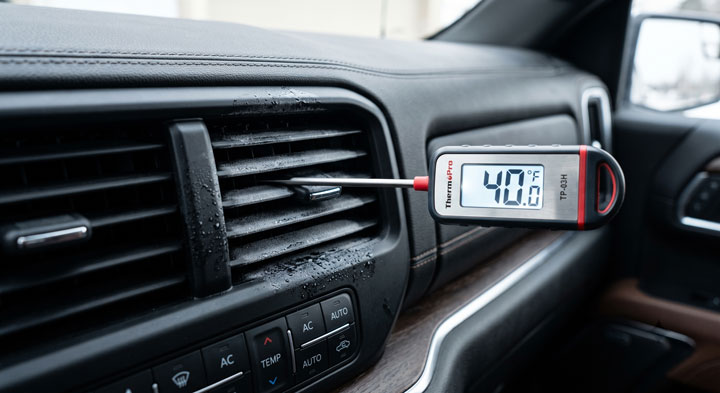
Insert your digital thermometer probe into the center driver-side dashboard air vent.
Continue charging slowly until cabin vent discharge temperatures drop into the target range of 38°F to 45°F.
Stop adding refrigerant immediately once the low-side gauge needle rests comfortably in the green operational zone for your ambient temperature.
Release the trigger, pull back the quick-coupler outer locking sleeve, and disconnect the hose from the service port.
Reinstall the plastic dust cap onto the low-side service valve to prevent moisture and road dirt contamination.
Bryan’s Garage Expert Tip: Proper automotive cooling system repair requires accurate diagnostics rather than guesswork. If you want to explore more professional truck care guides, visit Bryan’s Garage for trusted DIY mechanical advice.
Decoding Refrigerant Specifications: R-134a vs. R-1234yf and System Capacities
Understanding the transition between automotive chemical refrigerants is essential for maintaining modern truck HVAC systems.
For over two decades, General Motors utilized R-134a (tetrafluoroethane) as the standard working fluid across all full-size truck platforms.
R-134a offers excellent thermal transfer efficiency and operates under predictable high-side and low-side vapor pressures.
However, global environmental mandates led automotive manufacturers to transition to low Global Warming Potential (GWP) gases.
Starting around the 2017 model year, GM began phasing in hydrofluoroolefin R-1234yf refrigerant on select Silverado trim levels.
If you are sourcing freon for 2017 chevy silverado models, always cross-reference your under-hood emission sticker before buying supplies.
R-1234yf breaks down much faster in the upper atmosphere, reducing its environmental footprint significantly compared to legacy gases.
However, R-1234yf requires specialized synthetic PAG oil formulations and distinct service port coupler geometry.
Never attempt to force an R-134a quick-coupler onto an R-1234yf service port fitting.
Overcharging either system reduces cooling efficiency because excessive gas prevents liquid refrigerant from fully evaporating inside the cabin core.
Always measure total gas weight in ounces or grams when performing a complete system evacuation and recharge.
Exceeding factory mass capacity by as little as two ounces can raise head pressures dramatically, causing compressor clutch thermal shutdown.

Mechanical Diagnostics: Understanding Pressure Readings, Ambient Temps, and Component Failure Modes
Diagnosing an automotive air conditioning system requires evaluating thermodynamic pressure curves against external temperature.
As ambient air temperature rises, static and dynamic gas pressures inside sealed aluminum lines increase naturally.
On an 80°F afternoon, a properly charged low-side system typically operates between 30 PSI and 40 PSI while the compressor runs.
If low-side gauge pressure drops below 20 PSI, the system is low on gas, often caused by minor shaft seal leaks.
When low-side pressure drops too low, the chevy silverado ac low pressure switch opens its electrical circuit to disengage the compressor clutch.
This safety mechanism prevents the compressor from running dry without adequate circulating PAG oil protection.
Conversely, if both high-side and low-side pressures remain equal when the AC is switched on, the compressor clutch is not engaging.
Check for blown HVAC fuses, faulty clutch relays, or damaged electrical wiring harnesses at the front of the engine.
If low-side pressure spikes abnormally high while high-side pressure remains low, an internal valve failure inside the compressor may be present.
A severe restriction, such as a clogged expansion valve, will cause low-side vacuum drops alongside soaring high-side pressures.
Performing a chevy silverado ac orifice tube replacement is often necessary if metallic debris from a failing compressor plugs the internal plastic filter mesh.
Inspecting external airflow across the chevy silverado ac condenser is equally critical for maintaining low operating pressures.
Bent condenser fins or accumulated road dirt reduce heat exchange capacity, resulting in warm vent temperatures during idle.
| Silverado Generation & Model Years | Factory Refrigerant Type | Total System Freon Capacity (Weight) | Standard Factory Oil Specification |
|---|---|---|---|
| GMT800 (1999 – 2002) Single AC | R-134a | 1.88 lbs (30.0 oz / 850 grams) | PAG 150 Viscosity Synthetic Oil |
| GMT800 (2003 – 2006) Single AC | R-134a | 1.60 lbs (25.6 oz / 725 grams) | PAG 46 Viscosity Low Molecular Oil |
| GMT900 (2007 – 2013) All Models | R-134a | 1.60 lbs (25.6 oz / 725 grams) | PAG 46 Viscosity Synthetic Oil |
| K2XX (2014 – 2016) All Trims | R-134a | 1.50 lbs (24.0 oz / 680 grams) | PAG 46 Viscosity Synthetic Oil |
| K2XX (2017 – 2018) Split Spec | R-134a or R-1234yf | 1.43 lbs (22.9 oz / 650 grams) | PAG 46 / yf Specific Synthetic Oil |
| T1XX (2019 – 2026+) All Trims | R-1234yf | 1.20 lbs (19.2 oz / 545 grams) | PAG 46yf Specialized Low-GWP Oil |
Comprehensive Chevy Silverado Freon Capacity and System Specification Chart
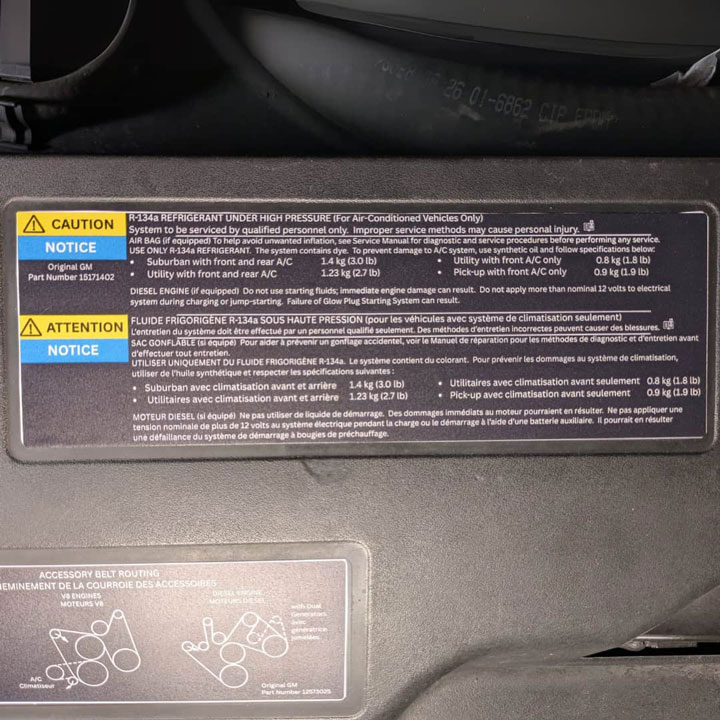
Knowing your exact truck specification prevents undercharging or overcharging during routine climate control maintenance.
Consulting verified factory specs is mandatory because refrigerant weight requirements decreased as heat exchangers became more efficient.
Reviewing a chevy silverado freon capacity chart ensures you purchase the exact weight of gas required for a complete fill.
Notice how older GMT800 trucks held nearly 30 ounces of gas, whereas modern T1XX platforms hold under 20 ounces.
This reduction occurs because modern micro-channel condensers offer significantly greater surface area in a smaller physical footprint.
When recharging with small 12-ounce retail cans, calculate your total mass additions carefully.
Adding two full 12-ounce cans into a modern 19-ounce system will result in an immediate overcharge condition.
Always subtract residual can weight using a digital kitchen scale for absolute charging precision.
Practical Application Guide: Roadside Diagnostic Checks and Leak Detection Protocols
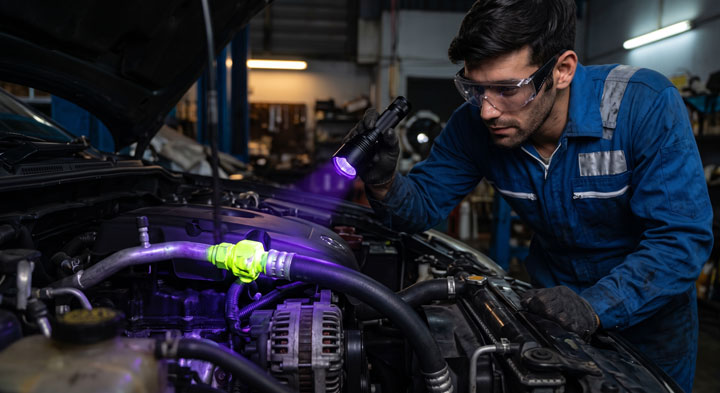
If your Silverado’s air conditioning system loses cold air rapidly after a recharge, a physical leak is present.
Refrigerant gas is odorless and invisible under normal atmospheric conditions, making small pinhole leaks hard to spot visually.
Begin your inspection by examining all aluminum line crimp joints for dark, oily dirt accumulation.
When gas leaks from a fitting, it carries synthetic PAG oil with it, creating a sticky residue that attracts road dust.
Injecting fluorescent ultraviolet (UV) leak detection dye into the low-side port offers a reliable diagnostic solution.
Add one small dose of concentrated UV dye into the low-side charging hose prior to adding gas.
Run the engine with the AC turned on high for 15 minutes to circulate dye through all lines, coils, and valves.
Darken your garage workspace and shine a high-intensity UV blue light along all aluminum plumbing runs.
Inspect the front face of the condenser behind the front grille, looking for bright yellow-green glowing spots.
Common leak locations on high-mileage trucks include the front compressor shaft seal and the aluminum condenser side welds.
Check the rubber Schrader valve cores inside both service ports using a soapy water solution to spot tiny air bubbles.
If bubbles appear inside the service port neck, use a valve core tool to tighten the brass core valve insert slightly.
Critical Risks and Common Mistakes to Avoid When Recharging Silverado AC Systems
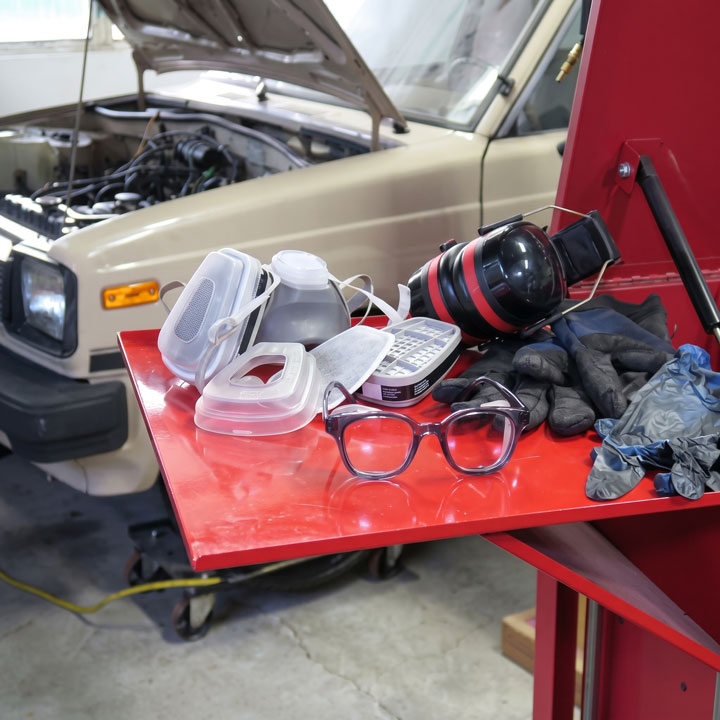
Executing an AC recharge without following proper safety procedures can lead to mechanical failure or physical injury.
Never invert a can of refrigerant upside down while charging into the low-side service valve.
Inverting the can forces liquid refrigerant directly into the compressor suction port, causing catastrophic hydraulic lock damage.
Compressors are engineered exclusively to pump vapor gas, not non-compressible liquids.
Always wear impact-rated safety glasses when connecting or disconnecting quick-coupler service fittings.
Escaping refrigerant gas rapidly expands upon contact with ambient air, reaching temperatures as low as -29°F.
Direct exposure to spraying refrigerant liquid will instantly cause severe frostbite burns to exposed skin and eyes.
Avoid using leak-sealer additives contained in cheap, off-the-shelf retail recharge cans.
Chemical leak sealers react directly with atmospheric moisture, expanding into a sticky gummy substance inside the lines.
This gummy residue clogs tiny internal passages inside the expansion valve, receiver-drier, and compressor control valves.
Professional shop recovery machines can also be contaminated and damaged by systems filled with chemical leak sealers.
Fixing leaks mechanically by replacing worn O-rings or damaged aluminum lines is always safer than using stop-leak chemicals.

“I’ve driven a Silverado for 5 years and didn’t know this existed.”
— The most common reaction when this article is shared
Did you know there’s a hidden storage compartment behind your rear seats? Or the button combo that switches your digital cluster to a completely different layout?
bryansgarage.com · July 28, 2026
Frequently Asked Questions About Chevy Silverado AC Recharge
How do I know if my Chevy Silverado AC needs a recharge or a new compressor?
If your cabin vents blow lukewarm air but your AC compressor clutch still engages and spins, your system is likely low on refrigerant gas. However, if the compressor hub remains completely stationary or makes loud grinding noises when turned on, an electrical or internal mechanical compressor failure is present.
Can I mix R-134a and R-1234yf refrigerants in my Silverado?
No, you should never mix R-134a and R-1234yf refrigerants under any circumstances. The two gases utilize different chemical compositions, require distinct synthetic compressor oils, and operate under different thermal pressure curves. Mixing gases will damage your compressor and degrade cooling performance.
What should the PSI gauge reading be on a low-side AC port?
On a standard 80°F to 85°F ambient day, proper low-side operating pressure typically falls between 30 PSI and 40 PSI while the compressor clutch is actively engaged. Always consult an ambient temperature pressure chart, as correct target PSI varies based on outdoor weather conditions.
Why does my AC blow cold while driving but warm up when idling?
Warm vent temperatures at idle usually indicate inadequate airflow across your front AC condenser coil. Check if your engine cooling fan clutch or electric radiator fans are operating properly, and clear away any leaves or road debris blocking the front grille assembly.
Is it normal to lose a small amount of AC freon over time?
Over several years of operation, minor gas loss can occur through micro-porous rubber hoses and rotating compressor shaft seals. Losing roughly 0.5 to 1.0 ounce of refrigerant per year is relatively common on older high-mileage vehicles.
Conclusion
Recharging your Chevy Silverado’s air conditioning system is an easy DIY task that restores ice-cold cabin comfort while saving money.
Ready to transform your car maintenance from a stressful chore into a breeze? Explore more tips at Bryan’s Garage. Have questions? Our team can help you find the best solutions for your car problems and avoid costly mechanic visits.
Note: Individual results may vary depending on individual vehicle makes, models, year of manufacture, and overall condition. This article is intended for general automotive reference purposes only and does not replace official manufacturer service manuals or advice from a certified mechanic.