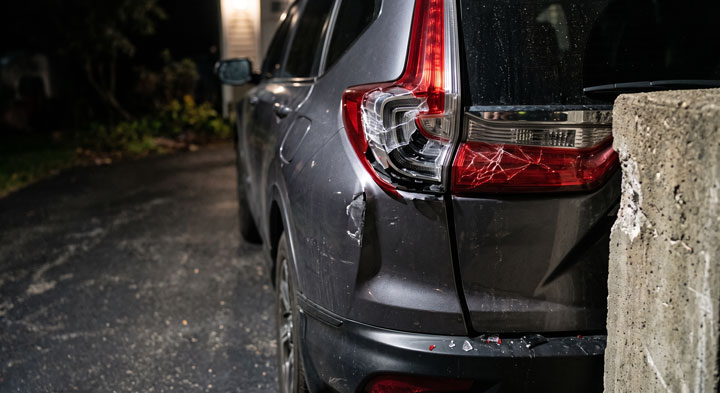
I still remember backing my Honda CR-V into a dark driveway after an exhausting twelve-hour shift, hearing that sickening crunch of plastic against a concrete pillar, and getting hit with a $450 repair estimate from the local dealership the next morning.
That frustrating moment led me to launch Team Bryan’s Garage, where we help everyday drivers master simple DIY repairs, save hard-earned cash, and confidently tackle installing a new honda crv tail light assembly without paying outrageous labor fees.
Honda CRV Tail Light Assembly Replacement Housing and Cost Guide
In This Article
Step-by-Step Housing Replacement: Complete removal and installation walkthrough for all CR-V generations.
Cost Breakdown & Parts Guide: OEM vs. Aftermarket vs. Used housing pricing and labor costs.
Generation-Specific Nuances: Understanding key differences between 3rd, 4th, 5th, and 6th generation CR-Vs.
How to Replace Your Honda CR-V Tail Light Assembly: Step-by-Step DIY Guide
Replacing a damaged rear lighting unit on your crossover is one of the easiest DIY auto repair projects you can perform at home.
You do not need expensive specialty gear or years of professional mechanical experience to achieve dealership-quality results.
Following a structured routine ensures you replace your damaged lens safely without scratching your painted body panels or breaking delicate plastic trim clips.
Before you begin the repair, gather a few basic hand tools to keep the job moving smoothly.
You will need an 8mm socket, a 10mm socket, a socket ratchet extension bar, a plastic trim removal tool, clean microfiber towels, and a pair of protective mechanic gloves.
Honda CRV Tail Light Assembly Replacement Housing and Cost Guide
Step 1: Park Securely and Disconnect the Negative Battery Terminal
Park your Honda CR-V on a flat, level surface, engage the parking brake, and turn off the ignition completely.
Pop the front hood and locate the 12-volt starter battery in the engine compartment.
Use a 10mm wrench to loosen the nut on the negative battery terminal cable end.
Lift the cable off the negative terminal post and tuck it securely to the side to prevent accidental electrical short circuits while working on rear vehicle wiring.
This simple safety step protects your car’s body control module from unexpected voltage spikes during the swap.
Step 2: Open the Rear Liftgate and Access the Mounting Fastener Covers
Walk to the back of the SUV and lift the rear tailgate completely to expose the inner plastic trim panels next to the tail lamp lens.
Locate the small plastic access covers or screw caps positioned directly alongside the inner edge of the light housing.
Insert your plastic trim removal tool underneath the edge of these small cosmetic caps.
Gently pry outward to unsnap the caps without gouging the surrounding plastic interior trim or chipping clear coat paint.
Set the small plastic caps aside in a safe spot so you do not misplace them during assembly.
Step 3: Unbolt the Retaining Screws and Anchors
Inspect the exposed metal bracket area inside the hatch jamb to locate the primary mounting bolts.
Most Honda CR-V model years utilize two or three hex bolts, typically 8mm or 10mm in size, which double as Phillips-head screws.
Attach your 8mm or 10mm socket to your ratchet and carefully turn each retaining bolt counterclockwise.
Support the outer plastic light lens with your free hand while loosening the final bolt so the housing does not drop onto the bumper.
Store the factory mounting bolts inside your vehicle cup holder or a magnetic parts tray for safekeeping.
Step 4: Disengage the Side Guide Pins and Extract the Old Housing
With the metal bolts removed, the tail lamp structure remains held in place by plastic locator alignment pins pushed into rubber grommets on the body quarter panel.
Grasp the top and bottom exterior edges of the lamp housing firmly with both hands.
Pull the entire housing straight back toward the rear of the vehicle, applying steady and parallel pressure.
Avoid twisting or prying the assembly sideways, as angled force can snap the plastic locator guide posts off the body shell.
Once the guide pins disengage from the rubber grommets, the light unit will slide outward, exposing the main wiring harness.
Honda CRV Tail Light Assembly Replacement Housing and Cost Guide
Step 5: Disconnect the Electrical Harness and Transfer the Bulbs
Hold the detached light housing steady while locating the electrical pigtail connector on the rear mounting plate.
Press the center release tab on the wiring harness plug firmly with your thumb and pull the harness connector away from the socket.
If your model year uses separate twist-lock bulb sockets, rotate each socket counterclockwise a quarter-turn to pull the bulb harness free from the housing.
If your replacement unit is a bare shell, transfer your existing brake, turn signal, and reverse bulbs directly into the new housing sockets.
Inspect the rubber socket seals for cracks or hardening before reinstalling the bulb sockets into the new housing unit.
Always check your vehicle manual to verify your exact honda crv tail light bulb size before installing a traditional housing.
Step 6: Mount the New Housing Assembly and Reinstall Fasteners
Line up your new housing unit and reconnect the main electrical harness plug until you hear a distinct plastic click locking tab snap into place.
Position the rear locator alignment pins on the housing directly over the rubber body grommets on the quarter panel.
Push the light unit straight forward toward the front of the vehicle until the housing seats flush against the body sheet metal.
Thread the factory mounting bolts into the structural threaded holes by hand first to avoid cross-threading the fine metal threads.
Tighten the bolts firmly using your socket ratchet, taking care not to overtighten and crack the plastic mounting ears.
Snap the plastic cosmetic trim caps back over the bolt recesses and reconnect your negative battery terminal under the hood.
Test all lighting functions, including parking lights, hazard signals, brake illumination, and reverse lights, to verify proper operation.
At Bryan’s Garage, we recommend applying a small bead of dielectric grease inside the electrical wiring harness connector terminals during installation to repel moisture and stop corrosion before it starts.
If you want to read our baseline article on honda crv tail light replacement, you will find additional model-year breakdowns there.
Honda CR-V Rear Light Assembly Cost Breakdown & Parts Comparison
Understanding the full spectrum of replacement parts costs helps you choose the best component for your repair budget.
The total expense of fixing a broken or foggy tail lamp housing depends on whether you select genuine OEM parts, aftermarket units, or recycled salvage components.
Professional labor fees at dealership service centers can quickly double the total price tag of an otherwise inexpensive component swap.
Factory fitment, exact color match, high UV resistance, 12-month dealer warranty.
Aftermarket (CAPA Certified)
$75 – $180 per side
Direct fit, cost-effective, high availability, meets DOT/SAE safety standards.
Used / Salvage Assembly
$45 – $110 per side
Budget-friendly, original factory glass quality, may show minor cosmetic wear or lens haze.
Honda CRV Tail Light Assembly Replacement Housing and Cost Guide
Selecting an aftermarket honda crv tail light housing unit can keep your total repair expense under one hundred dollars if you do the work yourself.
If you prefer factory original components, buying an OEM part online from a wholesale Honda supplier saves significantly compared to dealer counter retail pricing.
If you take your vehicle to an independent repair shop or dealership, expect to pay between $80 and $150 in extra labor fees per hour.
Because the physical swap takes less than thirty minutes, paying a shop over $100 for labor is usually an unnecessary expense.
Buying a reliable used honda crv tail light assembly from a certified auto recycler is another smart way to save money while retaining factory plastic quality.
Evaluating your options carefully ensures you achieve a seamless, water-tight finish without overspending on basic vehicle maintenance.
Generation-Specific Nuances: 3rd, 4th, 5th, and 6th Gen CR-V Models
Honda has redesigned the rear styling of the CR-V across various production generations, introducing structural changes to the lamp assemblies.
Understanding these generational differences prevents you from ordering incorrect parts or damaging hidden body retention clips.
Check your owner documentation or review factory honda crv specs to confirm whether your trim uses full LED or halogen lamps.
3rd Generation (2007 – 2011 Models)
Third-generation CR-V models feature iconic vertical pillar tail light housings extending upward along the tailgate opening.
These units rely entirely on traditional incandescent bulbs for brake, turn, and tail light functions.
Two 8mm bolts secure the inner edge inside the hatch door jamb, while two plastic friction clips anchor the outer upper section.
When removing these tall vertical housings, pull straight backward without tilting the top section outward to keep the long plastic guide pins intact.
Fourth-generation models maintain the signature vertical pillar design but introduce more complex interior plastic reflector geometries.
Accessing the mounting bolts requires removing small plastic cover plates located along the interior hatch jamb using a thin trim tool.
The upper portion of the housing uses a specialized rubber-isolated locator peg that can bind if dust and road grime collect inside the socket.
Applying a tiny drop of spray lubricant around the rubber grommet area makes pulling the old assembly off the quarter panel much easier.
Take care not to overtighten the mounting screws during reassembly, as the plastic mounting ears on 4th Gen housings are relatively brittle.
5th Generation (2017 – 2022 Models)
Fifth-generation CR-Vs transitioned to a dramatic L-shaped rear lighting signature extending into the rear liftgate door itself.
These models feature a split two-piece tail light design: one primary housing mounted on the rear body quarter panel and an inner sub-housing mounted on the tailgate hatch.
Higher trim levels (EX-L, Touring) incorporate sealed, non-serviceable LED light pipes and brake circuits into the main body housing.
If an LED strip fails on a 5th Gen model, you cannot simply swap a light bulb; you must complete a full honda crv tail light housing replacement.
Always verify whether your specific trim level uses halogen bulbs or factory integrated LED boards before purchasing replacement units.
Honda CRV Tail Light Assembly Replacement Housing and Cost Guide
6th Generation (2023 – Present Models)
Sixth-generation CR-V models feature sleek, modern vertical LED light blades with dark-tinted inner housings.
These units integrate sophisticated electronic control circuits connected directly to the vehicle’s central CAN-bus communication network.
Removing the housing requires removing inner access panel covers inside the trunk side carpet liner to reach the lower bracket bolts.
The main wiring harness uses a multi-pin weather-pack connector equipped with a secondary locking slider lever.
Always disconnect the negative battery cable before unplugging 6th Gen housings to prevent triggering digital lighting system fault codes.
Troubleshooting Electrical Faults and Wiring Failures After Installation
Installing a fresh housing usually fixes your rear lighting problems, but unexpected electrical issues can sometimes pop up afterward.
If your brake light, turn signal, or running light fails to illuminate after installing a new assembly, follow these step-by-step diagnostic checks.
If your new light fails to turn on, you may need to inspect the honda crv tail light wiring for bent pins or damaged grounds.
Maintaining your rear lights is just as critical for night visibility as keeping your front honda crv headlight assembly clear and aligned.
Checking for Bent Pins inside the Electrical Harness Connector
Honda CRV Tail Light Assembly Replacement Housing and Cost Guide
The most common cause of complete lighting failure on a newly installed tail lamp unit is a bent terminal pin inside the multi-pin connector plug.
Unplug the wiring harness from the housing socket and shine a flashlight into the male connector block.
Inspect all small metal pins to ensure they are perfectly straight and parallel to one another.
If a pin has accidentally bent sideways during installation, use a pair of needle-nose pliers or a small dental pick to carefully straighten it.
Align the plug carefully before reconnecting it to prevent bending the pins again.
Testing for Blown Fuses in the Engine Under-Hood Fuse Box
If neither the left nor right running light illuminates, a short circuit during installation may have blown a system fuse.
Locate the main fuse box under the vehicle hood on the driver’s side of the engine bay.
Remove the plastic fuse box lid and locate the diagram printed on the underside of the cover.
Find the fuse labeled “TAIL”, “STOP”, or “SMALL LT”, which typically uses a 10-amp or 15-amp mini blade fuse.
Pull the fuse using the plastic fuse puller tool inside the box and inspect the internal metal wire bridge.
If the thin metal wire inside the plastic fuse body is broken or melted, replace it with a new fuse of the exact same amperage rating.
Addressing LED Hyper-Flashing Issues
If you upgraded a older halogen CR-V model with aftermarket LED light housings, you might notice your turn signals blinking twice as fast as normal.
This rapid blinking phenomenon, known as hyper-flashing, happens because low-draw LED circuits trick the turn signal flasher relay into thinking a bulb is burned out.
To fix hyper-flashing, install plug-and-play load resistors inline with the turn signal power and ground wires behind the housing.
Mount load resistors directly to the metal body sheet metal because they get quite warm during extended turn signal operation.
Alternatively, replace your factory turn signal flasher module under the dashboard with an LED-compatible electronic flasher relay.
Practical Application Guide: Sealing Gaskets and Moisture Prevention
Honda CRV Tail Light Assembly Replacement Housing and Cost Guide
Preventing water intrusion into your new rear light assembly is crucial for ensuring long-term performance and clarity.
Water droplets, heavy condensation, or pooling water inside a tail light lens look bad and can short out electrical sockets.
Taking a few extra minutes to seal your light housing properly during installation prevents moisture problems down the road.
Inspect the thick foam or rubber seal gasket mounted on the back side of your replacement light housing before bolting it to the vehicle body.
Ensure the rubber gasket sits fully seated inside its plastic channel without any twists, gaps, or pinches.
Wipe down the painted sheet metal mounting surface on the car body using isopropyl alcohol to remove hidden dirt and grit.
Cleaning this surface ensures the new rubber seal compresses evenly against smooth metal, creating a tight barrier against rain and car wash spray.
If you notice tiny fog droplets inside a brand-new housing on humid days, do not panic right away.
Modern light housings feature small, screened breather vents on the back cover to equalize internal temperature and air pressure.
Minor atmospheric fogging usually clears up on its own once you drive the car with the lights turned on for twenty minutes.
However, if standing liquid water collects in the bottom of the lens, the main perimeter seal is compromised and requires replacement.
Overcoming Risks & Common DIY Installation Pitfalls
While replacing a tail light housing is a straightforward job, avoiding common mistakes keeps your repair quick and headache-free.
Knowing what to look out for helps you protect your car’s finish and save money on replacement fasteners.
One common mistake DIYers make is using metal screwdrivers to pry plastic trim covers off body panels.
Metal tools can easily chip painted edges, inviting rust, or snap brittle plastic trim tabs off hatch cover panels.
Always use dedicated nylon plastic trim tools when prying cosmetic caps off car body panels.
Another frequent error is overtightening the metal mounting bolts when securing the new assembly back onto the vehicle frame.
The mounting tabs on tail light housings are made from molded plastic that can crack if subjected to excessive torque.
Tighten the bolts until they feel snug against the body bracket, then add just a quarter-turn more to compress the rubber seal.
Never force or yank a light housing sideways if it feels stuck to the quarter panel during removal.
Yanking at an angle can snap the plastic alignment locator pins off the housing structure, leaving broken plastic studs trapped inside the rubber body grommets.
If a housing feels stuck, apply firm, even pressure straight back toward the rear bumper until the pins release cleanly.
Working on cold plastic parts in sub-freezing temperatures increases the risk of snapping plastic tabs or trim clips.
If you are tackling this repair in cold winter weather, warm up the garage space first or use a handheld hair dryer to gently warm the plastic trim before prying on clips.
Honda CRV Tail Light Assembly Replacement Housing and Cost Guide
Frequently Asked Questions (FAQ)
How long does it take to replace a Honda CR-V tail light housing?
Replacing a single tail light housing on a Honda CR-V typically takes between 15 and 30 minutes for a DIY beginner using basic hand tools.
Can I just replace the cracked outer glass lens without replacing the entire housing?
No, modern tail light assemblies feature plastic outer lenses that are factory-sealed to the rear reflector housing using permanent acoustic welds.
Attempting to cut open and reseal just the outer clear lens usually leads to water leaks and persistent condensation, so replacing the complete housing assembly is recommended.
Is it legal to drive with a cracked tail light lens if the bulbs still work?
In most jurisdictions, driving with a cracked or broken tail light lens that emits white light backward is illegal and can result in a traffic citation.
Additionally, cracked plastic allows rainwater to seep into internal electrical sockets, potentially blowing fuses and causing complete tail lamp circuit failure.
Does a new replacement tail light assembly come with bulbs included?
Some complete OEM and high-end aftermarket assemblies ship pre-assembled with new bulbs and wiring sockets, while bare housing units require you to transfer your existing bulbs.
Always review the product description carefully before ordering so you know whether you need to buy extra replacement bulbs separately.
How do I stop moisture from getting inside my newly installed light housing?
Ensure the thick foam perimeter seal is aligned properly and seated flat against a clean, dirt-free sheet metal mounting surface on the car body before tightening mounting bolts.
🟢 Going viral on CR-V Owners Club & Reddit
“I’ve driven a CR-V for 4 years and didn’t know this existed.” — The most common reaction when this article is shared
15
features
1997+
models
15 min
read
Free
no signup
Did you know your backup camera has a hidden top-down ‘drone view’? Or that your cruise control automatically downshifts on steep mountain hills to save your brakes?
Replacing a damaged honda crv tail light assembly yourself is a fast, easy, and affordable repair that restores your crossover’s appearance, safety, and road legality.
By following our guide and choosing the right replacement housing, you can skip expensive dealership labor fees while getting your vehicle back in top shape.
Ready to transform your car maintenance from a stressful chore into a breeze? Explore more tips at Bryan’s Garage.
Have questions? Our team can help you find the best solutions for your car problems and avoid costly mechanic visits.
Note: Individual results may vary depending on individual vehicle makes, models, year of manufacture, and overall condition. This article is intended for general automotive reference purposes only and does not replace official manufacturer service manuals or advice from a certified mechanic.