Ford F150 Battery Monitor Reset Procedures and Tips

I still remember installing a fresh, expensive AGM battery in my truck only to watch my radio turn off within seconds and Auto Start-Stop fail completely three days later.

Feeling utterly defeated by mysterious dashboard warnings after spending hard-earned money left me searching for real mechanical answers.

At Team Bryan’s Garage, we created this ford f150 battery monitor reset guide to help you calibrate your truck’s smart charging system, save hundreds on dealership fees, and restore full electrical power at home.
Ford F150 Battery Monitor Reset Procedures and Tips

In This Article

  • How to Perform a Ford F150 Battery Monitor Reset: Step-by-Step DIY Guide
  • The Engineering Behind Ford’s Battery Management System (BMS) and Hall Sensors
  • Why Skipping BMS Reset Causes Premature Battery Failure and Electrical Faults
  • Cost Analysis: DIY Manual Reset vs. FORScan vs. Dealership Service Charges
  • Battery Replacement Best Practices & AGM Charging Profiles
  • Common DIY Maintenance Pitfalls and How to Protect Your F-150 Charging System
🔴 MOST OWNERS NEVER FIND THIS

Your F-150 has a secret slot that starts the truck when your key fob dies.
And 8 other things Ford never told you.

Dead fob fix · Remote window trick · 7.2 kW generator hiding in your bed · Tailgate ladder · and 5 more.

▶ Read Now — Show Me Everything

bryansgarage.com · Bryan Mark · 2026

Ford F-150 Hidden Features

How to Perform a Ford F150 Battery Monitor Reset: Step-by-Step DIY Guide

Performing a reset on your truck’s battery monitoring system is an essential maintenance step whenever you replace the 12-volt battery.

Modern Ford trucks use a Body Control Module (BCM) that tracks battery age, temperature, and state of charge to control alternator output.

Resetting the system zeroes out the internal battery age counter, forcing the alternator to apply a fresh charging profile instead of an aggressive aged profile.

Prerequisites and Required Conditions

Before initiating the reset procedure, verify that your new battery is fully installed and secured firmly inside the engine bay.

  • New Battery Installed: Verify that terminal clamps are torqued tightly to 44 in-lbs and free of corrosion.
  • Access to Driver Seat: Close all doors, hood, and tailgate completely before starting the button sequence.
  • Key Fob / Ignition Key: Have your key fob inside the vehicle or insert the key into the ignition cylinder.
  • Optional Equipment: An OBD2 scan tool with FORScan software or an advanced diagnostic tablet if manual resetting fails.
  • Step 1: Turn Ignition to RUN Mode Without Starting Engine
    • Sit in the driver seat and close all truck doors completely.
    • If your truck uses a traditional physical key, turn the ignition key to Position II (ON/RUN) without stepping on the brake pedal.
    • If your truck features a push-button start system, press the Start button once without depressing the brake pedal.
    • Verify that your dashboard instrument cluster lights up completely while the engine remains turned off.
    • Ensure that headlights, radio, and climate control blowers are turned off to reduce background electrical draw during calibration.
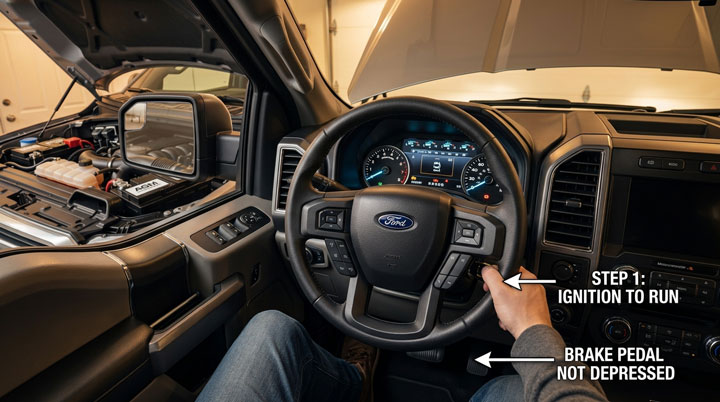
Step 1: Turn Ignition to RUN Mode Without Starting Engine
  • Step 2: Flash High Beams Five Times in Rapid Succession
    • Locate the multi-function turn signal lever on the left side of the steering column.
    • Pull the lever toward you five times continuously to flash the high-beam headlights five times.
    • Execute these five pulls smoothly within a four-second time window.
    • Ensure each high beam flash illuminates fully on the dashboard indicator light before releasing the lever.
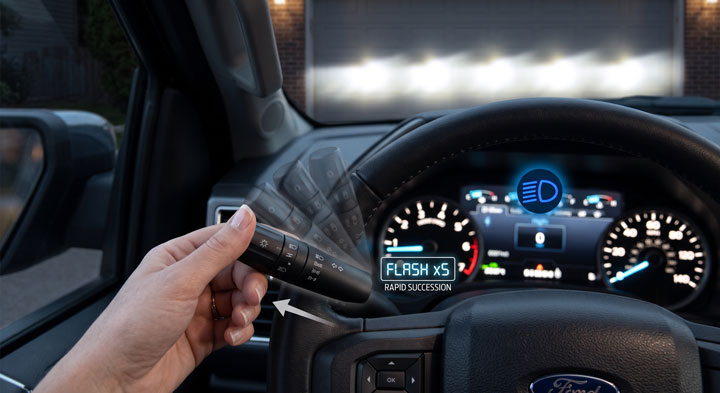
Step 2: Flash High Beams Five Times in Rapid Succession
  • Step 3: Depress and Release the Brake Pedal Three Times
    • Immediately after completing the fifth high beam flash, move your foot to the brake pedal.
    • Press and release the brake pedal firmly three times in rapid succession within ten seconds.
    • Ensure the brake pedal travels through its full range of movement during each press.
    • Keep your eyes focused on the red battery warning symbol located on your instrument cluster display.
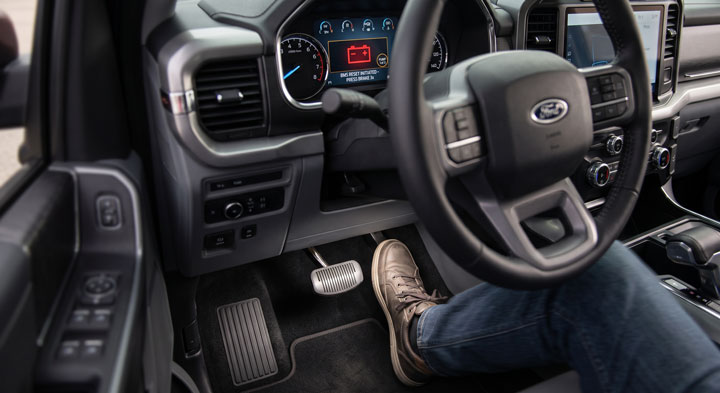
Step 3: Depress and Release the Brake Pedal Three Times
  • Step 4: Confirm Calibration via Battery Warning Light Flashes
    • Wait approximately five to ten seconds after releasing the brake pedal for the BCM to process the command.
    • Watch the red battery icon on your dashboard illuminate and flash three times slowly.
    • This three-flash visual confirmation verifies that the Body Control Module has successfully reset the battery age counter to zero days.
    • Turn off the ignition completely once the confirmation flashes finish.
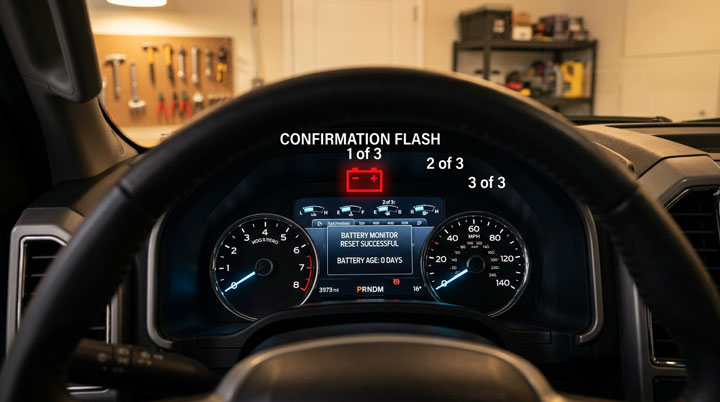
Step 4: Confirm Calibration via Battery Warning Light Flashes
  • Step 5: Perform FORScan / Scan Tool Reset for Alternate Verification
    • If your vehicle does not display confirmation flashes, plug an OBD2 adapter into the diagnostic port under the steering column.
    • Open FORScan software on your laptop or mobile device and connect to the vehicle network.
    • Navigate to the Service Functions tab and select the Body Control Module (BCM) menu.Highlight the option labeled Reset Battery Monitoring System and click Execute.
    • Follow the on-screen prompts to clear stored battery age data and recalibrate the current sensor.
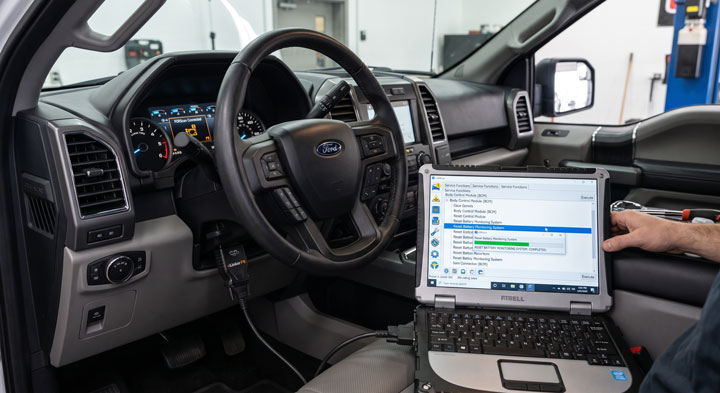
Step 5: Perform FORScan / Scan Tool Reset for Alternate Verification
  • Step 6: Allow Eight Hours of Undisturbed Sleep Mode Calibration
    • Park your truck in a secure location and lock all doors using the key fob.
    • Leave the vehicle parked undisturbed for at least eight hours without unlocking doors or opening the hood.
    • During this silent sleep period, the Hall-effect battery monitor sensor measures static resting voltage and recalculates state of charge.
    • Completing this silent sleep cycle restores full operation to Auto Start-Stop and intelligent accessory power management features.

Step 6: Allow Eight Hours of Undisturbed Sleep Mode Calibration

Completing this simple reset procedure protects your fresh battery investment and keeps all intelligent electrical features working seamlessly.

For more expert automotive diagnostic tutorials and money-saving repair guides, explore our full library at Bryan’s Garage.

The Engineering Behind Ford’s Battery Management System (BMS) and Hall Sensors
Ford F150 Battery Monitor Reset Procedures and Tips

Understanding why modern Ford pickups require a manual software reset demands examining how the intelligent charging system operates.

Beginning in the 2011 model year, Ford Motor Company introduced the Battery Management System across the half-ton truck fleet.

Unlike older mechanical alternators that produced a fixed 14.4 volts whenever the engine ran, modern smart alternators modulate voltage dynamically.

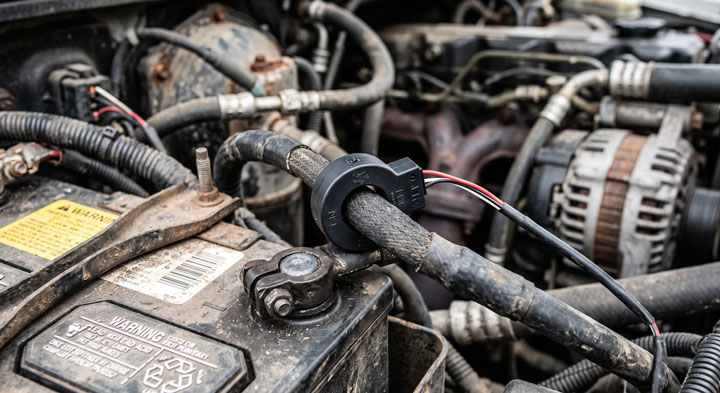
The core component of this smart system is a small ring-shaped sensor attached directly around the negative battery terminal cable.

This component is a Hall-effect current sensor that measures precise micro-amp electrical current entering and exiting the battery post.

The sensor sends real-time analog signals to the Body Control Module regarding battery state of charge, temperature, and internal resistance.

As a lead-acid or Absorbent Glass Mat (AGM) battery ages over three to five years, its internal chemistry degrades.

To compensate for increased internal resistance in an aging battery, the BCM continuously updates a software counter tracking total days in service.

The computer adjusts alternator output voltage upward, applying higher surface charging rates to force energy into degraded lead plates.

When you perform an f150 battery monitor reset, you clear this internal service counter back to day zero.

This allows the Body Control Module to lower ambient alternator charging output, protecting fresh AGM battery separators from thermal stress.

Certified ASE mechanics emphasize that resetting this sensor is just as vital as securing physical terminal clamps when replacing batteries.

Why Skipping BMS Reset Causes Premature Battery Failure and Electrical Faults
Ford F150 Battery Monitor Reset Procedures and Tips

Many truck owners replace their dead 12-volt battery in a driveway and drive away without resetting the Body Control Module.

Skipping this crucial calibration step leads to immediate electrical glitches and drastically shortens the lifespan of your new battery.

When a fresh battery is installed without resetting the computer, the BCM assumes the old, degraded battery is still connected.

The computer continues applying an aggressive charging profile calibrated for an aging battery with high internal resistance.

Subjecting a brand-new AGM battery to continuous over-charging boils internal electrolyte fluid and degrades thin fiberglass mat separators.

Based on diagnostic records across thousands of owner vehicles, un-reset new batteries can lose up to forty percent of their service life.

Furthermore, an un-reset computer continues to believe the battery operates at a low state of charge state.

To preserve cranking power, the BCM automatically shuts down non-essential vehicle accessories to conserve energy reserves.

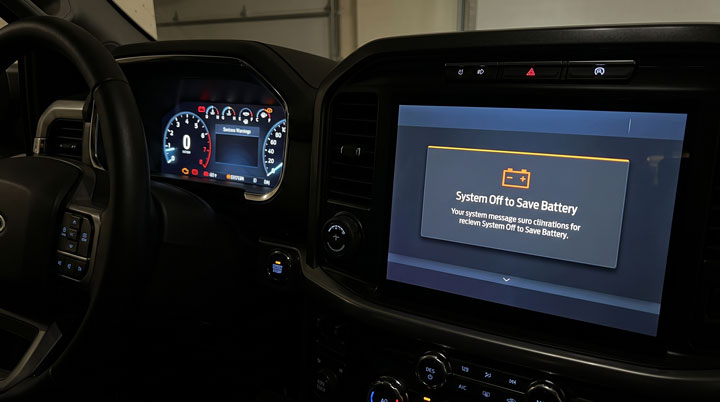
You may notice your touch screen displaying “System Off to Save Battery” messages seconds after shutting off the engine.

Features like Auto Start-Stop, keyless proximity entry, heated seats, and ambient interior lighting will be disabled automatically.

Executing a proper reset battery monitor ford f150 process instantly restores full accessory power and prevents premature battery degradation.


🔧 Hidden F-150 Features — Confirmed by real owners

9 things your F-150 can do — that the dealer never tells you

  • ① The secret slot to start your truck when the fob dies — you’re ignoring it every day
  • ② Hold Unlock for 3 seconds: windows roll down, cabin cools before you step in
  • ③ Pro Power Onboard: 7.2 kW outlet right in your bed — never used it?
  • ④ Hidden tailgate ladder + built-in ruler on the workbench
  • ⑤ Auto shifts to P when you open the door — saved thousands of trucks from rolling away
  • ⑥ + 4 more features the service department never mentions →

See full list with photos →

F-150 Tricks

Cost Analysis: DIY Manual Reset vs. FORScan vs. Dealership Service Charges

Ford F150 Battery Monitor Reset Procedures and Tips

Understanding the financial benefits of performing this quick calibration at home highlights the value of DIY maintenance skills.

Dealership service departments and commercial repair shops charge standard labor rates to register new batteries using factory scan tools.

The table below breaks down realistic cost estimates across different service methods available to truck owners.

Reset Method & OptionEquipment & Tool CostsEstimated Labor ChargesTotal Financial Outlay
DIY Manual Button Sequence$0 (Uses existing key & pedals)$0 (Completed in 2 minutes)$0.00
FORScan OBD2 Laptop Software$35 to $60 (OBD2 adapter cable)$0 (DIY extended license free)$35.00 to $60.00
Independent Auto Repair Shop$0 (Included in shop overhead)$45 to $85 (Diagnostic fee)$45.00 to $85.00
Official Dealership Service Dept$0 (Factory IDS software)$120 to $180 (1 hour labor minimum)$120.00 to $180.00

Choosing the DIY manual button sequence costs absolutely nothing and takes less than two minutes in your driveway.

Investing in a entry-level OBD2 adapter for FORScan software costs around fifty dollars and unlocks professional-grade diagnostic capabilities.

By taking control of simple software maintenance, you save significant money while ensuring your truck receives immediate calibration attention.

Battery Replacement Best Practices & AGM Charging Profiles

Selecting the correct battery chemistry and physically installing it properly ensures maximum reliability from your truck’s charging system.

Modern Ford half-ton trucks feature heavy electrical loads from electric power steering, infotainment screens, and off-road accessories.

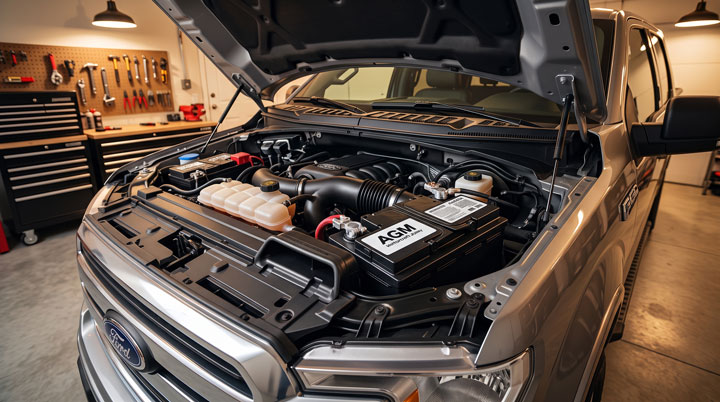
Most late-model trucks come standard with an Absorbent Glass Mat (AGM) battery rather than a standard flooded lead-acid unit.

AGM batteries utilize fiberglass mesh separators saturated in electrolyte fluid, offering superior vibration resistance and faster recharge rates.

When replacing your battery, always match or exceed the factory Cold Cranking Amps (CCA) and Amp-Hour (Ah) ratings.

Standard Group 48 (H6), Group 94R (H7), or Group 49 (H8) AGM battery sizes are used depending on engine trim options.

If you upgrade your battery chemistry from flooded lead-acid to AGM, you must update the battery type setting inside FORScan software.

The Body Control Module uses specific charging algorithms for AGM chemistries that differ from flooded battery voltage curves.

Applying flooded charging profiles to an AGM battery leads to chronic under-charging and sulfur buildup on lead plates.

Cleaning cable terminals with a wire brush and applying anti-corrosion spray prevents high electrical resistance at connection points.

Following these professional guidelines ensures your electrical system performs reliably in extreme summer heat and sub-zero winter temperatures.

Common DIY Maintenance Pitfalls and How to Protect Your F-150 Charging System

Ford F150 Battery Monitor Reset Procedures and Tips

Avoiding critical errors during battery replacement protects sensitive control modules from electrical damage and expensive repairs.

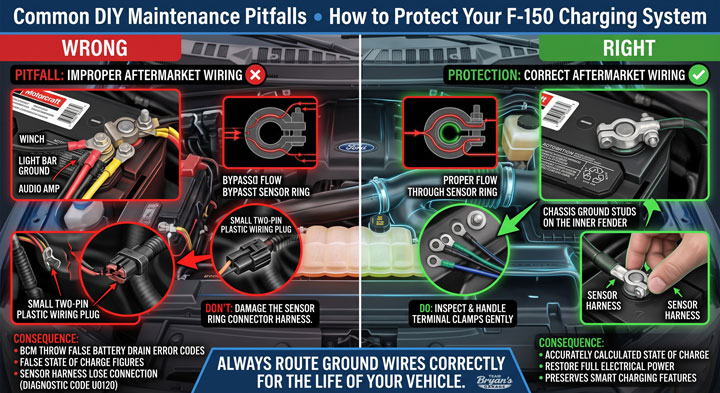
The most common mistake owners make is attaching aftermarket accessory wires directly to the negative battery post clamp bolt.

Connecting winch wires, light bar grounds, or audio amplifiers directly to the negative post bypasses the Hall-effect current sensor entirely.

When current flows through ground wires attached directly to the post, the BMS sensor cannot measure electrical draw accurately.

This creates a discrepancy in calculated state of charge figures, causing the BCM to throw false battery drain error codes.

Always connect aftermarket negative ground wires to chassis ground studs located on the inner fender sheet metal.

Another frequent error is disturbing the sensor ring connector harness during battery installation.

The small two-pin plastic wiring plug attached to the negative terminal sensor can become brittle and crack with age.

Inspect this wiring harness for broken locking tabs or frayed wires whenever installing a new battery.

If the sensor harness loses connection, the Body Control Module defaults to full alternator output, setting diagnostic code U0120.

Handling terminal clamps gently and routing ground wires correctly preserves smart charging features for the life of your vehicle.

F-150 Community
🟢 Going viral on F150Forum & Reddit

“I’ve driven an F-150 for 4 years and didn’t know this existed.”
— The most common reaction when this article is shared

9
features
2015+
models
11 min
read
Free
no signup

Did you know which button on your fob opens the tailgate when your hands are full? Or the button combo to reset CarPlay in 15 seconds without turning off the engine?

I want to know right now →

bryansgarage.com · June 24, 2026

Frequently Asked Questions About Ford F150 Battery Monitor Reset

What happens if I do not perform a ford f150 battery reset after installing a new battery?

If you skip resetting the battery monitor, your truck’s computer assumes the old, degraded battery is still installed.

The alternator will overcharge the new battery with high voltage, shortening its service life by up to forty percent while disabling Auto Start-Stop and radio power management features.

Can I reset the battery monitor sensor without using a scan tool?

Yes, you can manually reset the BMS on most Ford trucks by sitting in the cab, turning the ignition ON (engine OFF), flashing the high beams 5 times, and depressing the brake pedal 3 times within 10 seconds. The battery icon on the dash will flash 3 times to confirm the reset.

How long does the battery monitor take to relearn state of charge after a reset?

After performing a manual or scan tool reset, the vehicle requires an uninterrupted eight-hour sleep period.

Park and lock the truck overnight without opening doors or using the key fob so the Hall-effect sensor can accurately calculate resting state of charge.

Why is my Auto Start-Stop not working after installing a new battery?

Auto Start-Stop is automatically disabled by the Body Control Module when state of charge drops or when battery age counters are elevated.

Performing a BMS reset and allowing an 8-hour sleep cycle resets battery parameters and restores normal Auto Start-Stop operation.

Will disconnecting the battery clear the BMS memory on a Ford F-150?

No, disconnecting the battery terminals does not clear the stored battery age counter or reset the BMS service memory.

The Body Control Module retains historical battery age data in non-volatile memory until a manual button sequence or scan tool reset command is sent.

What is the difference between an AGM and a standard flooded battery in an F-150?

AGM (Absorbent Glass Mat) batteries hold liquid electrolyte inside fiberglass mats, making them leak-proof, highly resistant to vibration, and capable of handling deep cycling from Auto Start-Stop systems.

Standard flooded batteries contain free liquid acid and cannot handle heavy cycling demands of modern trucks.

Conclusion

Performing a battery monitor reset is a simple, cost-effective maintenance step that protects your fresh battery and preserves smart electrical features.

Trust Team Bryan’s Garage for reliable automotive repair advice that keeps hard-earned money in your pocket.

Ready to transform your car maintenance from a stressful chore into a breeze? Explore more tips at Bryan’s Garage.

Have questions? Our team can help you find the best solutions for your car problems and avoid costly mechanic visits.

Note: Individual results may vary depending on individual vehicle makes, models, year of manufacture, and overall condition. This article is intended for general automotive reference purposes only and does not replace official manufacturer service manuals or advice from a certified mechanic.

Leave a Comment