Troubleshooting Ford F150 Backup Sensor Warning Beeps

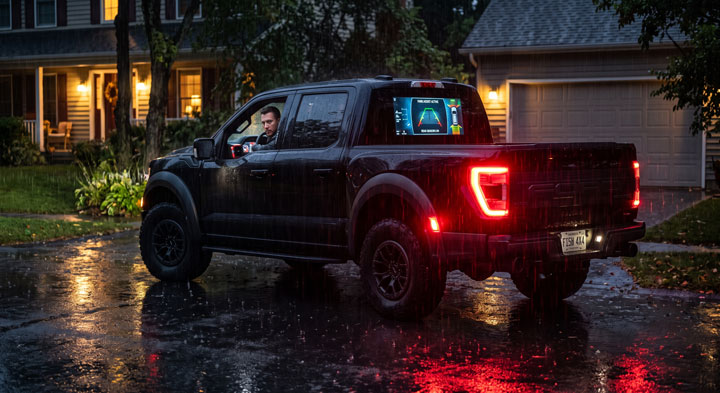
I still remember shifting my truck into reverse on a rainy evening only to be startled by an ear-splitting continuous alarm, even though my rear bumper was completely clear of obstacles.

Standing in my driveway trying to decode cryptic dashboard error messages left me completely frustrated and worried about backing into hidden objects.

At Team Bryan’s Garage, we created this guide on the ford f150 backup sensor buzzer to help you isolate sensor faults, test warning speakers, and restore your park assist system without overpaying at a repair shop.
Troubleshooting Ford F150 Backup Sensor Warning Beeps

In This Article

  • How to Troubleshoot and Replace a Ford F150 Backup Sensor Buzzer: Step-by-Step DIY Guide
  • The Engineering Science of Ultrasonic Parking Aid Systems and PAM Communication
  • Diagnosing False Warnings, Environmental Interferences, and Bumper Harness Corrosion
  • Cost Comparison: DIY Sensor & Buzzer Replacement vs. Dealership Service Charges
  • Multimeter Resistance Testing and Harness Waterproofing Protocols
  • Common DIY Installation Errors and How to Protect Bumper Sensor Wiring
🔴 MOST OWNERS NEVER FIND THIS

Your F-150 has a secret slot that starts the truck when your key fob dies.
And 8 other things Ford never told you.

Dead fob fix · Remote window trick · 7.2 kW generator hiding in your bed · Tailgate ladder · and 5 more.

▶ Read Now — Show Me Everything

bryansgarage.com · Bryan Mark · 2026

Ford F-150 Hidden Features

How to Troubleshoot and Replace a Ford F150 Backup Sensor Buzzer: Step-by-Step DIY Guide

Troubleshooting intermittent warning alarms or silent park assist systems requires systematic testing of ultrasonic sensors, bumper wiring harnesses, and the acoustic warning speaker.

When an ultrasonic sensor fails or its piezo chime speaker burns out, the Parking Aid Module (PAM) disables the entire system to prevent false driver guidance.

Following this structured diagnostic and replacement tutorial allows you to fix the underlying electrical fault safely in your home garage.

Prerequisites and Required Tools

Gathering proper diagnostic tools before crawling beneath the rear bumper prevents unnecessary repair delays and keeps electrical components safe.
Troubleshooting Ford F150 Backup Sensor Warning Beeps
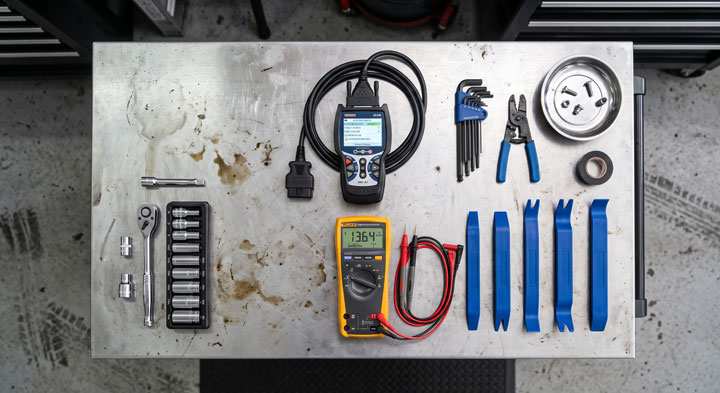
  • OBD2 Scan Tool: Advanced diagnostic scanner or laptop running FORScan software capable of reading Parking Aid Module (PAM) fault codes.
  • Digital Multimeter: Precision meter for testing circuit continuity, reference voltage, and internal speaker resistance.
  • Plastic Trim Removal Tools: Non-marring plastic pry tools to safely remove dashboard speaker trim and bumper wire clips.
  • Hand Tools Set: 7mm, 8mm, and 10mm sockets, ratchets, small flat-head screwdrivers, and safety glasses.
  • Replacement Components: OEM ultrasonic parking sensors or a direct-fit acoustic warning speaker chime module.
  • Electrical Chemicals: Electrical contact cleaner spray and dielectric silicone grease to seal waterproof connectors.
  • Step 1: Perform the “Acoustic Click Test” and Scan PAM Diagnostic Codes.
    • Set your truck’s emergency parking brake firmly and turn the ignition key to the ON position without starting the engine.
    • Depress the brake pedal and shift the transmission selector lever into REVERSE position.
    • Walk to the rear bumper, place your ear inches away from each of the four ultrasonic sensors, and listen closely for a faint, rapid clicking sound.
    • A working sensor emits a continuous high-frequency clicking vibration, while a failed sensor remains completely silent.
    • Plug your OBD2 scanner into the diagnostic port under the steering column and scan the PAM module for stored C-series trouble codes.
  • Step 2: Access the Rear Bumper Wiring Harness and Inspect Connectors.
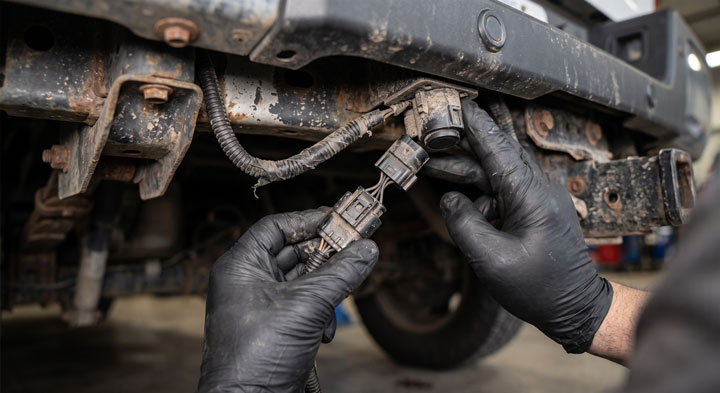
    • Crawl underneath the rear bumper assembly to gain visual access to the main parking aid wiring harness.
    • Locate the master wiring harness connector attached to the inner frame rail near the spare tire hoist area.
    • Unclip the locking safety tab and disconnect the electrical plug to inspect the metal terminals inside.
    • Check for green copper corrosion, bent connector pins, or road grime build-up that blocks electrical continuity.
    • Spray electrical contact cleaner into both sides of the connector plug and allow it to air-dry completely.
Troubleshooting Ford F150 Backup Sensor Warning Beeps
  • Step 3: Remove and Replace the Damaged Ultrasonic Parking Sensor.
    • Reach behind the steel bumper shell to locate the mounting bezel holding the silent ultrasonic sensor.
    • Gently spread the two flexible plastic retaining tabs on the sensor housing outward using your fingers.
    • Push the sensor head inward through the front bumper hole while pulling the electrical body out from behind the bumper.
    • Depress the small locking tab on the electrical connector and disconnect the old sensor plug.
    • Apply a thin layer of dielectric grease to the rubber weather seal of the new sensor and snap it firmly into the bumper bezel.
  • Step 4: Locate and Test the Acoustic Warning Chime Speaker Under Dash.
    • If your sensors click properly but no warning sound emits, the backup warning buzzer speaker may be burned out.
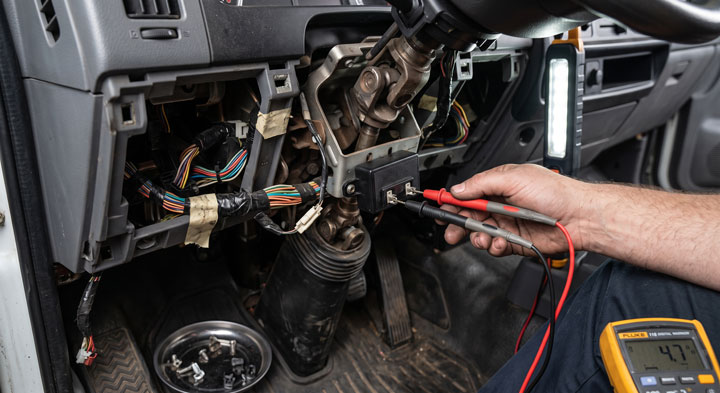
    • Locate the small acoustic piezo speaker module mounted behind the lower dashboard steering column trim or rear cab pillar.
    • Use a plastic trim removal tool to unclip the lower dash trim panel and disconnect the two-pin speaker wiring harness.
    • Set your digital multimeter to OHMS resistance mode and touch the test leads to the two speaker electrical terminals.
    • A functional warning speaker reads between 8 and 16 ohms, whereas an open circuit reading indicates a blown voice coil.
Troubleshooting Ford F150 Backup Sensor Warning Beeps
  • Step 5: Install the New Backup Radar Buzzer Module.
    • When replacing the warning chime speaker, verify that the new replacement unit matches OEM impedance ratings.
    • Align the mounting tabs of the new buzzer speaker with the factory metal bracket under the dashboard.
    • Insert the mounting screws or plastic push-pins to secure the speaker body firmly against vehicle metal.
    • Plug the two-pin electrical wiring connector into the new buzzer module until you hear a solid locking click.
    • Carefully press the plastic dashboard trim panel back into position, ensuring all metal spring clips align with dash slots.
  • Step 6: Clear Trouble Codes and Calibrate the Parking Aid System
    • Reconnect your OBD2 scan tool to the diagnostic port and select the PAM module menu option.
    • Execute the Clear Diagnostic Trouble Codes command to erase historical sensor fault codes from computer memory.
    • Start the engine, engage reverse gear, and slowly back toward a soft cardboard box placed behind the bumper.
    • Verify that the warning chime beeps slowly at six feet, increases tempo at three feet, and turns into a solid tone at twelve inches.
    • Completing this verification test confirms that your ultrasonic sensors and warning chime speaker operate in perfect harmony.

Performing these diagnostic steps restores full parking aid protection, keeping your truck Bumper safe from costly reverse impact damage.

For more detailed step-by-step automotive repair guides and diagnostic tutorials, explore our main library at Bryan’s Garage.

🔧 Hidden F-150 Features — Confirmed by real owners

9 things your F-150 can do — that the dealer never tells you

  • ① The secret slot to start your truck when the fob dies — you’re ignoring it every day
  • ② Hold Unlock for 3 seconds: windows roll down, cabin cools before you step in
  • ③ Pro Power Onboard: 7.2 kW outlet right in your bed — never used it?
  • ④ Hidden tailgate ladder + built-in ruler on the workbench
  • ⑤ Auto shifts to P when you open the door — saved thousands of trucks from rolling away
  • ⑥ + 4 more features the service department never mentions →

See full list with photos →

F-150 Tricks

The Engineering Science of Ultrasonic Parking Aid Systems and PAM Communication

Understanding how Ford’s Reverse Sensing System operates requires examining the physics of ultrasonic sound waves and module communication networks.

The system relies on four piezoelectric ultrasonic sensors mounted horizontally across the lower rear bumper step panel.

When the driver selects reverse gear, the Parking Aid Module (PAM) energizes each sensor with high-frequency electrical pulses.

The internal ceramic disc inside the sensor vibrates rapidly, emitting ultrasonic sound waves at approximately 40 kilohertz.

These sound waves travel outward behind the truck, bounce off stationary objects, and reflect back toward the bumper surface.

The sensor receives the returning echo wave, converting the mechanical sound vibration back into a low-voltage electrical signal.

By calculating the microsecond time delay between wave transmission and echo return, the PAM determines the exact distance to the obstacle.

The module then translates this distance calculation into acoustic audio pulses sent directly to the warning chime speaker.

As the distance to an obstacle shrinks from six feet down to twelve inches, the module increases beep frequency from 2 Hz up to a continuous 10 Hz tone.

On modern medium-speed CAN-bus networks, the PAM communicates continuously with the Instrument Cluster (IC) and Body Control Module (BCM).

If the PAM detects an open electrical circuit or shorted sensor wire, it flashes a “Check Park Aid” message across the driver display screen.

Understanding this high-speed electronic network prevents truck owners from replacing good sensors when the true culprit is a broken wiring ground.

Diagnosing False Warnings, Environmental Interferences, and Bumper Harness Corrosion

Troubleshooting Ford F150 Backup Sensor Warning Beeps

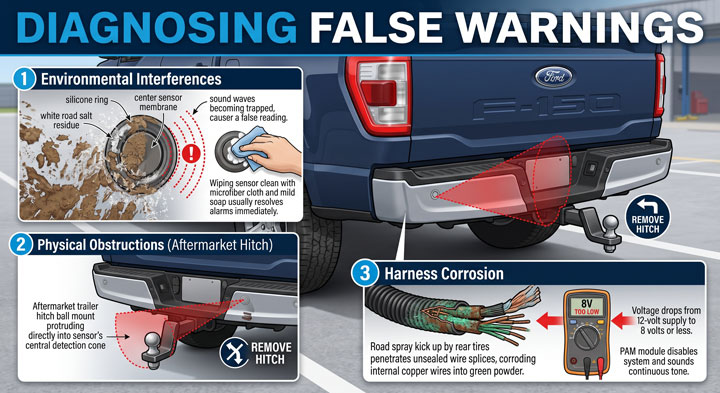
Few driving experiences are more annoying than a backup alarm sounding continuously when backing up in an empty parking lot.

Diagnosing erratic warning beeps requires identifying environmental triggers, physical sensor contamination, and wiring harness corrosion.

A primary cause of false warning beeps is dried mud, heavy road salt, or thick ice buildup caked over the face of the sensor.

When dirt covers the silicone ring surrounding the center sensor membrane, sound waves become trapped, causing the sensor to report a false obstacle.

Wiping the sensor face clean with a soft microfiber cloth and mild soap usually resolves temporary false warning alarms immediately.

Another frequent cause of false alerts is an aftermarket trailer hitch ball mount protruding directly into the sensor’s central detection cone.

Removing the heavy steel hitch drawbar when not towing prevents the inner bumper sensors from detecting the metal hitch ball as an obstruction.

In cold climate regions that use liquid magnesium chloride road salt, corrosion inside the rear bumper harness poses a significant problem.

Road spray gets kicked up by the rear tires, penetrating unsealed wire splices and corroding internal copper wire strands into green powder.

Corroded wiring causes high electrical resistance, dropping the 12-volt power supply to the sensors down to 8 volts or less.

When supply voltage drops below operational thresholds, the PAM module disables system operation and sounds a continuous warning tone.

Inspecting bumper wiring harnesses for swollen insulation or green corrosion saves hours of frustrating diagnostic troubleshooting.

Cost Comparison: DIY Sensor & Buzzer Replacement vs. Dealership Service Charges

Troubleshooting Ford F150 Backup Sensor Warning Beeps

Comparing the cost of fixing a malfunctioning park aid system yourself against commercial repair shop rates demonstrates substantial savings.

Dealership service departments charge steep hourly labor rates to perform computerized parking aid diagnostics and replace bumper sensors.

The comparison table below breaks down realistic component costs and labor charges across various repair methods.

Repair Option & ComponentParts & Equipment CostLabor & Diagnostic FeesTotal Financial Outlay
DIY Ultrasonic Sensor Replacement$18.00 to $35.00 (Single OEM sensor)$0.00 (Completed in 20 minutes)$18.00 to $35.00
DIY Warning Buzzer Speaker Swap$22.00 to $45.00 (Chime module)$0.00 (Completed in 30 minutes)$22.00 to $45.00
Independent Repair Shop Service$65.00 to $110.00 (Marked-up parts)$90.00 to $150.00 (1 hour labor)$155.00 to $260.00
Official Dealership Service Center$120.00 to $180.00 (OEM parts)$180.00 to $260.00 (Diagnostic + labor)$300.00 to $440.00

Performing a replace f150 backup sensor project yourself keeps hundreds of dollars in your pocket while teaching valuable electrical skills.

Similarly, executing a ford f150 backup radar buzzer replacement in your driveway requires only basic hand tools and thirty minutes of time.

By sourcing quality direct-fit replacement parts online, you eliminate steep dealership parts markups and diagnostic fees entirely.

Multimeter Resistance Testing and Harness Waterproofing Protocols

Verifying circuit integrity using a digital multimeter ensures you identify broken wires before purchasing unnecessary replacement components.

Begin electrical testing by disconnecting the three-pin harness plug from the suspected ultrasonic parking sensor.

Set your digital multimeter to measure DC voltage and connect the negative black lead to a solid chassis ground bolt.

Turn the ignition key to the ON position and touch the red multimeter probe to the reference power pin on the harness connector.

The multimeter should display a steady 12-volt power supply reading fed from the Parking Aid Module circuit.

Next, switch your multimeter dial to OHMS resistance testing mode to check the ground wire pin continuity to chassis ground.

A good ground circuit reads less than 0.5 ohms of resistance between the harness ground pin and the clean metal frame rail.

If voltage or ground readings fall outside factory specifications, inspect the wiring harness for pinched or broken wires along the frame.

When reassembling waterproof electrical plugs beneath the bumper, always pack female pin cavities with clear dielectric silicone grease.

Dielectric grease repels moisture, prevents road salt oxidation, and lubricates rubber weather seals to ensure long-term system reliability.

Common DIY Installation Errors and How to Protect Bumper Sensor Wiring

Troubleshooting Ford F150 Backup Sensor Warning Beeps

Avoiding common installation mistakes guarantees your newly installed parking sensors function correctly without intermittent failure.

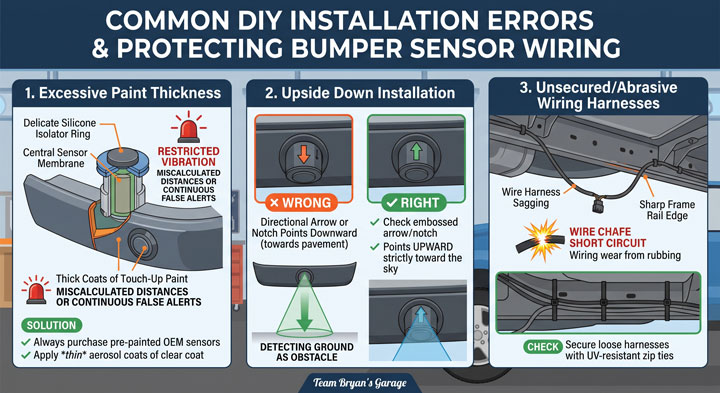
The most frequent mistake DIY mechanics make is painting unpainted replacement sensor heads with thick coats of touch-up paint.

Excessive paint thickness stiffens the delicate silicone isolator ring surrounding the central sensor membrane.

This restricts natural acoustic vibration, causing the sensor to miscalculate distances or report continuous false obstacle alerts.

Always purchase pre-painted OEM color-matched sensors or apply only thin aerosol coats of automotive clear coat.

Another common mistake is installing the ultrasonic sensor upside down inside the plastic bumper mounting bezel.

Ultrasonic sensors feature a small directional arrow or notch molded into the plastic housing rear body.

This directional arrow must point strictly UPWARD toward the sky to align internal sonic beam angles correctly.

Installing a sensor upside down causes its sound wave cone to aim downward toward the road pavement, detecting the ground as an obstacle.

Additionally, secure loose bumper wiring harnesses against frame rails using UV-resistant plastic zip ties.

Preventing wiring harnesses from sagging or rubbing against sharp steel frame edges eliminates wire chafe short circuits.

F-150 Community
🟢 Going viral on F150Forum & Reddit

“I’ve driven an F-150 for 4 years and didn’t know this existed.”
— The most common reaction when this article is shared

9
features
2015+
models
11 min
read
Free
no signup

Did you know which button on your fob opens the tailgate when your hands are full? Or the button combo to reset CarPlay in 15 seconds without turning off the engine?

I want to know right now →

bryansgarage.com · June 24, 2026

Frequently Asked Questions About Ford F150 Backup Sensor Warning Beeps

Why is my Ford F-150 backup alarm beeping continuously when nothing is behind me?

Continuous false warning beeps are usually caused by dirt, ice, or dried mud caked over the face of an ultrasonic sensor.

It can also stem from an aftermarket trailer hitch ball protruding into the sensor beam, a cracked bumper bezel, or internal water damage inside a sensor.

How do I know which backup sensor is bad on my Ford F-150?

Turn the ignition ON (engine OFF), place the transmission in REVERSE, and perform the “acoustic click test.” Put your ear close to each sensor; a working sensor emits a rapid clicking sound, while a dead sensor is silent.

Alternatively, scan the PAM module with an OBD2 scanner to read specific DTC codes like C1700 through C1703.

Where is the backup sensor warning chime speaker located on a Ford F-150?

Depending on the model year, the acoustic warning chime speaker is mounted underneath the lower driver-side dashboard near the steering column or behind the plastic trim on the rear cab pillar.

On newer models, warning tones are routed directly through the factory door audio speakers.

Can I turn off the reverse park assist warning beeps permanently?

Yes, you can temporarily disable the park assist system through the driver information screen on your instrument cluster menu or by pressing the “Park Aid Off” dashboard button.

However, the system automatically re-enables itself every time you cycle the ignition key.

How much does it cost to replace a Ford F-150 backup sensor?

Replacing an ultrasonic backup sensor yourself costs between $18 and $35 for an OEM or high-quality aftermarket sensor.

Having a commercial repair shop or dealership diagnose and replace the sensor costs between $155 and $300 including labor fees.

Do new replacement parking sensors require programming with a scan tool?

In most cases, individual ultrasonic parking sensors are direct plug-and-play components that do not require software reprogramming.

Once you replace the faulty sensor and clear stored trouble codes from the PAM memory, the system resumes normal operation automatically.

Conclusion

Troubleshooting backup sensor warning beeps is a simple DIY project that restores safety and prevents expensive rear bumper collisions.

Trust Team Bryan’s Garage for honest, expert mechanics advice that saves you time and money.

Ready to transform your car maintenance from a stressful chore into a breeze? Explore more tips at Bryan’s Garage.

Have questions? Our team can help you find the best solutions for your car problems and avoid costly mechanic visits.

Note: Individual results may vary depending on individual vehicle makes, models, year of manufacture, and overall condition. This article is intended for general automotive reference purposes only and does not replace official manufacturer service manuals or advice from a certified mechanic.

Leave a Comment