I still remember turning on my truck air conditioning on a hot afternoon only to be hit with a terrible musty smell and weak airflow that barely cooled the cab.
After spending frustrating hours inspecting fuses and blower motors, I discovered a filthy, leaf-clogged filter hidden deep behind the glove box dashboard trim.
At Team Bryan’s Garage, we put together this f150 cabin filter replace step guide to help you swap your filter in fifteen minutes, restore ice-cold airflow, and save hard-earned money.
In This Article
- How to Replace Your Ford F-150 Cabin Air Filter: A Step-by-Step DIY Guide
- The Mechanical Science of HVAC Airflow and Evaporator Core Protection
- Comparing Cabin Air Filter Media: Standard Paper vs Activated Carbon vs True HEPA
- F-150 Model Year Differences: 2015-2020 vs 2021+ Glove Box Architectures
- Recommended Maintenance Intervals and Seasonal Inspection Protocols
- Common DIY Installation Errors and How to Protect HVAC Blower Motors
Your F-150 has a secret slot that starts the truck when your key fob dies.
And 8 other things Ford never told you.
Dead fob fix · Remote window trick · 7.2 kW generator hiding in your bed · Tailgate ladder · and 5 more.
▶ Read Now — Show Me Everything
bryansgarage.com · Bryan Mark · 2026

How to Replace Your Ford F-150 Cabin Air Filter: A Step-by-Step DIY Guide
Changing the cabin air filter on a modern Ford half-ton truck is one of the easiest DIY maintenance tasks you can perform in your driveway.
Replacing a clogged filter restores proper air volume through your heating, ventilation, and air conditioning (HVAC) vents while trapping microscopic dust and pollen.
Following a structured step-by-step approach prevents you from snapping delicate plastic trim clips or dropping small screws into dash crevices.
Prerequisites and Required Tools
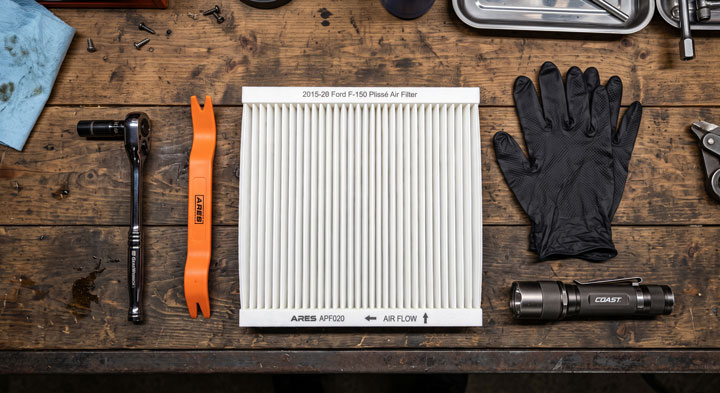
Gathering simple hand tools before opening the passenger side door ensures a smooth repair process without unexpected delays.
- New Replacement Filter: OEM Motorcraft FP-79 or high-efficiency aftermarket equivalent designed for 2015+ Ford F-150 trucks.
- Socket & Driver Set: 7mm nut driver or 1/4-inch drive ratchet equipped with a 7mm deep socket.
- Plastic Trim Removal Tool: Non-marring plastic wedge tool for unclipping dash molding without scratching surfaces.
- Mechanic Gloves & Flashlight: Nitrile work gloves to keep hands clean and a bright LED flashlight to illuminate dark housing corners.
- Cleaning Supplies: Shop vacuum or microfiber cloth to remove loose leaves and organic debris from the filter tray.
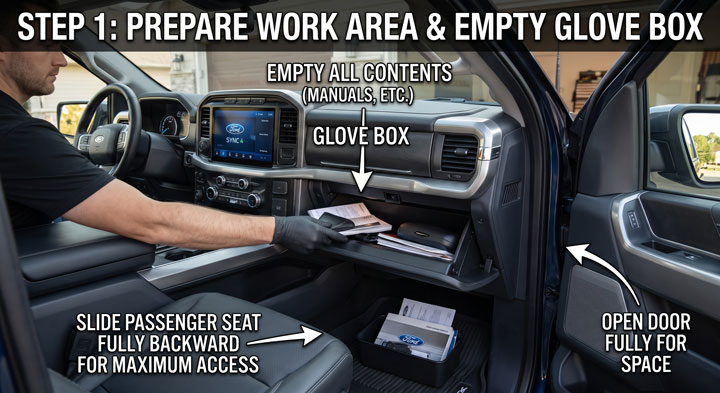
- Step 1: Clear the Glove Box and Prepare the Work Surface
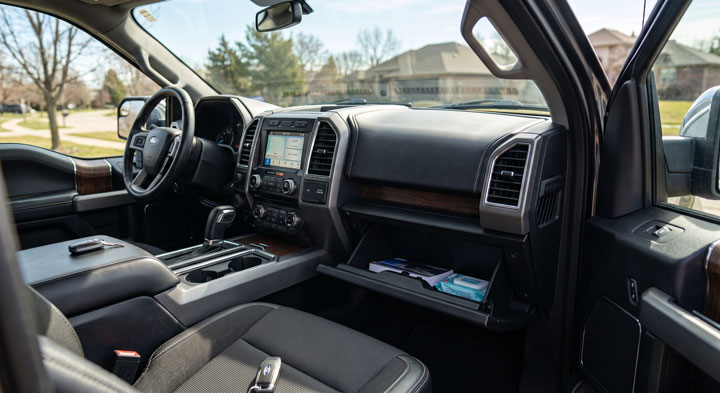
- Open the passenger side front door fully to allow comfortable arm movement inside the footwell area.
- Empty all contents from the glove compartment, including vehicle registration papers, manuals, and heavy items.
- Clearing heavy weight out of the box prevents the hinges from sagging or binding when unlatched from the dash frame.
- Slide the front passenger seat all the way backward along its seat rails to maximize knee room.
- Step 2: Disconnect the Soft-Drop Glove Box Damper Arm
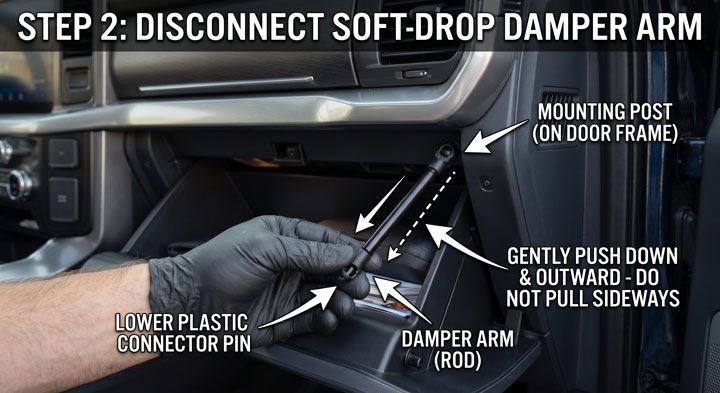
- Look along the outer right-hand edge of the open glove box door to locate the plastic damper arm rod.
- This gas-charged or spring-damped shock rod provides a slow, smooth drop motion when opening the compartment.
- Grasp the lower plastic connector pin attached to the glove box door frame firmly between your thumb and index finger.
- Gently slide or push the damper arm downward and outward off its mounting post to release it from the door.
- Do not pull the damper arm sideways with excessive force to avoid snapping the plastic ball joint socket.
- Step 3: Depress Side Retaining Tabs to Fully Lower Glove Box
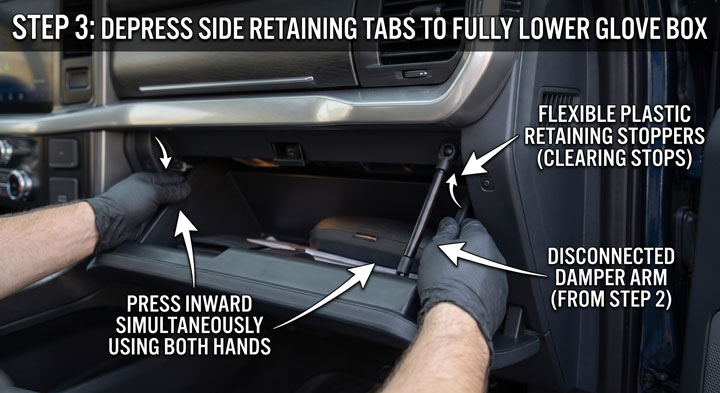
- Locate the flexible plastic retaining stoppers located on the upper left and upper right interior sidewalls of the glove box.
- Press inward on both outer sides of the glove box bin simultaneously using both hands.
- Squeezing the flexible plastic side walls allows the rubber stoppers to clear the inner dashboard frame stops.
- Slowly lower the glove box door downward past its normal stop position until it hangs freely toward the floor carpet.
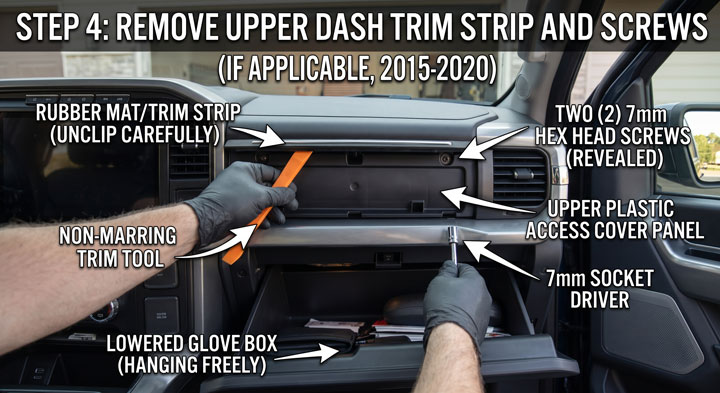
- Step 4: Remove Upper Dash Trim Strip and Access Screws (If Applicable)
- Inspect the decorative trim molding running directly above the open glove box opening on 2015 to 2020 models.
- Use a plastic trim tool to carefully unclip the rubber mat or decorative trim strip located above the door opening.
- Locate the two 7mm hex head screws securing the upper plastic access cover panel behind the dash trim.
- Insert your 7mm socket driver and turn the screws counterclockwise to remove them completely from the housing frame.
- Gently pull the plastic access cover forward to expose the rectangular HVAC filter housing door.
- Step 5: Unlatch Housing Access Door and Remove Old Filter
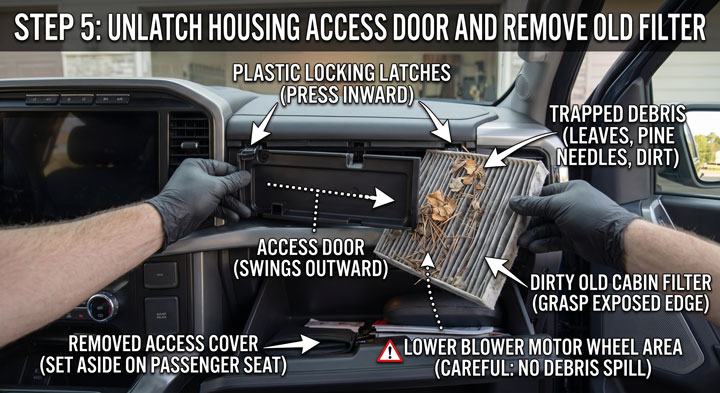
- Locate the plastic locking latches positioned on the far left and far right ends of the filter door.
- Press the locking tabs inward toward the center of the door to release the mechanical latch mechanism.
- Swing the access door outward and set it aside on your passenger seat work area.
- Grasp the exposed edge of the dirty paper cabin filter and pull it straight outward toward you.
- Slide the old filter out carefully so loose leaves, pine needles, or dirt do not spill into the lower blower motor wheel.
- Step 6: Verify Airflow Direction and Insert New Filter
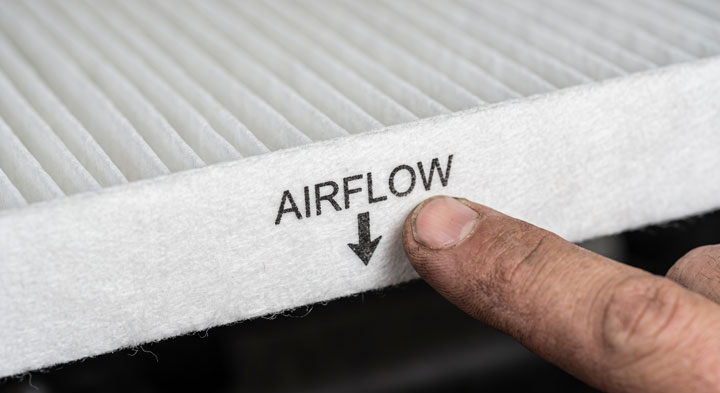
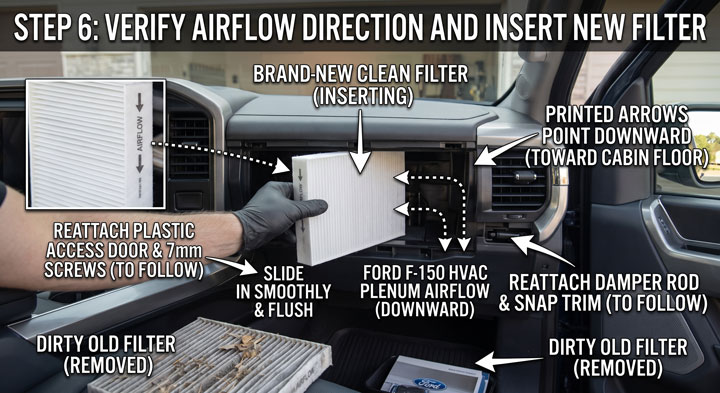
- Inspect the sides of your dirty filter to note the directional airflow arrows stamped on the frame border.
- Observe that air in the Ford F-150 HVAC plenum flows vertically downward from top to bottom toward the blower fan.
- Align your brand-new cabin filter so that its printed airflow arrows point strictly DOWNWARD toward the cabin floor.
- Slide the new filter smoothly into the rectangular slot until it seats flush against the rear housing stops.
- Reattach the plastic access door, secure the 7mm screws, snap the trim strip in place, reattach the damper rod, and close the glove box.
Completing this quick replacement keeps your cabin air fresh, eliminates air conditioning odors, and preserves HVAC blower motor efficiency.
For additional step-by-step automotive maintenance tutorials and practical repair hacks, visit our main library at Bryan’s Garage.
The Mechanical Science of HVAC Airflow and Evaporator Core Protection
Understanding how air flows through your truck’s heating and cooling system highlights why routine cabin filter changes matter mechanically.
The heating, ventilation, and air conditioning system draws outside ambient air through cowl vents located at the base of the windshield glass.
This incoming fresh air passes directly through the cabin air filter before entering the climate control mixing plenum.
A secondary function of the cabin filter is acting as a physical shield for the aluminum air conditioning evaporator core.
When the air conditioning system operates, moisture condenses rapidly on the chilled surface fins of the evaporator core under the dash.
If microscopic dirt, organic pollen, and leaf dust bypass a missing or damaged filter, they stick to wet evaporator fins.
This moist organic buildup creates an ideal breeding ground for mold spores, mildew fungus, and foul-smelling bacteria colonies.
Over time, accumulated dirt acts as an insulating blanket across evaporator fins, severely reducing heat transfer efficiency.
In severe instances, wet dirt debris traps moisture against aluminum tubes, causing galvanic corrosion and expensive evaporator pinhole leaks.
Replacing an evaporator core requires removing the entire dashboard assembly, costing between $1,200 and $1,800 in professional labor fees.
Furthermore, a severely clogged filter creates high static pressure resistance against the electric blower motor fan blades.
The electric motor works significantly harder to pull air through restricted filter pleats, drawing higher electrical amperage from the battery.
This added resistance overheats the blower motor resistor pack, leading to premature electrical resistor failure or burned wiring harnesses.
Maintaining a fresh filter allows unrestricted airflow, protecting expensive internal climate control components from premature mechanical failure.
Our team at Bryan’s Garage regularly reminds truck owners that spending twenty dollars on a fresh filter prevents thousand-dollar HVAC repairs.
Comparing Cabin Air Filter Media: Standard Paper vs Activated Carbon vs True HEPA
When shopping for replacement filters, you will encounter multiple filter media materials designed for varying air purification needs.
Selecting the right media type depends on whether you drive in dusty off-road environments, city traffic, or high-pollen rural areas.
The comparison table below details the performance characteristics, filtration efficiency, and replacement costs across common filter materials.
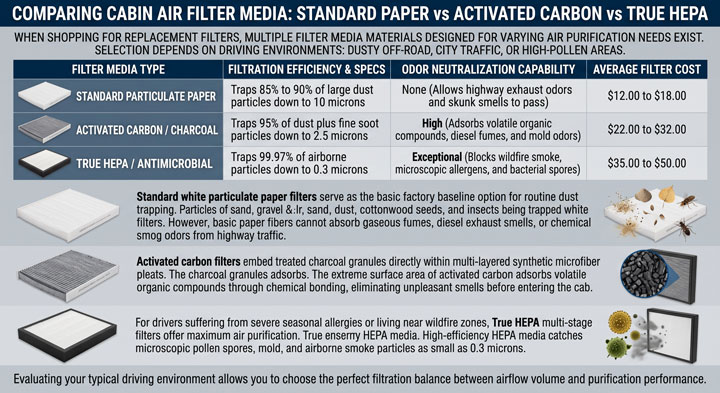
Standard white particulate paper filters serve as the basic factory baseline option for routine dust trapping.
Single-stage paper media captures sand, gravel dust, cottonwood seeds, and large insects effectively during summer driving.
However, basic paper fibers cannot absorb gaseous fumes, diesel exhaust smells, or chemical smog odors from highway traffic.
Activated carbon filters embed treated charcoal granules directly within multi-layered synthetic microfiber pleats.
The extreme surface area of activated carbon adsorbs volatile organic compounds through chemical bonding, eliminating unpleasant smells before entering the cab.
For drivers suffering from severe seasonal allergies or living near wildfire zones, True HEPA multi-stage filters offer maximum air purification.
High-efficiency HEPA media catches microscopic pollen spores, mold, and airborne smoke particles as small as 0.3 microns.
Evaluating your typical driving environment allows you to choose the perfect filtration balance between airflow volume and purification performance.
F-150 Model Year Differences: 2015-2020 vs 2021+ Glove Box Architectures
Understanding the subtle design differences across model years prevents confusion when performing a f150 cabin filter replace step guide project.
Ford Motor Company updated the interior dashboard architecture when launching the 14th generation F-150 for the 2021 model year.
It is important to note that 11th and 12th generation F-150 trucks (2004 to 2014) did not include factory cabin air filters.
Factory cabin air filtration became standard equipment across all F-150 trim levels starting with the 2015 13th generation redesign.
On 2015 to 2020 models, accessing the filter door requires removing two 7mm hex head screws concealed beneath an upper trim panel.
Owners must unclip the rubber trim strip located directly above the glove box opening to access those two 7mm screws.
On 2021 and newer 14th generation models, Ford simplified the housing access design significantly for easier maintenance.
The revised 2021+ dashboard layout eliminates the need to remove upper trim strips or unfasten 7mm metal screws.
Once you drop the glove box door past its stoppers on 2021+ trucks, the plastic filter housing door sits completely exposed.
You simply squeeze two side release latches on the housing door to pull the door off and swap the filter immediately.
This design improvement reduces total replacement time on newer trucks from fifteen minutes down to less than five minutes.
Knowing your specific model year guarantees you grab the correct tools before starting your replacement project.