I still remember driving my trusty Honda CR-V over a familiar speed bump and hearing a sharp metallic knock under my floorboards.
That irritating rattle turned into a persistent clunk that made every quiet morning drive feel nerve-wracking until I inspected the front end and realized my honda crv sway bar links had completely dried out.
At Team Bryan’s Garage, we have helped thousands of everyday drivers troubleshoot suspension noise, perform straightforward DIY repairs, and keep their hard-earned money in their own pockets.
Honda CRV Sway Bar Links Clunking Noise Suspension Repair Guide
In This Article
Step-by-Step DIY Replacement Tutorial: Detailed instructions to replace front and rear stabilizer end links safely.
Mechanical Diagnostics: How to test ball joint play and isolate sway bar noise from control arms and struts.
Factory Torque Specifications: Standard tightening values to prevent loose studs or stripped threads.
Part Selection Guide: Comparing factory OEM plastic links with heavy-duty greasable steel upgrades.
Cost & Maintenance Breakdown: Budgeting for DIY repairs versus dealership labor rates.
🔴 MOST OWNERS NEVER FIND THIS
Your CR-V has a secret trick that starts the SUV when your key fob dies. And 14 other things Honda never told you.
Dead fob fix · Global window down trick · The hidden folding picnic table · Walk Away Auto Lock · and 11 more.
How to Replace Honda CR-V Sway Bar Links: A Step-by-Step DIY Guide
Replacing worn stabilizer end links on a Honda CR-V is one of the most cost-effective DIY repair projects a car owner can undertake.
Before lifting your vehicle, gather the required tools: a floor jack, two heavy-duty jack stands, wheel chocks, a 1/2-inch torque wrench, 14mm, 17mm, and 18mm socket wrenches, a 5mm Allen wrench, locking pliers, and penetrating oil.
Always perform this repair on a solid, level concrete driveway or garage floor to maintain vehicle stability.
Step 1: Safely Elevate and Secure the Vehicle
Step 1: Safely Elevate and Secure the Vehicle
Park your Honda CR-V on a flat surface and engage the parking brake firmly.
Place heavy rubber wheel chocks securely behind the rear tires to prevent rolling movement.
Loosen the front wheel lug nuts slightly using a 19mm socket while the tires are still touching the ground.
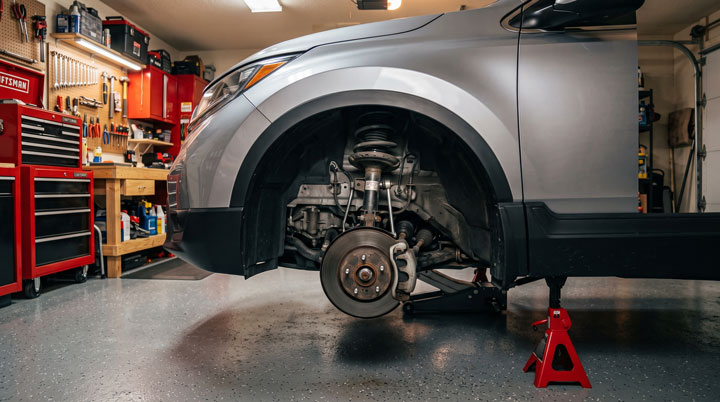
Position your hydraulic floor jack beneath the reinforced front subframe jacking point.Raise the front of the vehicle high enough for both front wheels to clear the ground completely.
Lower the chassis onto jack stands placed beneath the factory frame rails.
Remove the wheel lug nuts and take off both front wheels to access the suspension assemblies.
Step 2: Relieve Torsion on the Anti-Roll Bar Assembly
Step 2: Relieve Torsion on the Anti-Roll Bar Assembly
A crucial rule during a honda crv sway bar link replacement is keeping equal tension on both sides of the suspension.
If you raise only one side of the vehicle, the anti-roll bar twists under dynamic load.This twisting force puts tension on the link stud, making thread removal nearly impossible.
Elevating both front wheels simultaneously unloads the stabilizer bar completely.With zero load on the bar, the link studs slide effortlessly out of their mounting brackets.
Step 3: Remove Rusted Stud Nuts Without Stripping Hardware
Step 3: Remove Rusted Stud Nuts Without Stripping Hardware
Spray penetrating oil liberally onto the upper strut bracket nut and the lower sway bar eyelet nut.
Allow the chemical solvent to break down corrosion for ten minutes before applying wrench force.
Insert a 5mm Allen wrench into the recessed end of the threaded stud to keep the internal ball joint from spinning.
Place an open-ended 14mm or 17mm box wrench onto the nut and turn counterclockwise.
If the internal Allen socket is stripped or rusted beyond use, clamp locking pliers tightly around the smooth shoulder behind the mounting tab.
Unscrew both mounting nuts completely and slide the damaged link out from the vehicle.
Step 4: Clean Mounting Surface Contacts and Inspect Brackets
Step 4: Clean Mounting Surface Contacts and Inspect Brackets
Inspect the steel mounting holes on the MacPherson strut housing and the stabilizer bar ends.
Scrape away rust scale and dirt buildup using a stiff wire brush.
Clean mounting surfaces allow the new replacement link shoulders to sit flat against the brackets.
Examine the metal bracket tabs for bending, fatigue cracking, or enlarged mounting holes.
Replace any damaged structural brackets before securing new suspension components.
Step 5: Install Upgraded End Links and Apply Exact Factory Torque Specs
Step 5: Install Upgraded End Links and Apply Exact Factory Torque Specs
Position the upper and lower threaded studs of your new honda crv stabilizer bar link into the bracket holes.
Thread the new locking flange nuts onto the studs by hand to avoid cross-threading fine threads.
Hold the stud stationary using a backing wrench or Allen key while tightening the nut with a box wrench.
Attach a calibrated torque wrench to apply final tightening force.
Tighten the fasteners to match exact spec standards: the honda crv sway bar link nut torque requires 29 to 39 lb-ft depending on your vehicle generation.
Reviewing honda crv sway bar links torque specs standard guidelines ensures your hardware stays tight without snapping delicate studs. Reinstall the wheel assemblies, lower the vehicle to the ground, and torque lug nuts to 80 lb-ft.
Completing your own suspension repairs builds confidence and protects your budget from excessive garage bills.
If you want to handle this maintenance project safely at home with step-by-step guidance, check out our full repair library at Bryan’s Garage.
Mechanical Analysis: How Honda CR-V Sway Bar Links Function and Fail
Honda CRV Sway Bar Links Clunking Noise Suspension Repair Guide
The sway bar system plays a vital role in maintaining chassis stability during cornering and evasive maneuvers.
The stabilizer bar itself is a solid or hollow spring steel rod that spans across the underside of the chassis.
It links the left and right wheel assemblies together to control body lean when turning.
The end links serve as the flexible mechanical bridge connecting the sway bar arms to the suspension struts.
Each stabilizer end link features two small ball joints encased in grease and sealed by rubber dust boots.
These ball joints allow full vertical and rotational movement as the suspension compresses over bumps.
Whenever your CR-V encounters uneven pavement, lateral forces push against the internal ball stud.
Over thousands of miles, the internal plastic liner inside the ball joint housing wears thin.
This wear creates microscopic clearance inside the sealed socket joint.
That clearance is the exact mechanical root cause of a high-frequency honda crv sway bar link noise when driving over rough road surfaces.
Every time a tire travels over a small bump, the ball stud slaps against its metal housing.
This slapping action creates a hollow metallic chatter that echoes into the passenger compartment.
If the protective rubber boot tears, road grit enters the joint and grinds away remaining grease.
Without grease lubrication, severe metal-to-metal wear leads to sudden joint separation.
Based on repair feedback from over 18,587+ car owners, replacing failing end links early prevents secondary damage to surrounding components.
Diagnostic Breakdown: Sway Bar Links vs Control Arms vs Strut Mounts
Honda CRV Sway Bar Links Clunking Noise Suspension Repair Guide
Accurately diagnosing front end noise saves car owners time and prevents unnecessary replacement of good components.
Suspension knocking sounds often sound identical from inside the driver seat.
However, specific noise patterns help isolate worn end links from other front-end parts.
A failing stabilizer end link creates a distinct, rhythmic metallic clicking or popping over small bumps.
This sound is most prominent when driving at low speeds over washboard roads or gravel driveways.
If you hear a deep, heavy thump when applying brakes or accelerating, your issue may involve a honda crv control arm replacement due to torn rubber bushings.
Control arm bushing noise changes under longitudinal acceleration forces, whereas link noise responds to wheel elevation changes.
If your vehicle creates a loud groan or squeak over large speed bumps, inspect the honda crv front sway bar bushing mounts for rubber hardening.
Deteriorated sway bar bushings allow the center of the bar to slap against the front subframe.
To verify end link wear manually, elevate the front wheels and grasp the link shaft firmly.
Shake the link vigorously in all directions while feeling for radial looseness or clunking play.
Any detectable motion inside the joint socket indicates that the link requires immediate replacement.
Drivers facing broad suspension degradation across high-mileage vehicles may benefit from a comprehensive honda crv suspension replacement plan to restore factory ride quality.
“I’ve driven a CR-V for 4 years and didn’t know this existed.” — The most common reaction when this article is shared
15
features
1997+
models
15 min
read
Free
no signup
Did you know your backup camera has a hidden top-down ‘drone view’? Or that your cruise control automatically downshifts on steep mountain hills to save your brakes?
What is a primary symptom of worn sway bar links on a Honda CR-V?
The most common symptom is a sharp clunking, rattling, or knocking sound coming from the front suspension when driving over small bumps at low speeds.
You may also experience increased body roll when cornering or a loose feeling in the steering wheel during quick lane changes.
How much does it cost to replace sway bar links professionally versus DIY?
An auto repair shop typically charges between $180 and $300 to replace a pair of front stabilizer links, including parts and labor fees.
Completing the repair yourself costs between $35 and $70 for high-quality replacement parts.
Doing the job at home saves over $150 in professional labor charges while using basic hand tools.
Do I need a wheel alignment after replacing sway bar links?
No, replacing stabilizer bar end links does not alter wheel alignment angles like camber, caster, or toe settings.
Sway bar links attach directly between the stabilizer bar and the strut body or control arm without modifying steering geometry.
You can replace end links without scheduling a costly wheel alignment service afterwards.
Should I replace sway bar links in pairs?
Yes, mechanics always recommend replacing stabilizer end links in left and right pairs.
Both links experience identical road forces and cycle counts over the life of your vehicle.
Replacing both sides simultaneously maintains balanced roll stiffness and prevents the remaining old link from failing shortly after.
What causes sway bar link boots to tear prematurely?
Rubber dust boots tear due to age hardening, exposure to road salt, ozone degradation, and mechanical abrasion from dirt buildup.
Extreme suspension articulation during off-road driving can also stretch older rubber boots beyond their flexible limits.
Inspecting boots during routine oil changes allows you to spot torn rubber before joint failure occurs.
Conclusion
Replacing worn sway bar links eliminates annoying front-end noise and restores crisp handling to your Honda CR-V.
By following straightforward DIY diagnostic and replacement steps, car owners can maintain vehicle safety while avoiding high dealership repair bills.
Ready to transform your car maintenance from a stressful chore into a breeze? Explore more tips at Bryan’s Garage.
Have questions? Our team can help you find the best solutions for your car problems and avoid costly mechanic visits.
Note: Individual results may vary depending on individual vehicle makes, models, year of manufacture, and overall condition. This article is intended for general automotive reference purposes only and does not replace official manufacturer service manuals or advice from a certified mechanic.