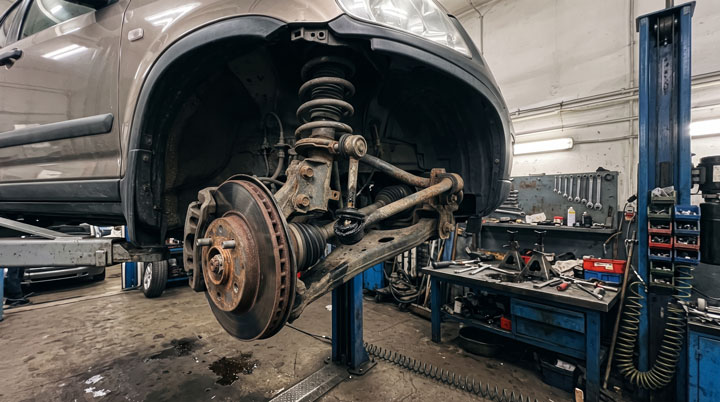
I still remember the first time my daily driver developed an agonizing metallic clunk over every tiny bump on my morning commute.
That maddening honda crv sway bar link noise drove me crazy until I pulled off the front wheel and discovered a completely blown ball joint boot on the stabilizer end link.
Here at Bryan’s Garage, our team has helped thousands of vehicle owners troubleshoot this exact suspension rattle, save hundreds in unnecessary labor fees, and restore factory-smooth ride quality right in their home driveways.
Honda CRV Sway Bar Link Noise Suspension Clunks and Diagnostics
In This Article
Step-by-Step Diagnostic and Replacement Process: How to safely test, remove, and install stabilizer links on your Honda CR-V.
Mechanical Deep-Dive into Suspension Clunks: Understanding why ball joints fail and how chassis roll affects stabilizer links.
Symptom Differentiating Guide: Isolating sway bar link rattles from control arm, strut, and sway bar bushing noise.
Factory Fastener Torque Specifications: Torque guidelines for Gen 2 through Gen 5 Honda CR-V models.
How to Safely Diagnose and Replace Honda CR-V Sway Bar Links: A Complete DIY Guide
Before beginning any diagnostic work on your Honda CR-V suspension system, you must gather proper safety equipment and mechanical hand tools.
You will need a hydraulic floor jack, two heavy-duty jack stands, wheel chocks, a 1/2-inch drive torque wrench, 14mm, 17mm, and 18mm sockets, a 5mm or 6mm Allen wrench, locking pliers, a pry bar, and penetrating rust solvent.
Working on suspension components under vehicle load can cause sudden component shifts, so prioritizing physical stability is mandatory for every home mechanic.
Step 1: Elevate the Front End and Secure the Vehicle
Step 1
Park your Honda CR-V on a flat, level concrete surface and firmly engage the emergency parking brake.
Place heavy rubber wheel chocks behind the rear tires to prevent any unexpected rolling movement during the procedure.
Loosen the front lug nuts slightly using a 19mm socket before lifting the front end off the ground.
Position the floor jack under the front subframe jack point and raise the vehicle until both front wheels clear the ground completely.
Lower the chassis securely onto certified jack stands positioned under the reinforced frame rails.
Never attempt to diagnose suspension play while supporting the vehicle solely with a hydraulic floor jack.
Remove the lug nuts entirely and set the front wheel assemblies aside to expose the lower strut mount and stabilizer bar attachments.
Step 2: Perform the Manual Play and Pry Bar Load Test
Step 2.
To isolate a stubborn honda crv clunking noise suspension issue, you must evaluate the stabilizer bar end link under zero tension.
Elevating both front wheels simultaneously relieves torsional tension from the front anti-roll bar.
Grasp the center steel shaft of the sway bar link firmly with your bare hand.
Vigorously push and pull the link rod in inward, outward, upward, and downward directions.
Any detectable mechanical lash, play, or dull knocking sound confirms internal ball joint wear.
Insert a small pry bar between the lower sway bar eyelet and the end link ball joint housing.
Apply moderate leverage up and down while observing the sealed joint for excess movement.
If the joint socket shifts inside its housing before moving the sway bar itself, the inner nylon cup is severely deteriorated.
Step 3: Inspect Rubber Dust Boots and Ball Joint Integrity
Step 3.
Examine the flexible neoprene or rubber boots protecting the upper and lower ball joints of the end link.
A compromised dust boot allows road grit, water, and salt to contaminate the internal grease cavity.
Look closely for micro-cracks, tears, missing retaining rings, or squeezed-out black grease around the perimeter.
Even if no physical play is felt by hand, a torn boot guarantees imminent ball joint failure and harsh metal-to-metal contact.
If you notice a sudden honda crv popping noise turning into driveways, inspect the lower stud mounting threads for structural flex or loosening locknuts.
Replace both left and right side links as a paired set to maintain uniform chassis roll stiffness across the front axle.
Step 4: Remove Corroded Fasteners Without Stripping Internal Hex Recesses
Step 4
Thoroughly spray the exposed threads of the upper strut stud and lower stabilizer bar stud with high-penetration oil.
Allow the chemical solvent to break down rust accumulation for at least ten minutes before applying wrench force.
Honda factory end links feature a hex key socket embedded directly into the threaded center stud shaft.
Insert a 5mm Allen wrench into the center stud to prevent the internal ball joint from spinning while turning the 14mm or 17mm outer nut with a box wrench.
If the internal hex socket is rusted out or stripped, clamp narrow-jaw locking pliers tightly around the smooth shoulder behind the mounting tab.
Unscrew the upper and lower locknuts counterclockwise until the damaged link releases completely from the vehicle.
Clean the mounting holes on the MacPherson strut bracket and sway bar end using a wire brush to remove rust scales.
Step 5: Install Replacement End Links and Apply Exact Factory Torque Specs
Step 5
Guide the threaded studs of your new high-performance honda crv sway bar links into the mounting holes on the strut body and sway bar arm.
Hand-thread the new flange nuts onto the studs to prevent cross-threading the fine pitch threads.
Hold the stud stationary using a hex wrench or backing wrench flat while snugging the nut with an open-ended wrench.
Finish tightening the fasteners using a calibrated torque wrench to ensure proper clamping force without over-stretching the threads.
Refer strictly to the manufacturer torque guidelines: honda crv sway bar link nut torque requires 29 to 39 lb-ft depending on the generation.
Improper torque application is the primary cause of premature noise recurrence and fastener backing-out during aggressive cornering.
Reinstall the front wheels, hand-tighten the lug nuts, lower the vehicle to the ground, and final-torque wheel nuts to 80 lb-ft.
If you want to handle this repair safely at home without making common mechanical errors, check out our full diagnostic guide at Bryan’s Garage.
Mechanical Comparison: OEM vs Aftermarket Honda CR-V Sway Bar Links
Honda CRV Sway Bar Link Noise Suspension Clunks and Diagnostics
Choosing the correct replacement component directly impacts suspension longevity and noise elimination.
Our team at Bryan’s Garage evaluated the top market options for Honda CR-V stabilizer link replacements based on structural durability, ease of installation, and maintenance convenience.
Component Brand / Type
Installation Complexity
Serviceability & Features
Expected Longevity
OEM Honda Genuine Parts
Low (Exact Fitment)
Sealed Unit / Maintenance Free
60,000 – 90,000 Miles
Moog Problem Solver Series
Moderate (Grease Fitting clearance)
Greasable Zerk Fittings / Heavy Duty Ball Stud
80,000 – 120,000 Miles
TRQ HD Stabilizer Links
Low (Backing Wrench Flat)
Sealed Boot / Enlarged Ball Socket
50,000 – 80,000 Miles
Dorman OE Fix Series
Low (Hex Stud Head)
Thicker Steel Rod / Weather Protection Coating
50,000 – 75,000 Miles
Meyle HD Heavy Duty
Low (Enlarged Pin Head)
Increased Ball Diameter / Reinforced Joint Shell
90,000 – 130,000 Miles
Sankei 555 Japanese OEM Equivalent
Low (Exact Factory Specs)
High Torsion Resistance / Sealed Synthetic Greased Socket
70,000 – 100,000 Miles
Generic Economy Store Brands
Moderate (Weak Stud Recess)
Thin Rubber Boot / Standard Stamped Shell
15,000 – 30,000 Miles
While standard factory replacements work well for daily commuters, our technicians prefer heavy-duty greasable units like Moog or Meyle HD for drivers navigating severe winter road conditions or rough terrain.
Mechanical Deep-Dive: Why Sway Bar Links Wear Out Early on the Honda CR-V
To understand why stabilizer links fail on suburban crossovers, we must analyze chassis roll dynamics.
The Honda CR-V utilizes an independent MacPherson strut front suspension paired with a solid spring steel anti-roll bar.
The anti-roll bar connects the left and right strut assemblies to resist body roll during sharp cornering maneuvers.
When your CR-V encounters an uneven road surface, one wheel compresses while the opposite wheel stays flat.
This differential movement forces the sway bar link ball joints to twist dynamically under immense mechanical tension.
Inside every factory sway bar link lies a polished steel ball stud seated within a synthetic nylon resin socket.
Over tens of thousands of driving cycles, small micro-shocks degrade the thin grease film separating the metal ball stud from its synthetic seat.
Once dry friction begins, the nylon socket deforms, creating microscopic tolerance gaps.
This microscopic clearance is the exact physical origin of diagnose sway bar link rattle honda crv complaints.
Every time your tire hits a small pavement joint, sewer grate, or gravel patch, the unseated ball stud knocks back and forth inside its metal housing.
This metallic chatter transfers straight into the hollow body structure of the vehicle, amplifying the sound inside the passenger cabin.
Furthermore, Honda CR-Vs built between 2002 and 2022 feature relatively long stabilizer link rods to maximize ground clearance.
Longer link designs experience higher lateral leverage forces during quick directional steering transitions.
According to certified Master Technicians, salt spray and road debris accelerate this wear by cracking the lower rubber boots.
Water intrusion flushes away synthetic lithium grease, causing rapid rust formation on the mirror-finish ball sphere.
Once corrosion pits the ball surface, it shreds the internal plastic lining in a matter of days.
Regular visual inspections during oil changes allow owners to spot leaking grease boots before catastrophic joint separation occurs.
How to Safely Diagnose Suspension Clunks Without Overspending at Dealerships
Honda CRV Sway Bar Link Noise Suspension Clunks and Diagnostics
Suspension noises are notoriously deceptive because sound travels across metal frame rails and subframe mounts.
A loud pop or metallic knock coming from under the floorboards could stem from several distinct front-end components.
Car owners often spend hundreds replacing functional struts when a inexpensive 30-dollar stabilizer link was the true culprit.
To properly pinpoint a persistent used honda crv sway bar link noise, you must systematically isolate each potential noise generator.
Start by observing when the noise occurs during real-world driving scenarios.
Sway bar link clunks occur almost exclusively during low-speed over-bump driving or when single wheels hit potholes individually.
If the clunking sound occurs when both wheels hit a smooth dip simultaneously, the anti-roll bar itself is moving parallel within worn rubber bushings.
Conversely, a loud metallic pop that occurs specifically when turning the steering wheel from lock to lock while stationary points toward binding strut top mount bearings.
Lower control arm bushing failure creates a deep thud during hard braking or sudden accelerator tip-in rather than high-frequency rattling over small bumps.
If you suspect control arm issues during diagnosis, consult our step-by-step guide on honda crv control arm replacement for detailed bushing deflection limits.
To verify if a noise originates strictly from the stabilizer linkage, try disconnecting both end links from the sway bar entirely.
Secure the disconnected sway bar safely away from axle shafts using heavy zip ties, then take a brief low-speed test drive around your neighborhood.
If the persistent chatter vanishes completely, you have definitive proof that the end links or sway bar bushings were causing the noise.
Never operate your vehicle at highway speeds with disconnected stabilizer links, as body roll stability will be noticeably reduced.
If your diagnostic checks reveal noise in the back of the vehicle, inspect the honda crv rear sway bar bushing mounts and rear link joints for similar rubber degradation.
Comprehensive suspension inspection saves daily drivers from wasting hard-earned money on unneeded component overhauls.
Drivers dealing with broad chassis wear across high-mileage vehicles should explore complete honda crv suspension replacement strategies to restore factory damping and handling precision.
Evaluating the entire suspension assembly ensures long-term driving comfort and balanced tire wear.
Investing in durable parts and following proven service protocols ensures safe, noise-free vehicle operation for tens of thousands of miles.
🟢 Going viral on CR-V Owners Club & Reddit
“I’ve driven a CR-V for 4 years and didn’t know this existed.” — The most common reaction when this article is shared
15
features
1997+
models
15 min
read
Free
no signup
Did you know your backup camera has a hidden top-down ‘drone view’? Or that your cruise control automatically downshifts on steep mountain hills to save your brakes?
Is it safe to drive my Honda CR-V with a noisy or broken sway bar link?
Driving with a loose or rattling sway bar link is generally safe for short distances at cautious speeds, but prompt repair is strongly advised.
A failed link degrades your vehicle’s anti-roll stability, causing excessive body lean when cornering or making emergency swerving maneuvers.
If the joint snaps completely, the loose metal rod can swing into your tire sidewall, brake hoses, or drive axles, causing severe structural damage.
How much does it cost to replace sway bar links on a Honda CR-V?
Having a professional auto repair shop replace front sway bar links typically costs between $180 and $290 for parts and labor.
The physical parts cost between $25 and $60 per side when purchasing quality aftermarket links online.
By tackling this repair yourself in your garage, you can complete the entire job for under $60 in total parts cost.
What specific tools do I need to fix front stabilizer link noise?
You will need a floor jack, two jack stands, wheel chocks, a 19mm wheel lug wrench, and a 1/2-inch drive torque wrench.
For the link fasteners, prepare 14mm, 17mm, or 18mm combination wrenches alongside a 5mm Allen key socket.
A heavy pry bar, rust penetrating fluid, and locking jaw pliers are also recommended for rusted hardware.
Why does my front end knock specifically when driving over small bumps?
Small bumps create short, fast suspension movements that exercise the end link ball joints rapidly without compressing main coil springs fully.
When micro-play exists inside the link socket, small pavement sharp drops cause the ball stud to strike the metal shell violently.
This creates a distinct chatter or popping sound that vanishes on smooth highway roads.
How long does it take to replace front sway bar links DIY?
An experienced DIY mechanic can replace both front stabilizer links in approximately 45 to 90 minutes.
First-time mechanics should reserve about two hours to safely jack up the car, remove frozen hardware, and torque fasteners properly.
Soaking rusted threads with penetrating lubricant ahead of time speeds up the removal process significantly.
Conclusion
Fixing front suspension clunks on your Honda CR-V restores original steering response and quiet ride comfort.
Following proper diagnostic steps ensures you fix the real problem without wasting money on unneeded parts.
Ready to transform your car maintenance from a stressful chore into a breeze? Explore more tips at Bryan’s Garage.
Have questions? Our team can help you find the best solutions for your car problems and avoid costly mechanic visits.
Note: Individual results may vary depending on individual vehicle makes, models, year of manufacture, and overall condition. This article is intended for general automotive reference purposes only and does not replace official manufacturer service manuals or advice from a certified mechanic.