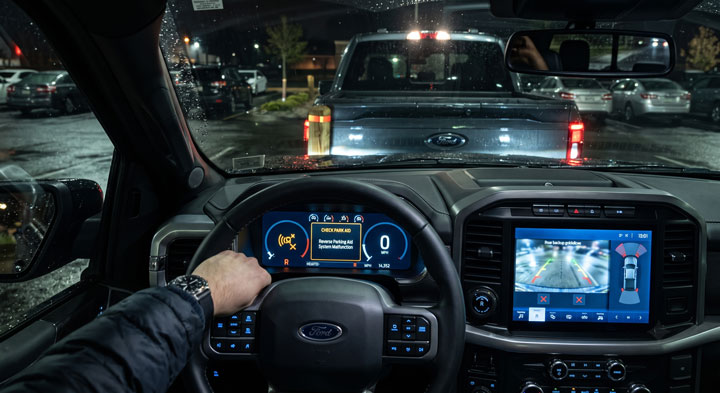
I still remember backing my F-150 into a tight driveway when a sudden dashboard error message ruined my evening.
After nearly backing into a low wooden post because my warning chimes failed completely, I realized I needed a quick ford f150 backup sensor replace strategy.
Our team at Bryan’s Garage broke down the entire process so you can repair your reverse parking assist sensors safely at home without spending hundreds at a dealership.
Ford F150 Backup Sensor Replace
In This Article
Step-by-Step DIY Replacement: How to safely swap faulty parking sensors on your F-150 rear bumper.
How to Replace Ford F150 Backup Parking Sensors: Step-by-Step DIY Guide
Replacing a damaged or non-responsive parking assist sensor on your Ford F-150 is a manageable home mechanic project.
Most modern Ford trucks use ultrasonic transducer sensors embedded directly into the rear bumper assembly.
When these sensors fail due to road debris, impact, or moisture intrusion, your instrument cluster displays warnings like Check Park Aid or Parking Sensor Blocked.
Before beginning the physical repair, review the required tools and cost breakdown comparison below.
Repair Attribute
Dealership Service Center
DIY Replacement at Home
Average Total Cost
$250 – $450 per sensor
$25 – $65 per sensor
Time Required
2 to 4 hours (plus wait time)
30 to 45 minutes
Difficulty Level
Professional Certified Tech
Beginner / Intermediate DIY
Key Tools Needed
Proprietary IDS Diagnostic Station
Trim tool, dielectric grease, OBD2 scanner
To execute a flawless ford f150 backup sensor replacement, gather these essentials before starting:
New OEM Motorcraft or high-quality aftermarket ultrasonic backup sensor.
Plastic trim removal tool set or flathead screwdriver.
Dielectric silicone grease for weatherproofing electrical connections.
Microfiber cloth and rubbing alcohol for cleaning bumper retainers.
Safety glasses and mechanic work gloves.
OBD2 scanner with Ford specific DTC code reading capability (optional but helpful).
Follow these five detailed steps to safely complete the replacement process on your truck.
Step 1: Secure the Truck, Chock Wheels, and Disconnect Power.
Step 1
Park your Ford F-150 on a flat level concrete surface and engage the parking brake firmly.
Place wheel chocks in front of the front tires to eliminate any potential vehicle movement.
Pop the hood and disconnect the negative terminal cable from your 12-volt battery using an 8mm wrench.
Disconnecting the battery prevents short circuits while working on the active rear bumper harness.
Wait approximately five minutes to allow residual power in the Parking Assist Module to drain completely.
Step 2: Crawl Under the Rear Bumper and Locate the Faulty Sensor.
Step 2
Slide under the rear bumper assembly from behind the truck to gain clear access to the wiring harness.
Locate the four round sensor bodies mounted along the step bumper metal reinforcement channel.
Inspect each sensor body for cracked housings, physical impact marks, or loose wiring pigtails.
Identify the specific sensor position (outer left, inner left, inner right, or outer right) that requires removal.
Clear away dried mud, road salt, or undercoating spray from the surrounding plastic retainer clip.
Step 3: Disconnect Electrical Connector and Release Retainer Clips.
Step 3.
Locate the small locking tab on the electrical wiring harness plug attached to the sensor base.
Press the red or black locking tab down firmly with your thumb while pulling the harness connector away.
Never pull directly on the wires, as this can pull internal pin terminals out of the connector housing.
Locate the two plastic flexible locking fingers on the bumper bezel housing that hold the sensor.
Gently spread these plastic tabs outward while pressing the sensor face inward from the outside bumper face.
Slide the old sensor cylinder straight back out of the bezel housing.
Step 4: Clean Bezel Housing, Apply Grease, and Lock New Sensor.
Step 4.
Thoroughly wipe down the inside of the bumper bezel opening using a clean microfiber cloth and isopropyl alcohol.
Inspect the rubber silicone insulator ring surrounding the tip of your new ultrasonic sensor.
Ensure this rubber ring is positioned flush so moisture cannot bypass the bumper seal.
Apply a thin coating of dielectric grease across the electrical terminal pins to prevent future corrosion.
Align the keyway alignment ridge on the new sensor body with the slot in the bumper bezel retainer.
Push the new sensor straight into the bezel until you hear both side retaining tabs click firmly into place.
Reconnect the electrical harness connector until the locking clip snaps shut securely.
Step 5: Reconnect Battery, Clear Codes, and Perform System Verification.
Step 5.
Crawl out from beneath the truck and double-check that all tools are cleared away from the rear axle area.
Reconnect the negative battery terminal cable under the hood and tighten the terminal nut securely.
Start your truck engine and inspect the main instrument cluster display screen.
Plug an OBD2 scanner into the port under the steering column to clear historic Parking Assist Module codes.
Shift the transmission into REVERSE with your foot firmly on the brake pedal to verify normal chime operation.
Completing this simple repair yourself saves significant money while expanding your DIY mechanic confidence.
If you want to master additional maintenance procedures and performance upgrades for your truck, visit our comprehensive technical resource hub at Bryan’s Garage.
🔧 Hidden F-150 Features — Confirmed by real owners
If painting is necessary to match custom bumper finishes, apply one thin layer of specialized bumper spray paint.
Avoid forcing tight electrical pigtail connectors together if grit or sand is trapped inside the plug cavity.
Blow out electrical plugs using compressed air before snapping connectors together.
Following these simple guidelines protects fragile electronics and ensures long-term reliability.
🟢 Going viral on F150Forum & Reddit
“I’ve driven an F-150 for 4 years and didn’t know this existed.” — The most common reaction when this article is shared
9
features
2015+
models
11 min
read
Free
no signup
Did you know which button on your fob opens the tailgate when your hands are full? Or the button combo to reset CarPlay in 15 seconds without turning off the engine?
Frequently Asked Questions About F-150 Parking Sensors
Q: How much does it cost to replace a Ford F150 backup parking sensor?
A: Doing the repair yourself costs between $20 and $65 for parts alone. Dealerships typically charge $250 to $450, including diagnostic fees and shop labor rates.
Q: Can I replace just one faulty parking sensor, or do I need to replace all four?
A: You can easily replace single individual sensors as they fail. Replacing all four is only necessary if severe wiring corrosion damages the entire rear harness loom.
Q: Why does my F-150 display “Check Park Aid” on the dashboard screen?
A: This notification indicates the Parking Assist Module detected an open circuit, short, or non-responsive sensor. Common causes include dead sensors, road grime coating the sensor face, or disconnected harness wiring.
Q: Do new Ford F-150 backup sensors require computer programming?
A: Standard replacement ultrasonic sensors do not require programming or dealer calibration. The system automatically recognizes functional sensors once trouble codes are cleared or after several ignition cycles.
Q: How do I know which backup sensor is bad on my truck?
A: Use an OBD2 scanner to read specific C1701–C1707 fault codes, or perform the ear acoustic click test while the vehicle is parked in REVERSE with the engine off.
Final Thoughts on Fixing Your F-150 Parking Sensors
Replacing a bad backup parking sensor restores your truck’s safety and prevents expensive bumper scrapes.
With basic tools, this simple DIY job takes under an hour and saves hundreds over repair shop prices.
Ready to transform your car maintenance from a stressful chore into a breeze?
Have questions? Our specialists can help you find the best repair solutions and avoid unnecessary mechanic visits!
Note: Individual results may vary depending on individual vehicle makes, models, year of manufacture, and overall condition. This article is intended for general automotive reference purposes only and does not replace official manufacturer service manuals or advice from a certified mechanic.