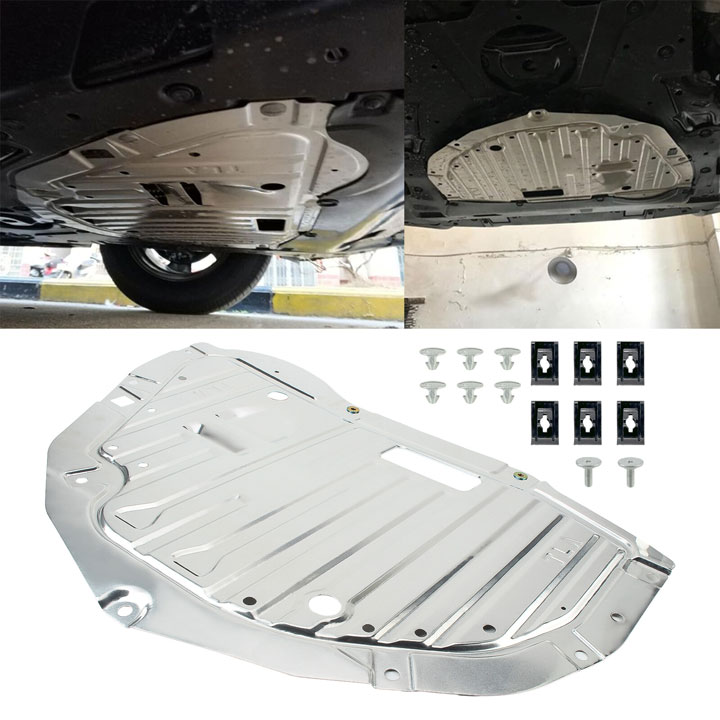
I still remember the terrifying scraping noise coming from under my car while driving down the highway at 65 mph.
I pulled over expecting a major transmission failure, only to find my broken honda crv engine splash shield dragging against the hot asphalt.
At Team Bryan’s Garage, we see this exact issue every single week, and we are here to show you how to fix it yourself quickly, safely, and without wasting hundreds of dollars at a dealership.
Honda CRV Engine Splash Shield UNDer Cover and Clip Replacement ( Internet)
In This Article
Step-by-Step Installation Guide: Clear, beginner-friendly instructions to replace your lower engine shield and clips.
Undercarriage Dynamics & Protection: Why Honda designed this cover and how it protects vital engine components.
Material Comparison: Evaluating OEM plastic panels against heavy-duty aluminum skid plate upgrades.
Hardware & Clip Selection Master Guide: Exact push pin sizes, turn screws, and metal clips needed for a secure fit.
Troubleshooting & Common Mistakes: Preventing dragging covers, loose fasteners, and costly oil pan damage.
🔴 MOST OWNERS NEVER FIND THIS
Your CR-V has a secret trick that starts the SUV when your key fob dies. And 14 other things Honda never told you.
Dead fob fix · Global window down trick · The hidden folding picnic table · Walk Away Auto Lock · and 11 more.
How to Replace Your Honda CR-V Engine Splash Shield and Push Pin Clips: A Step-by-Step DIY Guide
Replacing a damaged underbody guard is one of the most rewarding DIY tasks you can perform on your vehicle.
It requires minimal mechanical experience and basic hand tools.
Before beginning the installation process, you must gather all necessary equipment and ensure your workspace is safe.
Prerequisites and Tools Required
Honda CRV Engine Splash Shield UNDer Cover and Clip Replacement
You will need a reliable floor jack and two rated jack stands to lift the front end safely.
Never rely solely on a hydraulic jack when working underneath your car.
Gather a trim removal tool or a flathead screwdriver for popping out stubborn plastic clips.
A 10mm socket wrench is essential for removing factory belly pan bolts.
A set of high-strength replacement retention clips and new turn screws will ensure your new panel stays anchored firmly.
Wearing safety glasses is strongly recommended to protect your eyes from falling road dirt and rust particles.
Step-by-Step Installation Instructions
Step 1: Elevate and Secure the Vehicle
Park your Honda CR-V on a flat, level concrete surface.Engage the parking brake firmly to prevent any accidental rolling.
Place your hydraulic jack under the front center jacking point.
Raise the vehicle high enough to comfortably work underneath the engine bay.
Set two sturdy jack stands beneath the reinforced side pinch welds.Lower the car gently onto the stands before crawling underneath.
Step 2: Remove Damaged Retaining Clips and Bolts
Locate all mounting points along the front bumper lip and side wheel well liners.Insert your trim removal tool beneath the center head of each plastic push pin clip.
Pry upward gently to release the center pin locking mechanism.
Pull the entire body of the plastic clip out from the subframe alignment hole.
Use your 10mm socket to back out the metal bolts securing the rear edge of the shield.
Set aside any reusable hardware in a small tray so you do not lose it.
Honda CRV Engine Splash Shield UNDer Cover and Clip Replacement
Step 3: Detach the Old Undercarriage Guard
Support the center of the sagging plastic cover with one hand as you remove the final bolt.
Angle the panel down toward the rear of the vehicle to unhook it from the front bumper tabs.
Carefully pull the old unit out from under the chassis.Inspect the old shield for missing access covers, cracks, or severe road rash.
Clean off accumulated dirt, sand, and grease from the subframe mounting tabs with a shop rag.
Step 4: Position and Align the Replacement Cover
Slide the new engine splash cover under your CR-V.
Orient the cover so the oil drain access panel faces downward and toward the rear oil pan.
Lift the front edge of the shield and slip its lip into the matching slots on the front bumper cover.
Align the pre-drilled bolt holes on the shield with the threaded brass inserts in the subframe.
Insert two middle push pins loosely by hand to support the weight of the cover while aligning side holes.
Honda CRV Engine Splash Shield UNDer Cover and Clip Replacement ( Internet)
Step 5: Install Hardware and Push Pin Retainers
Thread all 10mm metal bolts into their respective subframe holes by hand first.
Hand-threading prevents cross-threading into fragile aluminum or sheet metal clips.
Tighten the 10mm bolts firmly with your socket wrench until snug, but do not overtighten.
Push new plastic retention clips into every remaining outer hole along the wheel liner and bumper trim.
Press the center locking head of each pin flush to expand the anchor legs behind the body panel.
Step 6: Perform a Final Security Check
Grasp the installed lower panel firmly with both hands and shake it in all directions.
Verify that there is zero excessive movement, rattling, or flex along the outer edges.
Ensure the oil drain access hatch is locked securely into position.
Raise the vehicle slightly with your hydraulic jack to remove the jack stands.
Lower your CR-V back to the ground and test-drive it at low speeds to verify silent operation.
If you prefer step-by-step video guidance or need extra maintenance tips, our team at Bryan’s Garage offers step-by-step tutorials to help you master home repairs effortlessly.
Understanding Your CR-V’s Undercarriage Architecture and Aerodynamics
Honda CRV Engine Splash Shield UNDer Cover and Clip Replacement
The lower belly shield on a modern Honda SUV is far more than a simple piece of molded plastic.
Engineers design this panel to serve three critical functions: fluid protection, noise suppression, and aerodynamic efficiency.
When you drive down the highway, low-pressure air rushes beneath your vehicle’s front subframe.
Without a smooth bottom cover, air swirls into the open engine bay, creating significant aerodynamic drag.
This air turbulence forces your engine to work harder to maintain cruising speed.
A properly fitted lower cover seals the undercarriage, directing air smoothly around the front tires and beneath the chassis.
This streamlined airflow directly improves fuel economy on daily highway commutes.
In addition to aerodynamics, the cover acts as an essential physical barrier against environmental hazards.
Road salt, slush, mud, and gravel can rapidly corrode electrical connectors, the starter motor, and air conditioning lines.
Water splashing onto hot exhaust manifolds can cause sudden thermal shock, leading to cracked metal over time.
The shield also protects fragile engine components, such as aluminum oil pans and transmission housings, from direct impact by minor road debris.
The overall engine bay layout varies slightly depending on your specific vehicle setup, such as the engine configuration found in your honda crv engine size.
Vehicle height also influences how much road debris strikes the underbody, which depends on the factory honda crv ground clearance.
Reviewing your factory manual or checking detailed honda crv specs will confirm the exact shield mounting points for your generation.
Plastic OEM Shields vs. Heavy-Duty Aluminum Skid Plate Upgrades
Honda CRV Engine Splash Shield UNDer Cover and Clip Replacement
When replacing a damaged belly cover, owners must choose between standard factory plastic or upgraded metal shields.
The factory option is usually a light plastic panel made from polypropylene or high-density polyethylene.
Plastic covers are affordable, light, and resistant to chemical corrosion from engine oil and road salt.
However, plastic becomes brittle after years of exposure to heat cycles, freezing temperatures, and engine heat.
Once brittle, hitting a snowbank or curbside parking block can shatter the plastic panel around the mounting clip holes.
An increasingly popular alternative is upgrading to an aluminum aftermarket skid plate.
Aluminum shields offer superior impact protection against rocks, tree branches, and heavy road debris.
If you frequently drive on unpaved roads, an aluminum cover provides outstanding peace of mind for your oil pan.
Opting for a metal unit is often considered a key part of honda crv off road upgrades for adventure drivers.
Master Hardware Guide: Selecting the Correct Honda Clips and Screws
Honda CRV Engine Splash Shield UNDer Cover and Clip Replacement
One of the biggest frustrations during this repair is dealing with broken or missing plastic retention hardware.
Honda uses specialized push pin fasteners that expand inside subframe mounting holes to lock the panel in place.
Over time, road grit gets trapped inside the clip mechanism, causing the plastic to seize and snap during removal.
Using the wrong replacement clip size will cause the panel to sag, loosen, or drag on the road.
The most common Honda push pin clip size features a 10mm stem diameter and a 20mm head diameter.
Matching the exact hole diameter is vital because a 8mm clip will slip out under wind vibration.
Pro Mechanic Tip from Bryan’s Garage: Always purchase a multi-pack of nylon bumper clips before starting this project.
Plastic clips are cheap, but stopping your job halfway through because of a broken $0.50 clip is frustrating.
Along with push pins, modern CR-Vs use quarter-turn metal screws and standard 10mm hex bolts.
The metal quarter-turn screws mate into steel speed nuts clipped onto the front subframe crossmember.
If these steel clips rust out, replace them alongside the belly shield to maintain tight tension.
Keeping hardware intact is essential whenever servicing your car, such as performing a routine honda crv oil change.
Hardware requirements remain consistent whether you are working on a classic used honda crv or a late-model new honda crv.
Critical Installation Pitfalls and How to Avoid Them
Even simple DIY repairs can go wrong if key details are overlooked during installation.
The single most common mistake is failing to engage the front bumper tabs into the plastic cover’s receiver slots.
If the front lip sits below the bumper edge instead of tucked inside, highway airflow will force the guard downward.
At high speeds, air pressure will fold the panel under the front tires, destroying the new shield instantly.
Another frequent mistake is relying on temporary zip ties to secure a loose underbody shield.
Zip ties are damaged by engine heat, road debris, and winter freezing, causing them to snap without warning.
Snapping zip ties on the highway can drop your shield onto the road, creating an immediate hazard for cars behind you.
Always use proper expanding nylon rivets or factory-spec bolts to anchor lower body panels securely.
Avoid over-tightening metal bolts into subframe speed nuts or plastic bumper brackets.
Over-torquing bolts strips out plastic threads, preventing hardware from clamping down properly.
Tighten bolts until they contact the mounting washer, then add just a quarter-turn to snug them down.
If you discover broken tabs on an old panel, sourcing a clean used honda crv splash shield can save money while ensuring genuine fitment.
Taking your time during installation guarantees your replacement panel will last for years without issue.
🟢 Going viral on CR-V Owners Club & Reddit
“I’ve driven a CR-V for 4 years and didn’t know this existed.” — The most common reaction when this article is shared
15
features
1997+
models
15 min
read
Free
no signup
Did you know your backup camera has a hidden top-down ‘drone view’? Or that your cruise control automatically downshifts on steep mountain hills to save your brakes?
Replacing your Honda CR-V splash shield protects your engine from road salt, water, and debris impacts while maintaining peak fuel efficiency.
By following our simple guide and using the right push clips, you can handle this repair at home easily and avoid high shop fees.
Ready to transform your car maintenance from a stressful chore into a breeze? Explore more tips at Bryan’s Garage.
Have questions? Our team can help you find the best solutions for your car problems and avoid costly mechanic visits.
Note: Individual results may vary depending on individual vehicle makes, models, year of manufacture, and overall condition. This article is intended for general automotive reference purposes only and does not replace official manufacturer service manuals or advice from a certified mechanic.